REMOVE CONTENTS FROM BOX. VERIFY ALL PARTS ARE PRESENT READ INSTRUCTIONS CAREFULLY BEFORE STARTING INSTALLATION
|
|
|
- Anita Gunvor Jacobsen
- 5 år siden
- Visninger:
Transkript

1 FORD EXPLORER PARTS LIST Qty Part Description Qty Part Description 1 Bull Bar 2 12mm x 35mm Bolt Plates 1 Passenger/Right Mounting Bracket 2 12mm Nut Plate 1 Driver/Left Mounting Bracket 2 12mm x 50mm Hex Bolts 2 50mm x 90mm Spacer Plates 4 12mm x 35mm Hex Bolts 1 5mm x 25mm Screw 12 12mm Flat Washers 2 5mm Flat Washers 8 12mm Lock Washers 1 5mm Nylon Lock Nut 6 12mm Nuts Install Time : Minutes (Professional Installation) 50mm x 90mm Spacer Plates 12mm x 35mm Bolt Plates 12mm Nut Plates Passenger/Right Mounting Bracket Driver/Left Support Bracket REMOVE CONTENTS FROM BOX. VERIFY ALL PARTS ARE PRESENT READ INSTRUCTIONS CAREFULLY BEFORE STARTING INSTALLATION INSTALLATION PROCEDURE: 1. ASSISTANCE IS RECOMMENDED. CUTTING IS REQUIRED. DRILLING IS OPTIONAL. 2. Start installation under the driver side front of the vehicle, (Figure 1). Insert (1) 12mm Nut Plate into the large oval opening in the bottom of the frame channel and slide it forward in the frame with the flat side down against the frame channel and welded nut up, (Figure 2B). Line up the threaded hole in the Nut Plate with the factory hole at the front of the frame, (Figure 2A). Next, insert (1) 12mm Bolt Plate into the large oval opening and center the threaded bolt in the oval hole, (Figure 2C). 3. Select the driver side Frame Mounting Bracket. Hold the Mounting Bracket up in position against the bottom of the frame and over the threaded bolt on the Bolt Plate, (Figure 3A). Secure the Bracket to the Bolt Plate with (1) 12mm Flat Washer, (1) 12mm Lock Washer and (1) 12mm Hex Nut. Leave hardware loose at this time. Slide (1) Spacer Plate between the frame channel and the Bracket, (Figure 3A & 3B). Insert (1) mm x 35mm Hex Bolt with (1) 12mm Lock Washer and (1) 12mm Flat Washer through the hole in the Bracket, Spacer Plate and into the Nut Plate, (Figure 4). Snug but do not tighten hardware at this time. Page 1 of 6
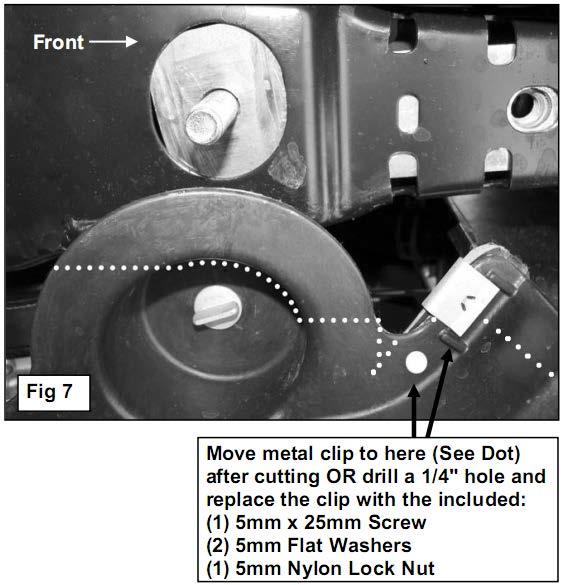
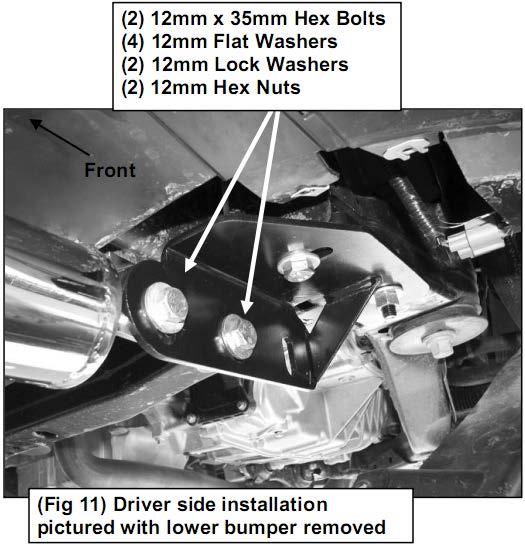
2 4. Move to the passenger side of the vehicle. Determine if the vehicle is equipped with the factory installed fresh air inlet in the plastic bumper cover. a. Vehicles without air inlet: Repeat Steps 2 & 3 for passenger side Frame Mounting Bracket installation, (Figures 5A, 5B & 5C). b. Vehicles equipped with air inlet, (Figure 6): Repeat Step 2 to install the 12mm Bolt Plate and 12mm Nut Plate. Hold the Frame Bracket in the approximate position over the Bolt and Nut Plates. Mark the outline of the Bracket onto the mounting tab on the plastic air inlet, (scoop), (Figure 7). Remove the inlet and place it on a clean, stable work surface. Use a hacksaw to cut the required material from the mounting area on the inlet. Check the fit often and trim material away as necessary. Do not cut off the mounting tab. Carefully pry off the metal clip and move it as indicated in (Figure 7) or drill a 1/4" hole through the top and bottom of the scoop and replace the clip with the included (1) 5mm x 25mm Screw, (2) 5mm Flat Washers and (1) 5mm Nylon Lock Nuts. Do not over-tighten 5mm hardware. IMPORTANT! Any cutting tool may break or shatter. Government regulations require safety glasses & equipment at all times when cutting. Install the Frame Bracket as described in Step 3. NOTE: Complete the Bull Bar installation before reinstalling the plastic air inlet scoop. NOTE: Before proceeding, it may be considerably easier to remove the plastic bumper cover to cut the slots for the Bull Bar. However, on some models, the bumper cover may be held in place on the ends with factory rivets making removal and reinstallation extremely difficult and best done by a professional, (Figure 6). Determine if the bumper is held in place with rivets, (visible from the outside below the fog lights), before attempting to remove the bumper cover. 5. Measure the width across the Bull Bar, (mounting tab to mounting tab appx. 36-1/4" to 36-1/2"). Use a tape measure to locate the middle of the plastic bumper cover, (Figure 8). Mark the mid point on the back of the bumper. NOTE: You can also locate the mold mark on the back of the bumper to determine the mid point. Place a layer of masking tape on the back of the bumper cover in front of the Frame Mounting Brackets. On the driver side, draw a vertical line on the tape 18" out from the middle of the bumper. Draw a second vertical line 19" out from the middle, (Figure 8). Repeat this Step on the passenger side of the bumper cover. 6. Use the location of the previously installed Frame Mounting Bracket to determine where to draw the top and bottom horizontal lines, (Figure 9). Carefully cut this area out of the bumper cover with a sharp knife or hacksaw, (Figure 10). IMPORTANT: Do not cut through the top or bottom edge of the bumper cover. Only remove enough material to clear the mounting tabs on the Bull Bar. 7. Reinstall the bumper cover if removed as described in Step With assistance, position the Bull Bar onto the inside of the Mounting Brackets. Attach the Bull Bar to the Mounting Brackets with (4) 12mm x 35mm Hex Bolts, (8) 12mm Flat Washers, (4) 12mm Lock Washers and (4) 12mm Hex Nuts, (Figure 11). Do not tighten at this time. 9. Level and adjust the Bull Bar and tighten all of the hardware. 10. Reinstall the air inlet, (scoop), removed in Step 4b. Trim scoop to clear Brackets as necessary. Page 2 of 6


3 (Fig 1) Driver side pictured from below Driver Side installation Pictured Insert Nut Plate into opening and line up with forward hole in frame Front Fig 2B UP Front Fig 2C Fig 2A Page 3 of 6


4 Page 4 of 6

5 Page 5 of 6

6 Page 6 of 6
INSTALLATION GUIDE FTR Cargo Rack Regular Ford Transit 130" Wheelbase ( Aluminum )
") INSTALLATION GUIDE 1505-FTR Cargo Rack Regular Ford Transit 130" Wheelbase ( Aluminum ) QUICK START GUIDE Phase 1 - Assembly q 1.1 Setup... q 1.2 Cargo Rack Assembly... 3-4 5-6 Phase 2 - Installation q
INSTALLATION GUIDE 1505-FTR Cargo Rack Regular Ford Transit 130" Wheelbase ( Aluminum ) QUICK START GUIDE Phase 1 - Assembly q 1.1 Setup... q 1.2 Cargo Rack Assembly... 3-4 5-6 Phase 2 - Installation q
Installation Instructions
 FORD 20K Industry Standard Rail Custom Mounting Kit #2760 Gross Trailer Weight (Maximum)...20,000 lbs. Vertical Load Weight (Max. Pin Weight)...5,000 lbs. SYSTEM TOW CAPACITY Please note, in order to determine
Installation Instructions
 FORD 20K Industry Standard Rail Custom Mounting Kit #2766 Gross Trailer Weight (Maximum)...20,000 lbs. Vertical Load Weight (Max. Pin Weight)...5,000 lbs. SYSTEM TOW CAPACITY Please note, in order to determine
Installation Instructions
 DODGE 16K Industry Standard Rail Custom Mounting Kit #2764 Gross Trailer Weight (Maximum)...16,000 lbs. Vertical Load Weight (Max. Pin Weight)...4,000 lbs. SYSTEM TOW CAPACITY Please note, in order to
TOYOTA #2748. Gross Trailer Weight (Maximum)...16,000 lbs. Vertical Load Weight (Max. Pin Weight)...4,000 lbs. SYSTEM TOW CAPACITY
...16,000 lbs. Vertical Load Weight (Max. Pin Weight)...4,000 lbs. SYSTEM TOW CAPACITY") TOYOTA 16K Industry Standard Rail Custom Mounting Kit #2748 Gross Trailer Weight (Maximum)...16,000 lbs. Vertical Load Weight (Max. Pin Weight)...4,000 lbs. SYSTEM TOW CAPACITY Please note, in order to
TOYOTA 16K Industry Standard Rail Custom Mounting Kit #2748 Gross Trailer Weight (Maximum)...16,000 lbs. Vertical Load Weight (Max. Pin Weight)...4,000 lbs. SYSTEM TOW CAPACITY Please note, in order to
Installation Instructions
 DODGE 20K Industry Standard Rail Custom Mounting Kit #2746 Gross Trailer Weight (Maximum)...20,000 lbs. Vertical Load Weight (Max. Pin Weight)...5,000 lbs. SYSTEM TOW CAPACITY Please note, in order to
#89853 Command Center
 1 #89853 Command Center Portable AV Center Assembly Instructions #89853 Command Center Portable AV Center Part rawing escription Qty Part rawing escription Qty Hardware List A Socket Screw M6X9mm 16 A
Start Here USB *CC * *CC * USB USB
 1 USB Start Here USB 11 USB WARNING: To ensure that the software is installed correctly, do not connect the USB cable until step 11. 11 USB 2 a. b. Lower both the paper tray and the print cartridge door.
Justeringsanvisninger finnes på de to siste sidene.
 d Montering av popup spredere Justeringsanvisninger finnes på de to siste sidene. Link til monteringsfilm på youtube: http://youtu.be/bjamctz_kx4 Hver spreder har montert på en "svinkobling", det vil si
KAMPANJE APK : APK-5: Skifte pakninger mellom turbo og CCDPF
 KAMPANJE APK-5 20150722: APK-5: Skifte pakninger mellom turbo og CCDPF Berørte modeller for APK-5: Vitara APK416D, totalt 66 biler. Liste med chassisnummer legges ikke ved, bruk Forhandlerweb til å sjekke
KAMPANJE APK : APK-8: Bytte bakaksel bolter
 KAMPANJE APK-8 20160222: APK-8: Bytte bakaksel bolter Berørte modeller for APK-8: Vitara APK, S-cross AKK, og Swift AZG. Totalt 454 biler på det norske markedet. Liste med chassisnummer legges ikke ved,
SERVICE BULLETINE 2008-4
 S e r v i c e b u l l e t i n e M a t e r i e l l Materiellsjef F/NLF kommuniserer påminnelse omkring forhold som ansees som vesentlige for å orientere om viktige materiellforhold. Målgruppen for Servicbulletinen
BASEPLATE Honda CR-V
 , Rev 0 08/16 BASEPLATE 9519328 Honda CR-V Pin Height: 16 Centers: 21 ITEM PART # QTY DESCRIPTION 1 00057 3 WASHER,.25 SPRING LOCK 2 00059 4 WASHER, FLAT.375 3 00060 6.375 LOCKWASHER 4 00061 4.375 HEX
Installation Instructions
 DODGE 24K Custom SuperRail Mounting Kit #3522 Gross Trailer Weight (Maximum)...24,000 lbs. Vertical Load Weight (Max. Pin Weight)...6,000 lbs. Installation Instructions SPECIFICATIONS Fits 2013 Dodge 2500
Monteringsanvisning. Assembly instructions. Ledsagerbrems / Drum brake. Artikkelnummer/ Item no.
 Monteringsanvisning Assembly instructions Exigo 30 Emineo Ledsagerbrems / Drum brake Beskrivelse/Description 20 Flexel/Compact 84417 20 Luft/Pneumatic 84416 20 Pur 84419 22 Flexel/Compact 84437 22 Luft/Pneumatic
INSTALLATION INSTRUCTIONS 922 RODA PIVOT HINGES FRAMELESS DOOR CELESTA DRESDEN TRESOR
 INSTALLATION INSTRUCTIONS 922 RODA PIVOT HINGES NEED INSTALLATION HELP? Call 1-800-45-BASCO (452-2726) Monday - Friday 8:00 A.M. - 4:30 P.M. Eastern Time FRAMELESS DOOR CELESTA DRESDEN TRESOR QCI0272 REV.
Handicare Emineo Ledsagerbrems Basic / Drum brake Basic
 Monteringsanvisning Assembly instructions Handicare Emineo Ledsagerbrems Basic / Drum brake Basic Beskrivelse/Description Art. nr / Item no. 20 Flexel/Compact 84417 20 Luft/Pneumatic 84416 22 Flexel/Compact
SafeRing / SafePlus Retrofit of under voltage coil V Module
 SafeRing / SafePlus Retrofit of under voltage coil V Module Installation Instructions www.abb.com Document status Responsible RELEASED NODIS Location Date Name Prepared NODIS 2008-12-15 BJGU/GUSO Checked
Doing Our Best to Provide You the Best HONDA CIVIC. Pin Height - 14 Center Please order replacement parts by PART NO. and DESCRIPTION.
 HONDA CIVIC 11/17 TP20205, Rev 5 Pin Height - 14 Center - 24 23 9518205 parts list Ref. Part No. No. Qty. Description 1. 00057 1 1/4 Lock Washer 2. 00059 2 3/8 Flat Washer 3. 00060 4 3/8 Lock Washer 4.
Replacing the tube and/or tyre of a drive wheel, indoor/outdoor
 ASSEMBLY INSTRUCTION Replacing the tube and/or tyre of a drive wheel, indoor/outdoor EN NO 9010182A 5.2.7 9010182 Replacing the tube and/or tyre of a drive wheel, indoor/outdoor Preparation Be sure that
DANGER. Carbon Monoxide. Using a generator indoors WILL KILL YOU IN MINUTES. Carbon Monoxide
 DANGER Carbon Monoxide Using a generator indoors WILL KILL YOU IN MINUTES. Carbon Monoxide Generator exhaust contains high levels of carbon monoxide (CO), a poisonous gas you cannot see or smell. If you
MONTASJEANVISNING INSTRUCTIONS FOR ASSEMBLY AND USE
 MONTASJEANVISNING INSTRUCTIONS FOR ASSEMBLY AND USE Småvarereol R 3000 Shelving unit R 3000 ZERTIFIZIER T 1. Gavl / Upright frame 2. Hylle / Dividing shelf 3. Krysstag / Back braces 4. Gitter bakvegg /
DODGE. 12K Custom SuperRail Mounting Kit #3122. Gross Trailer Weight (Maximum)...12,000 lbs. Vertical Load Weight (Max. Pin Weight)...3,000 lbs.
...12,000 lbs. Vertical Load Weight (Max. Pin Weight)...3,000 lbs.") DODGE 12K Custom SuperRail Mounting Kit #3122 Gross Trailer Weight (Maximum)...12,000 lbs. Vertical Load Weight (Max. Pin Weight)...3,000 lbs. Installation Instructions SPECIFICATIONS Fits 2009-2017 Dodge1500
DODGE 12K Custom SuperRail Mounting Kit #3122 Gross Trailer Weight (Maximum)...12,000 lbs. Vertical Load Weight (Max. Pin Weight)...3,000 lbs. Installation Instructions SPECIFICATIONS Fits 2009-2017 Dodge1500
Mounting the electrically elevating legrest
 ASSEMBLY INSTRUCTION Mounting the electrically elevating legrest EN NO 9000A ..8 9000 Mounting the electrically elevating legrest Preparation Note! Switch off the wheelchair via remote control. Instructions
Windlass Control Panel
 SIDE-POWER 86-08955 Windlass Control Panel v1.0.2 Windlass Systems Installasjon manual SLEIPNER MOTOR AS P.O. Box 519 N-1612 Fredrikstad Norway Tel: +47 69 30 00 60 Fax: +47 69 30 00 70 w w w. s i d e
MONTASJEBESKRIVELSE INSTALLATION GUIDE
 MONTASJEBESKRIVELSE INSTALLATION GUIDE ADVARSEL WARNINGS Dette armaturet er et Klasse II produkt som IKKE SKAL TILKOBLES JORD. This device is a class II product: DO NOT CONNECT THE LAMP and the pole to
KAMPANJE AKK : Skifte setetrekk forseter
 KAMPANJE AKK-5 20160411: Skifte setetrekk forseter Berørte modeller: SX4 S-Cross AKK416 / AKK416D, totalt 220 biler. Liste med chassisnummer legges ikke ved, bruk Forhandlerweb til å sjekke om bilen er
Safering / Safeplus Retrofit of Ronis key for disconnector Interlock type EL11AP V and Sv modules
 Safering / Safeplus Retrofit of Ronis key for disconnector Interlock type EL11AP V and Sv modules Installation instructions www.abb.com Document status Responsible RELEASED NODIS Location Date Name Prepared
bondura Multi Tool 200 Hydraulic Ø200mm - Ø320mm user manual - for disassembly
 bondura Multi Tool 200 Hydraulic Ø200mm - Ø320mm user manual - for disassembly 1/ cone sleeve removal demontering av konhylse 2/ pin removal demontering av bolt 3/ additional Ø140mm - Ø195mm tillegg for
Replacing the carbon brushes
 ASSEMBLY INSTRUCTION Replacing the carbon brushes EN NO 9010180A 5.2.4 9010180 Replacing the carbon brushes (Puma 20/40) Preparation Switch off the wheelchair via the remote control. Be sure that the
SafeRing / SafePlus Retrofit of auxiliary switch S9 for fuse blown indication F module
 SafeRing / SafePlus Retrofit of auxiliary switch S9 for fuse blown indication F module Installation instructions www.abb.com Document status Responsible RELEASED NODIS Location Date Name Prepared NODIS
Slope-Intercept Formula
 LESSON 7 Slope Intercept Formula LESSON 7 Slope-Intercept Formula Here are two new words that describe lines slope and intercept. The slope is given by m (a mountain has slope and starts with m), and intercept
Hvordan føre reiseregninger i Unit4 Business World Forfatter:
 Hvordan føre reiseregninger i Unit4 Business World Forfatter: dag.syversen@unit4.com Denne e-guiden beskriver hvordan du registrerer en reiseregning med ulike typer utlegg. 1. Introduksjon 2. Åpne vinduet
Open Burner - 12" 2009 Viking Commercial Division 40
 Open Burner - 12" 2009 Viking Commercial Division 40 V36B6-NG V24B4-NG V12B2-NG Part Number Part Description QTY QTY QTY QTY QTY QTY 1 AV36PS Plate Shelf, Standard 36" 1 1 AV24PS Plate Shelf, Standard
KAMPANJE AZG : Skifte bolter reimhjul
 KAMPANJE AZG-4 20141009: Skifte bolter reimhjul Berørte modeller: Swift AZG type 3 (produsert i Ungarn) fra 2013 og nyere. (Type 3: Biler med automatisk kjørelys og navigasjon). Kampanjen omfatter totalt
SafeRing / SafePlus Retrofit of auxiliary switch S9 for relay trip indication V module
 SafeRing / SafePlus Retrofit of auxiliary switch S9 for relay trip indication V module Installation instructions www.abb.com Document status Responsible RELEASED NODIS Location Date Name Prepared NODIS
SERVICE BULLETINE
 S e r v i c e b u l l e t i n e M a t e r i e l l Materiellsjef F/NLF kommuniserer påminnelse omkring forhold som ansees som vesentlige for å orientere om viktige materiellforhold. Målgruppen for Servicbulletinen
Monteringsanvisning Installation manual Taksokkel for LHH og CareLite Ceiling mount for LHH and CareLite
 Monteringsanvisning Installation manual Taksokkel for LHH og CareLite Ceiling mount for LHH and CareLite Art.nr. 05-900-573-00. Page 1 of 9 Norsk Monteringsanvisning taksokkel Denne monteringsmanualen
Replacing the batteries
 ASSEMBLY INSTRUCTION Replacing the batteries EN NO 9010189A 5.2.14 9010189 Replacing the batteries Preparation Switch off the wheelchair via the remote control. Remove the fuses from the battery compartment
EPIC MODELL 150721A. INR guarantees product function if the industry regulations and the installation instruction are followed.
 EPIC MODELL 1 150721A INR guarantees product function if the industry regulations and the installation instruction are followed. Produkten är anpassad till branschregler Säker Vatteninstallation. INR garanterar
Kullsett/Coal Set for Jøtul GF 100 BF2 Jøtul GF 3 BF2
 Jøtul GF 100BF2/GF 3 BF2 Jøtul GI 160 BF Kullsett/Coal Set for Jøtul GF 100 BF2 Jøtul GF 3 BF2 Jøtul GI 160 BF Monterings- og bruksanvisning - Norsk 2 Installation and Operating Instructions- English 3
Exercise 1: Phase Splitter DC Operation
 Exercise 1: DC Operation When you have completed this exercise, you will be able to measure dc operating voltages and currents by using a typical transistor phase splitter circuit. You will verify your
31-VF1210WH-127. Vanity Meuble-lavabo. Porcelain top VT-SQ mm. 1194mm. 845mm. Tools You Will Need - Outils Requis. 465mm. 1215mm.
 Porcelain top VT-SQ207 3-VF20WH-27 25mm Vanity Meuble-lavabo 465mm 20mm 456mm 94mm 845mm Tools You Will Need - Outils Requis Screwdriver Tournevis Pencil Crayon Silicone Silicone Rev. Dec, 208 Replacement
SafeRing / SafePlus Retrofit of auxiliary switch S7 & S10 for position indication of load break switch and earthing switch C, F and SI modules
 SafeRing / SafePlus Retrofit of auxiliary switch S7 & S10 for position indication of load break switch and earthing switch C, F and SI modules Installation instructions www.abb.com Document status Responsible
Fitting instruction. devi-pipeheat / devi-flexheat Assembly between cold tail and selflimiting. Montering av tilledning på selvbegrensende varmekabel
 GB/NO Fitting instruction devi-pipeheat / devi-flexheat Assembly between cold tail and selflimiting heating cable Item no. 19806415 Montering av tilledning på selvbegrensende varmekabel Art. nr. 19806415
Model 44, Double Flush
 Model 44, Double Flush E x t e n s i o n Residential Standard Lift Installation Instructions And Owner s Manual Table Of Contents Pre-Installation 2 Important Safety Instructions 2 Removing an Existing
MERCEDES. Body Components and Front & Rear Lighting. Edition 1
 MERCEDES Body Components and Front & Rear Lighting Edition 1 Introduction Bison Parts are one of the UK fastest growing Commercial Vehicle specialists of steering, suspension and body components. All products
SafeRing / SafePlus Retrofit of Ronis key for earthing switch Interlock type EL11AP C, De, F and Sl modules
 We reserve all rights in this document and in the information contained therein: Reproduction, use or disclosure to third parties SafeRing / SafePlus Retrofit of Ronis key for earthing switch Interlock
52 StarkkTMLED. Instruction Manual. Kichler Lighting 7711 East Pleasant Valley Road P.O. Box Cleveland, Ohio
 52 StarkkTMLED Kichler Lighting 7711 East Pleasant Valley Road P.O. Box 318010 Cleveland, Ohio 44131-8010 Customer Service 866.558.5706 8:30 AM to 5:00 PM EST, Monday - Friday Instruction Manual 1 1. SAFETY
KAMPANJE AZH : Skifte av støvdeksel
 KAMPANJE AZH-4 0404: Skifte av støvdeksel Berørte modeller: Swift AZH type (produsert i Japan) fra 00 til 03. Kampanjen omfatter totalt 334 biler med chassisnummer mellom JSAFZD7S0000030 og JSAFZD7S0036004.
SafeRing / SafePlus Retrofit of auxiliary switch S10 for position indication of earthing switch De module
 SafeRing / SafePlus Retrofit of auxiliary switch S10 for position indication of earthing switch De module Installation instructions www.abb.com Document status Responsible RELEASED NODIS Location Date
ALUMINUM TWIN STACK PORTABLE AIR COMPRESSOR OL50135AL OPERATOR S MANUAL
 OL50135AL OPERATOR S MANUAL ALUMINUM TWIN STACK PORTABLE AIR COMPRESSOR! WARNING: To reduce the risk of injury, the user must read and understand the Operator s Manual before using this product. IN619302AV
Bytte til split Collin Lanyard RSL. Obligatorisk - alle rigger skal ha dette montert ved hopping etter 01.01.2015.
 S e r v i c e o r d r e M a t e r i e l l Materiellsjef F/NLF kommuniserer pålegg omkring forhold som ansees som vesentlige for å oppnå de målsettinger som er satt for materiellarbeidet via denne Service
SafeRing / SafePlus Retrofit of capacitive voltage indication type VPIS C, De, F and V Modules
 We reserve all rights in this document and in the information contained therein: Reproduction, use or disclosure to third parties without SafeRing / SafePlus Retrofit of capacitive voltage indication type
SafeRing / SafePlus Retrofit capacitive voltage indication type VDS C, F, De and V Modules
 We reserve all rights in this document and in the information contained therein: Reproduction, use or disclosure to third parties without SafeRing / SafePlus Retrofit capacitive voltage indication type
HOMELITE 26cc MIGHTYLITE STRING TRIMMER MODEL NOS. UT21506, UT21546, UT21907, UT21947 REPAIR SHEET
 HOMELITE 26cc MIGHTYLITE STRING TRIMMER MODEL NOS. UT21506, UT2156, UT2190, UT219 REPAIR SHEET HOMELITE 26cc MIGHTYLITE STRING TRIMMER MODEL NUMBERS UT21506 AND UT2190 1 25 26 2 5 6 28 12 22 16 9 2 3 8
KAMPANJE AZG : Skifte setevarmeelement
 KAMPANJE AZG-6 06078: Skifte setevarmeelement Berørte modeller: Swift AZG produsert i Ungarn fra 7.04.00 til 9.09.05. Totalt 43 biler Eierne kontaktes pr. brev fra Teknisk avdeling. NB! Ikke alle bilene
LED BUTIKKDISPLAY 2013 REV 2/1/13 R1
 LED BUTIKKDISPLAY 2013 REV 2/1/13 R1 Mini Maglite LED 2-Cell AA SIDE KICK Varenr: 31950010 BESKRIVELSE : 12x 2AA Mini Maglite LED Plasseringsforslag: Desktop. 2AA LED. 77 lumens. Fire modus (Høy, lav,
AV2-5, AV2-6, AV2-7, AV2-8, AV2-10, AV2-12
 ARENA-VATOR II PARTS MANUAL Models: AV2-4, AV2-5, AV2-6, AV2-7, AV2-8, AV2-10, AV2-12 Northstar Attachments, LLC 2/14/2007 ARENA-VATOR II ASSEMBLY ITEM QTY PART NO DESCRIPTION NET PRICE 1 1 AV-2004 4'
Elektronisk termostat med spareprogram. Lysende LCD display øverst på ovnen for enkel betjening.
 Elektronisk termostat med spareprogram. Lysende LCD display øverst på ovnen for enkel betjening. 27.5 LCD Electronic thermostat with program setting. Bright LCD display placed at the top of the heater
Safering / Safeplus Retrofit of Ronis key for load break switch Interlock type EL11AP C and Sl modules
 Safering / Safeplus Retrofit of Ronis key for load break switch Interlock type EL11AP C and Sl modules Installation instructions www.abb.com Document status Responsible RELEASED NODIS Location Date Name
bondura Multi Tool 200
 bondura Multi Tool 200 pin and conical sleeve removal Ø200mm - Ø320mm user manual - for disassembly art. 103807 rev. 16.03.2016 A 1/ bondura 6.6 1.1 conical sleeve removal / demontering av konhylse 1.2
60-162-300. Monteringsanvisning Assembly Instructions Monteringsanvisning. Søve Lekemiljø AS 3830 Ulefoss - Norway Tlf: +47 35 94 65 65 www.sove.
 UK Monteringsanvisning Assembly Instructions Monteringsanvisning Produkt nr. / Product no. / Produkt nr. 60-162-300 Ordr. nr. Dato. Sign. Søve Lekemiljø AS 3830 Ulefoss - Norway Tlf: +7 35 9 65 65 www.sove.no
Utøver går med feil lårnummer (og riktig startnummmer/brikke).
.") CASER Utøver går med feil lårnummer (og riktig startnummmer/brikke). - Arrangørfeil ingen konsekvens Utøver har ikke meldt seg på i rett tid og har reist med fly for å delta på Norges Cup. Hva skal TD
CASER Utøver går med feil lårnummer (og riktig startnummmer/brikke). - Arrangørfeil ingen konsekvens Utøver har ikke meldt seg på i rett tid og har reist med fly for å delta på Norges Cup. Hva skal TD
NEOREST Hybrid (Toilet bowl) NEOREST Hybrid. Installation manual. Safety Cautions Precaution before installation. Included parts.
 NEOREST Hybrid. Installation manual. Safety Cautions Precaution before installation. Included parts.") Installation manual NEOREST Hybrid (Toilet bowl) NEOREST Hybrid Safety Cautions Precaution before installation Included parts Part diagram Installation procedure EN Install the product properly according
Installation manual NEOREST Hybrid (Toilet bowl) NEOREST Hybrid Safety Cautions Precaution before installation Included parts Part diagram Installation procedure EN Install the product properly according
Instruksjons manual Instruction manual
 knm Copyright c - 2011 knm Side. 1 BRUK AV UTSTYRET Utstyret er designet for løft, trekk, folding/bøying, kutting, støtteoperasjoner etc, og krever, med sitt høye operasjonstrykk og tunge arbeids last,
IMPORTANT! HOLD ON THIS DOCUMENT FOR LATER REFERENCE! READ CAREFULLY! VIKTIG! BEHOLD DETTE DOKUMENTET FOR FREMTIDIG BRUK! LES NØYE IGJENNOM!
 GB IMPORTANT! HOLD ON THIS DOCUMENT FOR LATER REFERENCE! READ CAREFULLY! NOR VIKTIG! BEHOLD DETTE DOKUMENTET FOR FREMTIDIG BRUK! LES NØYE IGJENNOM! Produktmål, materiale: 135x77x72 cm Furu Proper use This
Safety a t t h e f A c t o r y
 Safety a t t h e f A c t o r y Sikkerhet på fabrikken Safety at the factory NÅ har du god tid til å lese denne brosjyren! I en krisesituasjon har du ikke like god tid You have plenty of time to read this
Norsk (English below): Guide til anbefalt måte å printe gjennom plotter (Akropolis)
: Guide til anbefalt måte å printe gjennom plotter (Akropolis)") Norsk (English below): Guide til anbefalt måte å printe gjennom plotter (Akropolis) 1. Gå til print i dokumentet deres (Det anbefales å bruke InDesign til forberedning for print) 2. Velg deretter print
Norsk (English below): Guide til anbefalt måte å printe gjennom plotter (Akropolis) 1. Gå til print i dokumentet deres (Det anbefales å bruke InDesign til forberedning for print) 2. Velg deretter print
FYSMEK1110 Eksamensverksted 23. Mai :15-18:00 Oppgave 1 (maks. 45 minutt)
") FYSMEK1110 Eksamensverksted 23. Mai 2018 14:15-18:00 Oppgave 1 (maks. 45 minutt) Page 1 of 9 Svar, eksempler, diskusjon og gode råd fra studenter (30 min) Hva får dere poeng for? Gode råd fra forelesere
FYSMEK1110 Eksamensverksted 23. Mai 2018 14:15-18:00 Oppgave 1 (maks. 45 minutt) Page 1 of 9 Svar, eksempler, diskusjon og gode råd fra studenter (30 min) Hva får dere poeng for? Gode råd fra forelesere
The regulation requires that everyone at NTNU shall have fire drills and fire prevention courses.
 1 The law The regulation requires that everyone at NTNU shall have fire drills and fire prevention courses. 2. 3 Make your self familiar with: Evacuation routes Manual fire alarms Location of fire extinguishers
SIDE- POWER SR 80/185 T SR 100/185 T. Installasjonsveiledning. Installation Guide. Thruster systems. Preliminær versjon: Preliminary version:
 SIDE- POWER Thruster systems SR 80/185 T SR 100/185 T Preliminær versjon: Installasjonsveiledning Preliminary version: Installation Guide SLEIPNER MOTOR AS P.O. Box 519 N-1612 Fredrikstad Norway Tel: +47
SafeRing / SafePlus Retrofit of Y4 or Y5 relay trip coil V Module
 SafeRing / SafePlus Retrofit of Y4 or Y5 relay trip coil V Module Installation instructions www.abb.com Document status Responsible RELEASED NODIS Location Date Name Prepared NODIS 2008-12-15 BJGU/GUSO
PARABOLSPEIL. Still deg bak krysset
 PARABOLSPEIL Stå foran krysset på gulvet og se inn i parabolen. Hvordan ser du ut? Still deg bak krysset på gulvet. Hva skjer? Hva skjer når du stiller deg på krysset? Still deg bak krysset Det krumme
Unit Relational Algebra 1 1. Relational Algebra 1. Unit 3.3
 Relational Algebra 1 Unit 3.3 Unit 3.3 - Relational Algebra 1 1 Relational Algebra Relational Algebra is : the formal description of how a relational database operates the mathematics which underpin SQL
TRANSFER CASE Mitsubishi Montero APPLICATION DESCRIPTION TESTING 4WD INDICATOR CONTROL UNIT (MONTERO) DETECTION SWITCH
 DETECTION SWITCH") TRANSFER CASE 1991 Mitsubishi Montero 1991-94 TRANSFER CASES Mitsubishi Dodge; Ram-50 Mitsubishi; Pickup, Montero APPLICATION TRANSFER CASE APPLICATIONS TABLE Application (1) Transmission Model Dodge 1991-93
TRANSFER CASE 1991 Mitsubishi Montero 1991-94 TRANSFER CASES Mitsubishi Dodge; Ram-50 Mitsubishi; Pickup, Montero APPLICATION TRANSFER CASE APPLICATIONS TABLE Application (1) Transmission Model Dodge 1991-93
Roma Garden Art.no: FP-ROMGR-100 Last updated: 12.07.13
 NOMonteringsanvisning 2 GB Assembly instructions 3 Roma Garden Art.no: FP-ROMGR-100 Last updated: 12.07.13 Roma Garden Vekt Krav til gulvplate 352 kg 670 mm Ta kontakt med en faghandler om du trenger tips
 Komplet stempelringsæt 50 CC : Pistonring assy 50 CC : ATFV5-030A 3 F5-06000 4 F5-060000 5 F5-0600 7 F5-0600 3 Pos Vare nr. / Part no. Qty Beskrivelse Description 954 Karburator - stempel, manuel
Safering / Safeplus Retrofit of Ronis key for earthing switch Interlock type EL11AP V and Sv modules
 Safering / Safeplus Retrofit of Ronis key for earthing switch Interlock type EL11AP V and Sv modules Installation instructions www.abb.com Document status Responsible RELEASED NODIS Location Date Name
Midnight BBQ Light USER MANUAL
 Midnight BBQ Light USER MANUAL Instructions The Midnight BBQ Light uses 4 x LR44 / AG13 batteries, included in the package. Unscrew the bottom cover and insert the included batteries and align the battery
BRUKER MANUAL/USERS MANUAL
 BRUKER MANUAL/USERS MANUAL 65 ELECTRICAL HEIGHT ADJUSTMENT FORHANDLER/DEALER. A/S SØRLANDETS ALUMINIUMPRODUKTER Mjåvannsveien 35, 4628 Kristiansand, NORWAY Tlf:+4 38 18 52 00 Fax:+4 38 18 20 86 9 3 1 2
GIMOTA AG. Assembly Instructions Dataconnectors D-SUB. Datenstecker Katalog Gimota AG 04/14 3
 GIMOTA AG Assembly Instructions Dataconnectors D-SUB 2015 Datenstecker Katalog Gimota AG 04/14 3 1 Assembly Instructions D-SUB TRAC / TRAC H 1.1 Preparation Standard Part sets Standard part sets conclude
[36] Boiserie. Melamine and lacquered door handles. Optional metal handle. Standard ABS handle. Look _silver (J) Pop _silver (P) _chromed (K)
![[36] Boiserie. Melamine and lacquered door handles. Optional metal handle. Standard ABS handle. Look _silver (J) Pop _silver (P) _chromed (K)](/thumbs/101/149932177.jpg "[36] Boiserie. Melamine and lacquered door handles. Optional metal handle. Standard ABS handle. Look _silver (J) Pop _silver (P) _chromed (K)") BOISERIE Backs 18mm thick matt, scratch resistant, non-reflective and washable melamine particleboard (Mfc), anti-shock ABS edge 1,5mm thick. They are provided with adjustable feet. Backs can be lacquered
BOISERIE Backs 18mm thick matt, scratch resistant, non-reflective and washable melamine particleboard (Mfc), anti-shock ABS edge 1,5mm thick. They are provided with adjustable feet. Backs can be lacquered
Tema Fusion Monteringsanvisning
 Monteringsanvisning Assembly instruction N-6230 SYKKYLVEN - NORWAY TLF. 70 25 59 00 - TELEFAX. 70 25 59 01 E-POST: post@tema.no Målsetting Dimensions Monter fast skrogene på veggen før du monterer skuffer,
SafeRing / SafePlus Retrofit of opening coil Y1 and auxiliary switch S7 F, C and SI Modules with latched mechanism
 SafeRing / SafePlus Retrofit of opening coil Y1 and auxiliary switch S7 F, C and SI Modules with latched mechanism Installation instructions www.abb.com Document status Responsible RELEASED NODIS Location
bondura dual 36 Ø50mm - Ø200mm assembly & inspection manual art rev A
 bondura dual 36 Ø50mm - Ø200mm assembly & inspection manual art. 103803 rev. 27.04.2016 A TABLE OF CONTENT / INNHOLD 1/ assembly montering 2/ technical specifications/torque tekniske data/tiltrekkingsmoment
SafeRing / SafePlus Retrofit of Y6 relay trip coil V Module
 SafeRing / SafePlus Retrofit of Y6 relay trip coil V Module Installation instructions www.abb.com Document status Responsible RELEASED NODIS Location Date Name Prepared NODIS 2008-12-15 BJGU/GUSO Checked
STOREFRONTS. Typical Details SCREW RACE JOINERY. Center Glazed Series B1. Interior Glazing (Shown with FF400 subsill) April 1998
 April 1998") - SCREW RCE JOINERY NOTE: NP22 glazing gaskets are used on both sides of glass. Typical TYPICL ELEVTION / (2.) HC20 Optional Head nchor PS00 Optional Filler EC0 Subsill s End Closure Typical (0.) IS IS2
- SCREW RCE JOINERY NOTE: NP22 glazing gaskets are used on both sides of glass. Typical TYPICL ELEVTION / (2.) HC20 Optional Head nchor PS00 Optional Filler EC0 Subsill s End Closure Typical (0.) IS IS2
3EASIDE 4-! $ESIGNED +ICHLER )NSTRUCTION #USTOMER KHA
NSTRUCTION #USTOMER KHA") KHA9090112 1 1. SAFETY RULES 1. To reduce the risk of electric shock, insure electricity has been turned off at the circuit breaker or fuse box before beginning. 2. All wiring must be in accordance with
KHA9090112 1 1. SAFETY RULES 1. To reduce the risk of electric shock, insure electricity has been turned off at the circuit breaker or fuse box before beginning. 2. All wiring must be in accordance with
KAMPANJE AZG : Skifte bakre bremsecalipere
 KAMPANJE AZG-5 06058: Skifte bakre bremsecalipere Berørte modeller: Swift AZG produsert i Ungarn fra 0.09.04 til..05. Totalt 656 biler Eierne kontaktes pr. brev fra Teknisk avdeling. NB! Ikke alle bilene
TUNNEL LIGHTING. LED Lighting Technology
 TUNNEL LIGHTING TunLite Linear Designed LED Tunnel & Underpass Light The TunLite is an LED linear luminaire providing reliable solutions to cover the lighting requirements of tunnels and underpasses. It
Owner s Manual Tilt Flat Screen Wall Mount
 Owner s Manual Tilt Flat Screen Wall Mount MODEL: DWT4585X CAUTION: DO NOT EXCEED MAXIMUM LISTED WEIGHT CAPACITY. SERIOUS INJURY OR PROPERTY DAMAGE MAY OCCUR! 200x200/300x300/ 400x200/400x400/ 600x400/800x400
Mjøsa Shower Cubicle Mjøsa Dusjkabinett
 Mjøsa Shower Cubicle Mjøsa Dusjkabinett Check the integrity of the glass details before assembly. Pay special attention to glass corners. Never install a faulty glass. Protect the glass from blows during
Instruksjoner for oppbevaring: Oppbevares på et kjølig, mørkt sted.
 icewave Bruksanvisning Instructions Hensikten med produktet (indikasjoner for bruk): IceWave reduserer: muskel-/skjelettsmerter, knesmerter, smerter på spesifikke steder, generell smerte i hele kroppen,
Trigonometric Substitution
 Trigonometric Substitution Alvin Lin Calculus II: August 06 - December 06 Trigonometric Substitution sin 4 (x) cos (x) dx When you have a product of sin and cos of different powers, you have three different
Kaplhenke Racing LLC 240 Quick Steer Roll Correction. Installation Instructions. English 2 Norwegian 8
 Kaplhenke Racing LLC 240 Quick Steer Roll Correction Installation Instructions Language Page English 2 Norwegian 8 DISCLAIMER: These products are intended for racing applications only. Kaplhenke Racing
Norsk Needlework. Celebrating 200 years of Norwegian Constitution. Norsk Skjold Votter Grunnlovsjubileet 2014
 Norsk Needlework M8 Cynthia Wasner Celebrating 200 years of Norwegian Constitution Norsk Skjold Votter Grunnlovsjubileet 2014 Shield of Norway Mittens Size: Women s Medium- Man s Medium Sport weight wool
HONSEL process monitoring
 6 DMSD has stood for process monitoring in fastening technology for more than 25 years. HONSEL re- rivet processing back in 990. DMSD 2G has been continuously improved and optimised since this time. All