TABLE RADIO TR 2500 DAB+ DE EN FR DA SV FI NO
|
|
|
- Martin Eriksson
- 5 år siden
- Visninger:
Transkript

1 TABLE RADIO TR 2500 DAB+ DE EN FR DA SV FI NO
2 GRUNDIG Kundenberatungszentrum Montag bis Freitag von 8.00 bis Uhr Deutschland: 0180 / Österreich: 0820 / * * gebührenpflichtig (0,145 /Min. aus dem Festnetz, Mobilfunk: max. 0,20 /Min.) Haben Sie Fragen? Unser Kundenberatungszentrum steht Ihnen werktags stets von Uhr zur Verfügung. 2

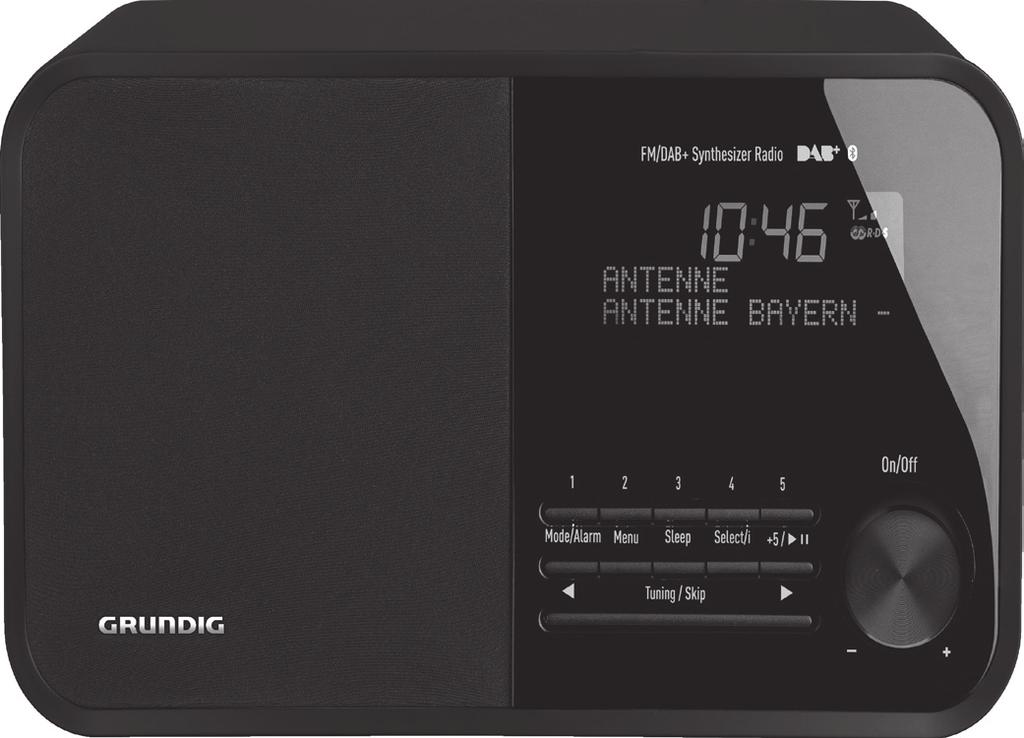
3 Display ON/OFF Mode/ Alarm Menu Sleep Select/i +5 eii r Tuning/Skip e Antenna USB AUX IN PHONES AC: 230V ~ 3
4 DEUTSCH ENGLISH FRANÇAIS DANSK SVENSKA SUOMI NORSK
5 SICHERHEIT UND INFORMATIONEN Dieses Gerät ist für die Wiedergabe von Tonsignalen bestimmt. Jede andere Verwendung ist ausdrücklich ausgeschlossen. 7 Schützen Sie das Gerät vor Feuchtigkeit (Tropfund Spritzwasser). 7 Stellen Sie keine mit Flüssigkeit gefüllten Gefäße (Vasen oder ähnliches) auf das Gerät. Gefäße könnten umkippen und mit der auslaufenden Flüssigkeit die elektrische Sicherheit beeinträchtigen. 7 Stellen Sie keine offenen Brandquellen, z.b. Kerzen, auf das Gerät. 7 Betreiben Sie das Gerät nur in einem gemäßigten Klima. 7 Sorgen Sie für ausreichende Belüftung des Gerätes, indem Sie einen Mindestabstand von 10 cm zur Umgebung einhalten. Bedecken Sie das Gerät nicht mit Zeitungen, Tischtüchern, Vorhängen, etc. 7 Treten Fehlfunktionen auf, etwa wegen einer kurzzeitigen Netzüberspannung oder wegen einer elektrostatischen Aufladung, setzen Sie das Gerät zurück. Ziehen Sie hierzu den Netzstecker und schließen Sie ihn nach einigen Sekunden wieder an. 7 Bitte beachten Sie beim Aufstellen des Gerätes, dass Oberflächen von Möbeln mit den verschiedensten Lacken und Kunststoffen beschichtet sind, welche meistens chemische Zusätze enthalten. Diese Zusätze können u.a. das Material der Gerätefüße angreifen, wodurch Rückstände auf der Möbeloberfläche entstehen, die sich nur schwer oder nicht mehr entfernen lassen. 7 Verwenden Sie keine Reinigungsmittel, diese können das Gehäuse beschädigen. Reinigen Sie das Gerät mit einem sauberen, trockenen Tuch. 7 Sie dürfen das Gerät nicht öffnen. Für Schäden, die durch unsachgemäße Eingriffe entstehen, übernimmt der Hersteller keine Garantie. 7 Sorgen Sie dafür, dass der Netzstecker frei zugänglich ist! 7 Ständige Benutzung des Kopfhörers bei hoher Lautstärke kann zu Schäden am Gehör führen. Achtung Hochfrequenz Strahlung 7 Das Gerät muss in Übereinstimmung mit dieser Bedienungsanleitung angeschlossen und betrieben werden. Das Gerät hat eine integrierte Antenne, es darf nicht mit anderen Antennen oder Sendeanlagen betrieben werden. 7 Nur durch Ziehen des Netzadapters ist das Gerät vollständig vom Stromnetz getrennt. Technische Daten Dieses Gerät ist funkentstört entsprechend den geltenden EU- Richtlinien. Dieses Produkt erfüllt die europäischen Richtlinien 2014/53/EU, 2009/125/EC und 2011/65/ EU. Den genauen Wortlaut der Konformitätserklärung (DOC) finden Sie auf der GRUNDIG Homepage Den genauen Wortlaut der Konformitätserklärung (DOC) finden Sie auf der GRUNDIG Homepage Das Typenschild befindet sich an der Rückseite des Gerätes. Spannungsversorgung: 230 V~, 50/60 Hz Max. Leistungsaufnahme: Betrieb < 14 W, Stand-by < 1 W Ausgangsleistung: DIN 45324, 10% THD 5 W Wellenbereiche: DAB/DAB+ 174, ,200 MHz FM 87, ,0 MHz BT-Frequenz: 2402 MHz MHz BT Max. Sendeleistung: 13dBm Abmessungen und Gewicht: B x H x T 245 x 135 x 145 mm Gewicht ca. 1,75 kg Technische und optische Änderungen vorbehalten! DEUTSCH 5
6 AC: 230V 50/60 Hz SICHERHEIT UND INFORMATIONEN Entsorgung von Altgeräten: Dieses Produkt erfüllt die Vorgaben der EU-WEEE- Direktive (2012/19/EU). Das Produkt wurde mit einem Klassifizierungssymbol für elektrische und elektronische Altgeräte (WEEE) gekennzeichnet. Dieses Gerät wurde aus hochwertigen Materialien hergestellt, die wiederverwendet und recycelt werden können. Entsorgen Sie das Gerät am Ende seiner Einsatzzeit nicht mit dem regulären Hausmüll; geben Sie es stattdessen bei einer Sammelstelle zur Wiederverwertung von elektrischen und elektronischen Altgeräten ab. Ihre Stadtverwaltung informiert Sie gerne über geeignete Sammelstellen in Ihrer Nähe. Einhaltung von RoHS-Vorgaben: Das von Ihnen erworbene Produkt erfüllt die Vorgaben der EU-RoHS Direktive (2011/65/EU). Es enthält keine in der Direktive angegebenen gefährlichen und unzulässigen Materialien. Informationen zur Verpackung Die Verpackung des Produkts wurde gemäß unserer nationalen Gesetzgebung aus recyclingfähigen Materialien hergestellt. Entsorgen Sie die Verpackungsmaterialien nicht mit dem Hausmüll oder anderem Müll. Bringen Sie sie zu einer von der Stadtverwaltung bereitgestellten Sammelstelle für Verpackungsmaterial. STROMVERSORGUNG Netz-Betrieb Prüfen Sie, ob die auf dem Typenschild (an der Rückseite des Gerätes) angegebene Netzspannung mit der örtlichen Netzspannung übereinstimmt. Ist dies nicht der Fall, wenden Sie sich an Ihren Fachhändler. 1 Beigepacktes Netzkabel in die Buchse»AC: 230 V ~ «des Gerätes stecken. Vorsicht: 7 Über das Netzkabel ist das Gerät mit dem Stromnetz verbunden. Wenn Sie das Gerät vollständig vom Stromnetz trennen wollen, müssen Sie das Netzkabel ziehen. Sorgen Sie daher dafür, dass der Netzstecker während des Betriebes frei zugänglich bleibt und nicht durch andere Gegenstände behindert wird. USB PHONES AUX IN 2 Stecker des Netzkabels in die Steckdose (230 V~, 50/60 Hz) stecken. 6 DEUTSCH
7 AUF EINEN BLICK Die Abbildungen des Gerätes finden Sie auf Seite 3. Bedienelemente an der Vorderseite Display Zeigt verschiedene Informationen wie Programmname, Uhrzeit, Weckzeit, Lautstärke und das Gerätemenü. ON/OFF Drücken, schaltet das Gerät + ein und aus; drehen, ändert die Lautstärke. Beendet das Wecken Stationstasten zum Speichern und Aufrufen von Rundfunk- Programmen. Mode/Alarm Menu Sleep Select/i Im Betrieb: Schaltet zwischen den Programmquellen DAB, FM, Bluetooth und AUX um. In Stand-by: aktiviert/deaktiviert die Weckfunktion; länger drücken, aktiviert die Einstellung für die Weckzeit und den Weckmodus. Ruft das Menü des Gerätes auf. Zum Einstellen des Sleep- Timers. Bestätigt Einstellungen. Im DAB-Betrieb: Blendet DAB-Programminformationen ein. Im FM-Betrieb: Blendet RDS Informationen ein. r Tuning/Skip e Im DAB-Betrieb: Wählen DAB-Rundfunk-Programme aus der Programmliste. Im FM-Betrieb: Zum Einstellen von FM-Rundfunk- Programmen. Wählen Optionen im Menü. Im Bluetooth-Betrieb: Wählen den vorhergehenden oder nächsten Titel. Bedienelemente an der Rückseite Antenna USB AUX IN PHONES Teleskopantenne. USB-Buchse für Software- Up-date. Audiosignal-Eingang (Stereo/Mono) zum Anschließen eines externen Gerätes. Buchse für Ohrhörer (3,5mm Stereo-Stecker); AC: 230 V ~, Anschlussbuchse für das mit- 50/60 Hz gelieferte Netzkabel. +5 eii Im DAB-/FM-Betrieb: Aktiviert die zweite Speicherebene auf den Stationstasten 6 bis 10. Im Bluetooth-Betrieb: Startet die Wiedergabe und schaltet auf Wiedergabe-Pause. DEUTSCH 7
8 EINSTELLUNGEN Rundfunk-Programme (DAB und FM) einstellen und speichern Erstinstallation Wenn das Gerät erstmals an das Stromnetz angeschlossen wird oder nach einem Reset, startet das Gerät einen automatischen Programm-Suchlauf nach DAB-Rundfunk-Programmen und speichert diese in der Programmliste. Danach sucht das Gerät nach FM-Rundfunk- Programmen und speichert zehn FM-Rundfunk- Programme auf den Programmplätzen (Presets) 1 bis 10. Die Uhrzeit wird automatisch eingestellt. 1 Für den bestmöglichen DAB/FM-Empfang die Teleskopantenne herauszuziehen. 2 Das Gerät mit»on/off«einschalten. Anzeige:»Welcome to«und danach»scanning «. Der automatische Programm-Suchlauf startet, sucht und speichert die gefundenen Rundfunk-Programme.»Preset Full«zeigt an, dass 10 FM- Rundfunk-Programme auf den Programmplätzen gespeichert wurden. Danach schaltet das Gerät ab, die Uhrzeit wird angezeigt. DAB- und FM-Rundfunk-Programme einstellen und speichern nach einem Ortswechsel Sie können den automatischen Programm-Suchlauf erneut starten. Dies ist sinnvoll, wenn Sie das Gerät an einem anderen Ort betreiben wollen oder wenn Sie nach neuen DAB-Rundfunk-Programmen suchen wollen. 1 Das Gerät mit»on/off«einschalten. Anzeige: der Name des Rundfunk-Programmes, z.b.»b5 akt«. 2 Das Menü mit»menu«aufrufen. 3 Menüpunkt»System«mit»r Tuning/Skip e«wählen und mit»select/i«bestätigen. 4 Menüpunkt»ATS«mit»r Tuning/Skip e«wählen und mit»select/i«bestätigen. Anzeige:»No«. 5 Mit»r Tuning/Skip e«die Anzeige» Yes«anwählen und den automatischen Programm- Suchlauf mit»select/i«starten. Der automatische Programm-Suchlauf startet, sucht und speichert die gefundenen Rundfunk-Programme. Danach schaltet das Gerät ab, die Uhrzeit wird angezeigt. 8 DEUTSCH
9 EINSTELLUNGEN DAB-Rundfunk-Programme auf Programmplätze speichern Nach dem automatischen Programm-Suchlauf werden alle DAB-Rundfunk-Programme in der Programmliste gespeichert. Ihre bevorzugten DAB- Rundfunk-Programme können Sie auch auf den Programmplätzen (Presets) 1 bis 10 speichern. 1 DAB-Rundfunk-Programm mit»r Tuning/ Skip e«wählen. Anzeige: der Name des Rundfunk-Programmes, das angezeigte DAB-Rundfunk-Programm wird nach 1 Sekunde aktiviert. 2 DAB-Rundfunk-Programm auf einem Programmplatz speichern, dazu eine der Programmplatztasten»1«bis»5«solange drücken, bis in der Anzeige»Preset 2 stored«erscheint. Hinweis: 7 Für die Programmplätze 6 bis 10 vorher»+5 eii«und danach»1«bis»5«drücken. DAB-Rundfunk-Programme einstellen und speichern manuell 1 Programmquelle DAB mit»mode/alarm«wählen. 2 Das Menü mit»menu«aufrufen. Anzeige:»Full scan«. 3 Menüpunkt»Manual tune«mit»r Tuning/Skip e«wählen und mit»select/i«bestätigen. Anzeige: zum Beispiel»5A I74.928«(Kanal und Frequenz eines DAB-Rundfunk- Programmes). 4 Gewünschte Frequenz/Kanal mit»r Tuning/ Skip«oder»Tuning/Skip e«einstellen. 5 Frequenz/Kanal mit»select/i«bestätigen. Der Empfangspegel wird angezeigt. 6 Einstellung mit»select/i«bestätigen. Die DAB-Rundfunk-Programme werden in der Programmliste gespeichert. FM-Rundfunk-Programme einstellen und speichern manuell 1 Programmquelle FM mit»mode/alarm«wählen. 2 Das Menü mit»menu«aufrufen. 3 Menüpunkt»Scan setting«mit»select/i«bestätigen. Anzeige:»Strong stations«. Hinweis: 7 Wählen Sie, ob nach empfangsstarken Rundfunk-Programmen gesucht werden soll (Anzeige»Strong stations only«) oder nach allen Rundfunk-Programmen (Anzeige:»All stations«). 4 Gewünschte Option mit»r Tuning/Skip e«wählen und mit»select/i«bestätigen. 5 Das Menü mit»menu«abschalten. 6 Gewünschtes Rundfunk-Programm einstellen, dazu»r Tuning/Skip«oder»Tuning/Skip e«länger drücken. Der Programmsuchlauf startet und stoppt beim nächsten Programm mit gutem Empfangssignal; oder»r Tuning/Skip«oder»Tuning/Skip e«wiederholt kurz drücken, bis die gewünschte Frequenz erreicht ist. Die Frequenz ändert sich pro Tastendruck um 50 Hz. 7 Rundfunk-Programm auf einem Programmplatz speichern, dazu»1«bis»5«solange drücken, bis»preset 2 stored«angezeigt wird. Hinweis: 7 Für die Programmplätze 6 bis 10 vorher»+5 eii«und danach»1«bis»5«drücken. DEUTSCH 9
10 EINSTELLUNGEN Zeitformat für die Uhrzeit einstellen (12- oder 24 Stunden) 1 Das Gerät mit»on/off«einschalten. Anzeige: z.b.»b5 akt«. 2 Das Menü mit»menu«aufrufen. 3 Menüpunkt»System«mit»r Tuning/Skip e«wählen und mit»select/i«bestätigen. 4 Menüpunkt»Time«mit»r Tuning/Skip e«wählen und mit»select/i«bestätigen. Anzeige:»Set Time/Date«. 5 Menüpunkt»Set 12/24 hour«mit»r Tuning/Skip e«wählen und mit»select/i«bestätigen. Anzeige:»Set 24 hour«. 6 Das gewünschte Zeitformat 12- oder 24 Stunden mit»r Tuning/Skip e«wählen. 7 Einstellung mit»select/i«bestätigen. 8 Einstellung mit»menu«beenden. Uhrzeit aktualisieren automatisch Die Uhrzeit wird automatisch aktualisiert, wenn ein Rundfunk-Programm ein Zeitsignal sendet. Sie können einstellen, ob die Aktualisierung von DAB- oder FM-Programmen durchgeführt werden soll oder Sie können diese Funktion ausschalten. 1 Das Gerät mit»on/off«einschalten. Anzeige: z.b.»b5 akt«. 2 Das Menü mit»menu«aufrufen. 3 Menüpunkt»System«mit»r Tuning/Skip e«wählen und mit»select/i«bestätigen. 4 Menüpunkt»Time«mit»r Tuning/Skip e«wählen und mit»select/i«bestätigen. Anzeige:»Set Time/Date«. 5 Menüpunkt»Auto update«mit»r Tuning/Skip e«wählen und mit»select/i«bestätigen. Anzeige:»Update from«. 6 Mit»r Tuning/Skip e«den Menüpunkt wählen, von dessen Programmquelle die Uhrzeit aktualisiert werden soll (Any = DAB und FM, oder DAB oder FM); oder den Menüpunkt»No update«wählen, wenn keine Aktualisierung stattfinden soll. 7 Einstellung mit»select/i«bestätigen. 8 Einstellung mit»menu«beenden. Uhrzeit einstellen manuell 1 Das Gerät mit»on/off«einschalten. Anzeige: z.b.»b5 akt«. 2 Das Menü mit»menu«aufrufen. 3 Menüpunkt»System«mit»r Tuning/Skip e«wählen und mit»select/i«bestätigen. 4 Menüpunkt»Time«mit»r Tuning/Skip e«wählen und mit»select/i«bestätigen. Anzeige:»Set Time/Date«. 5 Menüpunkt»Set Time/Date«mit»Select/i«bestätigen. Anzeige, z.b.:»set time 08:30«. 6 Stunden der Uhrzeit mit»r Tuning/Skip e«eingeben und mit»select/i«bestätigen. 7 Minuten der Uhrzeit mit»r Tuning/Skip e«eingeben und mit»select/i«bestätigen. 8 Datum (Tag) mit»r Tuning/Skip e«eingeben und mit»select/i«bestätigen. 9 Datum (Monat) mit»r Tuning/Skip e«eingeben und mit»select/i«bestätigen. 10 Datum (Jahr) mit»r Tuning/Skip e«eingeben 11 Einstellung mit»select/i«bestätigen. Anzeige:»Time saved«. 12 Einstellung mit»menu«beenden. 10 DEUTSCH
11 RADIO-BETRIEB Allgemeine Funktionen Ein- und ausschalten 1 Gerät mit»on/off«ein- oder ausschalten. Lautstärke ändern 1 Gewünschte Lautstärke mit» +«einstellen. Klang einstellen 1 Das Menü mit»menu«aufrufen. 2 Menüpunkt»System«mit»r Tuning/Skip e«wählen und mit»select/i«bestätigen. 3 Menüpunkt»Equaliser«mit»r Tuning/ Skip e«wählen und mit»select/i«bestätigen. Anzeige z.b.:»loudness«. 4 Gewünschte Option mit»r Tuning/Skip e«wählen und mit»select/i«bestätigen. 5 Menü mit»menu«abschalten. Mit Kopfhörern hören 1 Kopfhörer an die Kopfhörerbuchse»PHONE«(ø 3,5 mm) anschließen. Die Lautsprecher des Gerätes werden abgeschaltet. Achtung: 7 Ständige Benutzung der Kopfhörer bei hoher Lautstärke kann zu Gehörschädigungen führen. DAB-Radio-Betrieb Für den bestmöglichen DAB-Empfang genügt es, die Teleskopantenne herauszuziehen und entsprechend auszurichten. Programmquelle DAB-Radio wählen 1 Programmquelle DAB mit»mode/alarm«wählen. Anzeige:»DAB Mode«, danach der Name eines DAB-Programmes. Gespeicherte Programme aufrufen 1 Gewünschtes Programm mit den Stationstasten»1«bis»5«(Programmplätze 1 bis 5) oder mit»+5 eii«und den Stationstasten»1«bis»5«(Programmplätze 6 bis 10) aufrufen; oder gewünschtes Programm mit»r Tuning/Skip e«schrittweise wählen und mit»select/i«bestätigen. DAB-Programminformationen einblenden 1 Informationen zum aktuellen DAB-Programm kurzzeitig einblenden, dazu»select/i«wiederholt drücken. Folgende Informationen werden angezeigt: Infos vom Programmanbieter (z.b. Titel des aktuellen Stückes, -Anschrift), die Signalstärke, das Genre, das Ensemble (z.b. BR für Bayern), die Frequenz des Programmanbieters, Hinweise auf Signalstörungen (bei optimalen Empfang wird»signal error: 0«angezeigt), die Bit-Rate, der Übertragungsstandart, Uhrzeit und Datum. Dynamic Range Control (DRC) für DAB-Programme einstellen Wenn Sie Dynamic Range Control aktivieren, können Sie leise Passagen in einer lauten Umgebung besser hören. 1 Das Menü mit»menu«aufrufen. 2 Menüpunkt»DRC«mit»r Tuning/Skip e«anwählen und mit»select/i«bestätigen. Anzeige:»DRC off«. 3 Option»DRC high«oder»drc low«mit»r Tuning/Skip e«wählen und mit»select/i«bestätigen. 4 Menü mit»menu«abschalten. Hinweis: 7 DRC muss vom jeweiligen DAB-Programm unterstützt werden. DEUTSCH 11
12 RADIO-BETRIEB FM-Radio-Betrieb Für den bestmöglichen FM-Empfang genügt es, die Teleskopantenne herauszuziehen und entsprechend auszurichten. Programmquelle FM-Radio wählen 1 Programmquelle FM mit»mode/alarm«wählen. Anzeige:»FM Mode«, danach die Frequenz eines FM-Programmes. Gespeicherte Programme aufrufen 1 Gewünschtes Programm mit den Stationstasten»1«bis»5«(Programmplätze 1 bis 5) oder mit»+5 eii«und den Stationstasten»1«bis»5«(Programmplätze 6 bis 10) aufrufen. RDS Informationen aufrufen RDS (Radio-Data-System) ist ein Informationssystem, das zusätzlich von den meisten FM (UKW)-Programmen ausgestrahlt wird. Hinweise: 7 Es kann einige Zeit dauern, bis alle RDS- Informationen übertragen worden sind. 7 GRUNDIG hat keinen Einfluss auf die Richtigkeit dieser Informationen. 1»Select/i«wiederholt drücken. Die folgenden Informationen werden eingeblendet: Der Name des Rundfunk-Programmes, Radiotext (wenn angeboten), der Programmtyp (PTY), die aktuelle Uhrzeit und das Datum. Tonsignal von externen Geräten wiedergeben 1 Die Tonausgangsbuchsen des externen Gerätes mit einem handelsüblichen Adapterkabel an die Buchse»AUX IN«an der Rückseite des Gerätes anschließen. 2 Das Gerät mit»on/off«einschalten. 3 Programmquelle für das externe Gerät mit»mode/alarm«wählen. Anzeige:»AUX IN Mode«. 4 Gewünschte Lautstärke mit» +«einstellen. 5 Wiedergabe am externen Gerät starten. Hinweis: 7 Liegt an Buchse»AUX IN«kein Audio- Signal an, dann schaltet sich das Gerät automatisch nach 15 Minuten in Stand-by. Für den weiteren Gebrauch das Gerät erneut einschalten. 12 DEUTSCH
13 BLUETOOTH-BETRIEB Kompatibel mit folgenden Geräten Ihr TR 2500 kann mit allen marktüblichen Bluetooth-fähigen Geräten verbunden werden, die den Standard A2DP einhalten. Dies betrifft z.b. Smartphones, Laptops und Tablet-PCs. Programmquelle Bluetooth wählen 1 Programmquelle Bluetooth mit»mode/ Alarm«wählen. Anzeige:»Bluetooth«und»Searching«(Suche). Bluetooth Gerät suchen und verbinden 1 Am Bluetooth Gerät die Bluetooth Funktion aktivieren. 2 Am Bluetooth Gerät die Suchfunktion starten. Nach kurzer Zeit wird Ihr TR 2500 am Bluetooth Gerät angezeigt. 3 Am Bluetooth Gerät den TR 2500 auswählen und verbinden. 4 Ist das Bluetooth Gerät mit Ihrem Gerät verbunden wird am TR 2500»Bluetooth«und»Connected«(Verbunden) angezeigt. Hinweis: 7 Ihr TR 2500 kann nur von einem Bluetooth Gerät das Audiosignal empfangen und wiedergeben, es können jedoch bis zu 8 Bluetooth Gerät angemeldet werden. Ein angemeldetes Bluetooth Gerät aktivieren Hinweise: 7 Die Anmeldung der Bluetooth Geräte muss nur einmal erfolgen. 7 Beim Verlassen und der anschließenden Rückkehr in die Funk-Reichweite des TR 2500 meldet sich das Bluetooth Gerät automatisch an. 7 Das TR 2500 verbindet sich automatisch nur mit dem zuletzt angemeldetem Bluetooth Gerät. 7 Wenn das Bluetooth-Gerät nicht erkannt wird, muss es über sein Menü wieder aktiviert werden. Wiedergabe vom Bluetooth Gerät 1 Wiedergabe am Bluetooth Gerät starten. 2 Gewünschte Lautstärke mit» +«einstellen. 3 Wiedergabe am Bluetooth Gerät beenden. Hinweise: 7 Verschiedene Funktionen können auch am TR 2500 gesteuert werden. Wiedergabe- Pause mit»+5 eii«wählen, Wiedergabe fortsetzen dazu erneut»+5 eii«drücken; den vorherigen Titel mit»r Tuning/Skip«wählen, den nächsten Titel mit»tuning/skip e«wählen. 7 Beachten Sie, die Reichweite der Datenübertragung kann in Abhängigkeit vom verwendeten Bluetooth Gerät und den baulichen Gegebenheiten bis zu 9 m betragen. Bluetooth Gerät abmelden 1 Das angemeldete Bluetooth Gerät abmelden oder am TR 2500»Menu«drücken und mit»select/i«bestätigen. Die Anzeige wechselt auf»searching«. Bluetooth Gerät wieder anmelden 1 Wenn Sie aus der Reichweite der Datenübertragung gelangen oder den Bluetooth Modus abgeschaltet haben, wird das Bluetooth Gerät abgemeldet. 2 Zum erneuten Anmelden am Bluetooth Gerät Ihr TR 2500 wieder auswählen.. Hinweis: 7 Wenn sich das bereits registrierte Bluetooth Gerät nicht mehr verbinden läßt, Ihr TR 2500 aus der Geräteliste des Bluetooth Gerätes entfernen, neu suchen und erneut verbinden. Automatische Abschaltung Wurde die Programmquelle Bluetooth angewählt und es ist kein Bluetooth Zuspielgerät angemeldet, dann schaltet sich Ihr TR 2500 nach 15 Minuten automatisch in Stand-by. DEUTSCH 13
14 TIMER-BETRIEB Weckzeit/Weckmodus einstellen Hinweis: 7 Das Menü»Alarm Setup«kann auch im Stand-by Modus angewählt werden, dazu»mode/alarm«drücken und gedrückt halten. 1 Das Gerät mit»on/off«einschalten. Anzeige: z.b.»b5 akt«. 2 Das Menü mit»menu«aufrufen. 3 Menüpunkt»System«mit»r Tuning/Skip e«wählen und mit»select/i«bestätigen. 4 Menüpunkt»Alarm«mit»Select/i«bestätigen. Anzeige:»Alarm Setup«. 5»Select/i«drücken. Anzeige:»Alarm Wizard«und»Alarm Off«. 6 Weckbereitschaft mit»r Tuning/Skip e«aktivieren (»Alarm On«) und mit»select/i«bestätigen. Anzeige:»On time«, die Stunden der Uhrzeit blinken. 7 Stunden der Uhrzeit mit»r Tuning/Skip e«eingeben und mit»select/i«bestätigen. 8 Minuten der Uhrzeit mit»r Tuning/Skip e«eingeben und mit»select/i«bestätigen. 9 Weckmodus (Daily = Täglich, Once = Einmal, Weekends = am Wochenende oder Weekdays = am Wochentag) mit»r Tuning/Skip e«eingeben. Hinweis: 7 Wurde der Weckmodus Once = Einmal gewählt, das Datum (Tag, Monat und Jahr) jeweils mit»r Tuning/Skip e«eingeben und mit»select/i«bestätigen. 10 Wecksignal (»Buzzer«= Weckton,»DAB«= DAB-Programm oder»fm«= FM-Rundfunkprogramm) mit»r Tuning/Skip e«wählen und mit»select/i«bestätigen. 14 DEUTSCH Hinweis: 7 Wurde als Wecksignal»DAB«oder»FM«gewählt, mit»r Tuning/Skip e«das gewünschte Rundfunkprogramm wählen (nur Programme, die auf den Stationstasten 1 bis 10 gespeichert sind) oder die Option»Last listened«wählen (das zuletzt gehörte Programm) und mit»select/i«bestätigen. 11 Gewünschte Wecklautstärke mit»r Tuning/ Skip e«eingeben und mit»select/i«bestätigen. Anzeige:»Alarm saved«. 12 Einstellung mit»menu«beenden. Anzeige:»e«oder» «. Wecken unterbrechen 1 Während des Weckens eine beliebige Taste außer»on/off«drücken. Anzeige:»e«oder» «blinken. Das Wecksignal (Signalton oder Radio) stoppt. Hinweis: 7 Das Wecken setzt erneut ein, abhängig wie oft eine Taste gedrückt wurde (1 mal = nach 5 Minuten, 2 mal = 10 Minuten, 3 mal = 15 Minuten, 4 mal = 30 Minuten. Die Gesamtweckzeit beträgt 90 Minuten. Wecken für diesen Tag beenden 1 Während des Weckens»ON/OFF«drücken. Anzeige: die aktuelle Uhrzeit und»e«oder» «. Das Wecksignal (Signalton oder Radio) stoppt, die Weckbereitschaft bleibt mit der eingestellten Zeit für den nächsten Tag erhalten. Weckbereitschaft beenden/aktivieren 1 Gerät mit»on/off«ausschalten. 2 Weckbereitschaft mit»mode/alarm«beenden. Anzeige:»Alarm off«und das Symbol»e«oder» «erlischt. Die eingestellte Weckzeit bleibt erhalten. 3 Weckbereitschaft mit»mode/alarm«wieder aktivieren. Anzeige:»Alarm on«und das Symbol»e«oder» «.
15 TIMER-BETRIEB Sleep-Timer Das Gerät ist mit einem Sleep-Timer ausgestattet, der es zu einer voreingestellten Zeit (von 90 bis 10 Minuten) ausschaltet. Ausschaltzeit für den Sleep-Timer wählen 1 Das Gerät mit»on/off«einschalten. Anzeige: z.b.»b5 akt«. 2 Das Menü mit»sleep«aufrufen. Anzeige:»Set sleep time«und»sleep off«,» «blinkt. 3 Gewünschte Ausschaltzeit mit»r Tuning/ Skip e«wählen (in 10 Minuten Schritten) und mit»select/i«bestätigen. Anzeige:» «. Hinweise: 7 Zum Kontrollieren der verbliebenen Ausschaltzeit kurz»sleep«drücken. 7 Die Ausschaltzeit kann auch mit»sleep«(in 10 Minuten Schritten) eingestellt werden. Sleep-Timer abschalten 1 Zum vorzeitigen Abschalten des Sleep-Timers im Menüpunkt»Set sleep time«mit»r Tuning/Skip e«die Option»Sleep off«wählen und mit»select/i«bestätigen; oder Gerät mit»on/off«ausschalten. Anzeige:» «erlischt. SONDERFUNKTIONEN Beleuchtung der Anzeige für den Stand-by Modus einstellen Sie können wählen, ob die Anzeige im Stand-by Modus andauernd beleuchtet ist oder nach 10 Sekunden erlischt. 1 Das Menü mit»menu«aufrufen. 2 Menüpunkt»System«mit»r Tuning/Skip e«wählen und mit»select/i«bestätigen. 3 Menüpunkt»Backlight«mit»r Tuning/ Skip e«wählen und mit»select/i«bestätigen. 4 Gewünschte Option (»10 sec«oder»on«) mit»r Tuning/Skip e«wählen und mit»select/i«bestätigen. 5 Menü mit»menu«abschalten. Hinweis: 7 Durch Drücken einer beliebigen Taste wird die Beleuchtung wieder kurz eingeschaltet. Kontrast der Anzeige einstellen Je nach Blickwinkel auf die Anzeige kann diese durch den Kontrast optimiert werden. 1 Das Menü mit»menu«aufrufen. 2 Menüpunkt»System«mit»r Tuning/Skip e«wählen und mit»select/i«bestätigen. 3 Menüpunkt»LCD contrast«mit»r Tuning/Skip e«wählen und mit»select/i«bestätigen. 4 Kontrast mit»r Tuning/Skip e«wählen und mit»select/i«bestätigen. 5 Menü mit»menu«abschalten. DEUTSCH 15
16 SONDERFUNKTIONEN Software-Version abrufen 1 Das Menü mit»menu«aufrufen. 2 Menüpunkt»System«mit»r Tuning/Skip e«wählen und mit»select/i«bestätigen. 3 Menüpunkt»SW version«mit»r Tuning/ Skip e«wählen und mit»select/i«bestätigen. Die Softwareversion wird angezeigt. 4 Anzeige mit»menu«abschalten. Alle Einstellungen löschen (Reset) Durch diesen Systemreset kann das Gerät in seinen Auslieferungszustand zurückgesetzt werden. Hierbei gehen alle Einstellungen verloren. 1 Das Menü mit»menu«aufrufen. 2 Menüpunkt»System«mit»r Tuning/Skip e«wählen und mit»select/i«bestätigen. 3 Menüpunkt»Factory Reset«mit»r Tuning/Skip e«wählen und mit»select/i«bestätigen. Eine Sicherheitsabfrage wird eingeblendet. 4 Option»Yes«(Ja) mit»tuning/skip e«wählen. Hinweis: 7 Zum Abbrechen der Resetfunktion die Option»No«(Nein) mit»r Tuning/Skip«wählen. 5 Einstellung mit»select/i«bestätigen. Anzeige:»Restarting«. DAB-Rundfunkprogramme aus der Programmliste entfernen Nach einem Ortswechsel können Sie nicht mehr zur Verfügung stehende DAB-Rundfunkprogramme aus der Programmliste entfernen, diese DAB- Rundfunkprogramme sind mit einem? vor dem Namen markiert. 1 Das Menü mit»menu«aufrufen. 2 Menüpunkt» Prune«mit»r Tuning/Skip e«anwählen und mit»select/i«bestätigen. Eine Sicherheitsabfrage wird eingeblendet. 3 Option»Yes«(Ja) mit»tuning/skip e«wählen. Hinweis: 7 Zum Abbrechen die Option die Option»No«(Nein) mit»r Tuning/Skip«wählen. 4 Einstellung mit»select/i«bestätigen. 5 Einstellung mit»menu«beenden. In der Programmliste sind nur noch verfügbare DAB-Rundfunkprogramme enthalten. Software Update Damit können Sie wenn vorhanden eine aktuelle Software installieren. 1 PC an die Buchse»USB«anschließen 2 Das Menü mit»menu«aufrufen. 3 Menüpunkt»System«mit»r Tuning/Skip e«wählen und mit»select/i«bestätigen. 4 Menüpunkt»Software Upgrade«mit»r Tuning/Skip e«wählen und mit»select/i«bestätigen. Eine Sicherheitsabfrage wird eingeblendet. 5 Option»Yes«(Ja) mit»tuning/skip e«wählen. Anzeige:»Waiting«. Hinweis: 7 Zum Abbrechen des Updates die Option»No«(Nein) mit»r Tuning/Skip«wählen. 6 Update-Programm am PC starten. 7 Nach erfolgreichem Update die Verbindung zum PC entfernen. 16 DEUTSCH
17 SAFETY AND INFORMATION This device is designed for the playback of audio signals. Any other use is expressly prohibited. 7 Make sure the device is protected from dripping or splashing water. 7 Do not place any vessels such as vases on the device. These may be knocked over and spill fluid on the electrical components, thus presenting a safety risk. 7 Do not place any naked flames such as candles on the device. 7 Only use the device in a moderate climate. 7 Ensure that the device is adequately ventilated by placing it at least 10 cm from any other object. Do not cover the device with newspapers, table cloths, curtains, etc. 7 If malfunctions occur due to static electricity charges or fast transient (burst), reset the device. To do this, pull out the power plug and connect it again after a few seconds. 7 When deciding where to place the device, please note that furniture surfaces are covered by various types of varnish and plastic, most of which contain chemical additives. These additives can corrode the device supports, leaving residues on the furniture surfaces which can be difficult or impossible to remove. 7 Do not use any cleaning agent, as this may damage the casing. Clean the device with a clean, dry cloth. 7 Never open the device casing. The manufacturer will not accept any liability for damage resulting from improper handling. 7 Make sure the power plug is freely accessible. 7 Note, prolonged listening at loud volumes with the earphones can damage your hearing. RF Exposure Warning 7 This equipment must be installed and operated in acordance with provided manual. The device comprised a built-in antenna, and must not be co-located or operating in conjunction with any other antenna or transmitter. 7 The only way to completely disconnect the device from the mains is to unplug the mains cable. Technical data This device is noise-suppressed according to the applicable EU directives. This product fulfils the European directives 2014/53/ EU, 2009/125/EC and 2011/65/EU. You can find the CE declaration of conformity for the device in the form of a pdf file on the Grundig Homepage The type plate is located on the back side of the device. Power supply: 230 V ~, 50/60 Hz Max. power consumtion: Operating < 14 W, Stand-by < 1 W Output: DIN 45324, 10% THD 5 W Frequency band: DAB/DAB MHz FM MHz BT frequency :2402 MHz MHz BT maximum transmitted power:13dbm Dimension and weight: B x H x T 245 x 135 x 145 mm Weight approx kg Technical and design modifications reserved. ENGLISH 17
18 AC: 230V 50/60 Hz SAFETY AND INFORMATION Compliance with the WEEE Directive and Disposing of the Waste Product: This product complies with EU WEEE Directive (2012/19/EU). This product bears a classification symbol for waste electrical and electronic equipment (WEEE). This product has been manufactured with high quality parts and materials which can be reused and are suitable for recycling. Do not dispose of the waste product with normal domestic and other wastes at the end of its service life. Take it to the collection center for the recycling of electrical and electronic equipment. Please consult your local authorities to learn about these collection centers. Compliance with RoHS Directive The product you have purchased complies with EU RoHS Directive (2011/65/EU). It does not contain harmful and prohibited materials specified in the Directive. Package information Packaging materials of the product are manufactured from recyclable materials in accordance with our National Environment Regulations. Do not dispose of the packaging materials together with the domestic or other wastes. Take them to the packaging material collection points designated by the local authorities. POWER SUPPLY Mains operation Check that the mains voltage on the type plate (on the back of the device) corresponds to your local mains supply. If this is not the case, contact your specialist dealer. 1 Plug the mains cable supplied into the»ac: 230 V ~ «socket on the device. Caution: 7 The device is connected to the mains with the power cable. Pull out the power cable when you want to completely disconnect the device from the mains. Unplug the mains plug to disconnect the device from the mains. Make sure the power plug is easily accessible during operation and not hindered by other objects. USB PHONES AUX IN 2 Plug the mains cable into the socket (230 V ~, 50/60 Hz). 18 ENGLISH
19 OVERVIEW See the figure on page 3. Controls on the front Display Shows various information such as channel name, time, alarm time, volume and the menu. ON/OFF + Push the button, switches the device on and off; turn the button, adjusts the volume. Ends the alarm Preset buttons for storing and selecting radio stations. Mode/Alarm Menu Sleep In operating mode: switches between DAB, FM, Bluetooth and AUX input sources. In standby mode: activates/ deactivates the alarm function; ends alarm stand-by; press and hold down activates the settings for alarm time and alarm mode. Opens the menu. Sets the sleep timer. +5 eii In DAB/FM mode: activates the second level of preset buttons 6 to 10. In Bluetooth mode: starts and pauses playback. r Tuning/Skip e In DAB mode: selects DAB radio stations from the program list. In FM mode: tunes FM radio stations. Selects menu options. In Bluetooth mode: select the previous or next track. Controls on the back Antenna USB AUX IN PHONES AC: 230 V ~, 50/60 Hz Telescopic antenna. USB socket for upgrading the software of the device. Audio signal input (stereo/ mono) for connecting to an external device. Earphone socket (3.5 mm stereo plug). Connection socket for power cable supplied. Select/i Confirms settings. In DAB mode: displays DAB station information. In FM mode: displays RDS station information. ENGLISH 19
20 SETTINGS Tuning and storing radio stations (DAB and FM) first installation When the device is switched on for the first time or after factory reset, the Auto Tuning System will start to scan the whole DAB bandwidth and store in the program list. The device will then scan the FM waveband and store the first 10 radio stations as presets 1 to 10. The time is updated automatically. 1 For the best DAB/FM reception, it is sufficient to extend the telescopic antenna and direct it accordingly. 2 Press»ON/OFF«to switch on the device. Display:»Welcome to«and then»scanning «. The automatic station search starts, searches and stores the radio stations.»preset Full«displays that 10 FM radio stations are stored at the presets. After the automatic scan, the device switches to standby, the current time lights up. Tuning and storing DAB and FM radio stations after a removal You can activate the Auto Tuning System again. That is reasonable, if you will use the device in another place or search new DAB radio stations. 1 Press»ON/OFF«to switch on the device. Display: the name of the radio station, e.g.»b5 akt«. 2 Open the menu with»menu«. 3 Select the option»system«with»r Tuning/Skip e«and confirm by pressing»select/i«. 4 Select the option»ats«with»r Tuning/ Skip e«and confirm by pressing»select/i«. Display:»No«. 5 Select the option»yes«with»r Tuning/ Skip e«and start the automatic station search by pressing»select/i«. The automatic station search starts, searches and stores the radio stations. After the automatic scan, the device switches to standby, the current time lights up. Storing DAB radio stations to presets After the automatic station search, all radio stations will be stored in the program list. You can store your favored DAB radio stations on presets 1 to Select DAB radio stations with»r Tuning/ Skip e«. Display: the name of the radio station, the radio station will be activated in 1 second. 2 For storing the DAB radio station on a preset, press and hold down the required preset button»1«to»5«, until»preset 2 stored«appears. Note: 7 Press»+5 eii«and the required preset button»1«to»5«for presets 6 to 10. Programming DAB radio stations manually 1 Select the input source DAB with»mode/ Alarm«. 2 Open the menu with»menu«. Display:»Full scan«. 3 Select the option»manual tune«with»r Tuning/Skip e«and confirm by pressing»select/i«. Display: e.g.»5a I74.928«(channel and frequency of a DAB radio station). 4 Select the desired frequency/channel with»r Tuning/Skip«or»Tuning/Skip e«. 5 Press»Select/i«to confirm the frequency/ channel. Display: the signal strength. 6 Press»Select/i«to confirm the setting. The DAB radio stations will be stored in the program list. 20 ENGLISH
21 SETTINGS Programming FM radio stations manually 1 Select the input source FM with»mode/ Alarm«. 2 Open the menu with»menu«. 3 Confirm the option»scan setting«by pressing»select/i«. Display:»Strong stations«. Note: 7 You can select whether the device will scan radio stations with weak signal (display»strong stations only«) or all radio stations (display:»all stations«). 4 Select the desired option with»r Tuning/ Skip e«and confirm by pressing»select/i«. 5 Press»Menu«to switching off the menu 6 Press and hold down»r Tuning/Skip«or»Tuning/Skip e«to search the desired radio station. The automatic station search starts, and stops at the next station with a strong signal; or press briefly»r Tuning/Skip«or»Tuning/ Skip e«until you have found the frequency you want. The frequency changes in steps of 50 khz. 7 To store the FM radio station on a preset, press and hold down the required preset button»1«to»5«, until»preset 2 stored«appears. Note: 7 Press»+5 eii«and the required preset button»1«to»5«for presets 6 to 10. Setting the clock format (12 or 24 hours) 1 Press»ON/OFF«to switch on the device. Display: e.g.»b5 akt«. 2 Open the menu with»menu«. 3 Select the option»system«with»r Tuning/ Skip e«and confirm by pressing»select/i«. 4 Select the option»time«with»r Tuning/ Skip e«and confirm by pressing»select/i«. Display:»Set Time/Date«. 5 Select the option»set 12/24 hour«with»r Tuning/Skip e«and confirm by pressing»select/i«. Display:»Set 24 hour«. 6 Select the desired clock format (12 or 24 hours) by pressing»r Tuning/Skip e«. 7 Press»Select/i«to confirm the setting. 8 Press»Menu«to end the setting. ENGLISH 21
22 SETTINGS Updating the time automatically The device will normally update the time automatically, when a time signal is received. You can select from which source (DAB or FM) the update starts or you can disable this function. 1 Press»ON/OFF«to switch on the device. Display: e.g.»b5 akt«. 2 Open the menu with»menu«. 3 Select the option»system«with»r Tuning/ Skip e«and confirm by pressing»select/i«. 4 Select the option»time«with»r Tuning/ Skip e«and confirm by pressing»select/i«. Display:»Set Time/Date«. 5 Select the option»auto update«with»r Tuning/Skip e«and confirm by pressing»select/i«. Display:»Update from«. 6 Select the desired source (Any = DAB and FM, or DAB or FM) from which the update starts with»r Tuning/Skip e«; or select the option»no update«, if you want to disable the update. 7 Press»Select/i«to confirm the setting. 8 Press»Menu«to end the setting. 8 Set the day with»r Tuning/Skip e«and confirm by pressing»select/i«. 9 Set the month with»r Tuning/Skip e«and confirm by pressing»select/i«. 10 Set the year with»r Tuning/Skip e«. 11 Press»Select/i«to confirm the setting. Display:»Time saved«. 12 Press»Menu«to end the setting. Updating the time manually 1 Press»ON/OFF«to switch on the device. Display: e.g.»b5 akt«. 2 Open the menu with»menu«. 3 Select the option»system«with»r Tuning/ Skip e«and confirm by pressing»select/i«. 4 Select the option»time«with»r Tuning/ Skip e«and confirm by pressing»select/i«. Display:»Set Time/Date«. 5 Confirm the option»set Time/Date«by pressing»select/i«. Display: e.g.»set time 08:30«. 6 Set the hours with»r Tuning/Skip e«and confirm by pressing»select/i«. 7 Set the minutes with»r Tuning/Skip e«and confirm by pressing»select/i«. 22 ENGLISH
23 RADIO MODE General functions Switching on and off 1 Press»ON/OFF«to switch the device on and off. Adjusting the volume 1 Adjust the volume using» +«. Adjusting the tone 1 Open the menu with»menu«. 2 Select the option»system«with»r Tuning/ Skip e«and confirm by pressing»select/i«. 3 Select the option»equaliser«with»r Tuning/Skip e«and confirm by pressing»select/i«. Display e.g.:»loudness«. 4 Select the desired option with»r Tuning/ Skip e«and confirm by pressing»select/i«. 5 Press»Menu«to end the display. Listening with headphones 1 Connect the headphones to the»phone«headphone jack (ø 3.5 mm). This switches off the loudspeakers. Caution: 7 Excessive sound pressure from the earphones or headphones can cause hearing loss. DAB mode For the best DAB reception, it is sufficient to extend the telescopic antenna and direct it accordingly. Selecting the input source DAB 1 Select the input source DAB with»mode/ Alarm«. Display:»DAB Mode«, then the name of a DAB radio station. Selecting stored stations 1 Select the station you want using the preset buttons»1«to»5«(presets 1 to 5) or using»+5 eii«and the preset buttons»1«to»5«(presets 6 to 10); or select the desired station step by step by pressing»r Tuning/Skip e«and confirm by pressing»select/i«. Displaying DAB station information 1 To display information on the current DAB station, press»select/i«repeatedly. The following display appears in succession: Information from the provider (e.g. the title of the song, the address), the signal strength, the genre, the Ensemble (e.g. BR for Bayern), the current frequency, reference to signal interference (at optimum signal display»signal error: 0«) the bit rate, the broadcasting format, the current time and date. Setting Dynamic Range Control (DRC) for DAB stations When you activate Dynamic Range Control, you can hear lower sounds better in a loud environment. 1 Open the menu with»menu«. 2 Select the option»drc«with»r Tuning/ Skip e«and confirm by pressing»select/i«. Display:»DRC off«. 3 Select the option»drc high«or»drc low«with»r Tuning/Skip e«and confirm by pressing»select/i«. 4 Press»Menu«to end the display. Note: 7 The DAB station must support DRC. ENGLISH 23
24 RADIO MODE FM mode For the best FM reception, it is sufficient to extend the telescopic antenna and direct it accordingly. Selecting the input source FM 1 Select the input source FM with»mode/ Alarm«. Display:»FM Mode«, then the frequency of a FM radio station. Selecting stored stations 1 Select the station you want using the preset buttons»1«to»5«(presets 1 to 5) or using»+5 eii«and the preset buttons»1«to»5«(presets 6 to 10). Displaying RDS station informations RDS (Radio Data System) is an information system which is transmitted additionally by most FM stations. Notes: 7 It may take some time before all RDS information is available. 7 GRUNDIG has no influence on the correctness of such information. 1 Press»Select/i«repeatedly. The following display appears in succesion: The name of the radio station, radio text (if offered), station type (PTY), the current time and date. Listening to an external source 1 Use a standard audio cable to connect»aux IN«on the back of the device to an AUDIO OUT socket on the external equipment. 2 Press»ON/OFF«to switch on the device. 3 Select the input source for the external device with»mode/alarm«. Display:»AUX IN Mode«. 4 Adjust the volume using» +«. 5 Start playback on the external device. Note: 7 If no audio signal is available on socket»aux IN«, the device switches automatically to Stand-by mode after 15 minutes. For further use switch on the device again. 24 ENGLISH
25 BLUETOOTH MODE connect, navigate to the Bluetooth menu on your device and select the unit from the list. Bluetooth device compatibility Your TR 2500 connects with all Bluetooth devices that support the A2DP profile including the most smartphones, laptops and tablets. Selecting the input source Bluetooth 1 Select the input source DAB with»mode/ Alarm«. Display:»Bluetooth«and»Searching«. Pairing Bluetooth device 1 Activate on the Bluetooth device the Bluetooth function. 2 Start on the Bluetooth device the search function. After a short period of time, your TR 2500 is displayed on the Bluetooth device. 3 Select the TR 2500 on the Bluetooth device and connect it. 4 Once the Bluetooth device is connected to your device, the TR 2500 will display»bluetooth«and»connected«. Note: 7 Although the TR 2500 can only stream audio from one device at a time, it is capable of being paired with up to eight devices. Connecting a paired Bluetooth Device Notes: 7 You will only need to pair your Bluetooth device with the unit one time. 7 The next time your Bluetooth device and the TR 2500 are in range of each other, and the Bluetooth feature is turned on, they will automatically connect. 7 The TR 2500 will only automatically connect to the last Bluetooth Device it was connected to. 7 If your paired device does not automatically Play Audio signal from your Bluetooth device 1 Start playback on the Bluetooth Device. 2 Adjust the volume using» +«. 3 End playback on the Bluetooth Device. Notes: 7 Various functions may also be controlled from the TR Select Playback-Pause using»+5 eii«, press»+5 eii«again to resume playback; select previous title by pressing»r Tuning/Skip«, select next title by pressing»tuning/skip e«. 7 Keep in mind that depending on the used Bluetooth device and the structual conditions the wireless range can be up to 9 m. Disconnect the Bluetooth device 1 Switch off the Bluetooth function at the Bluetooth device or press at the TR 2500»Menu«and confirm with»select/i«. Display changes to:»searching«. Reconnecting the Bluetooth device 1 If you move out of range or turn off the Bluetooth feature on your device, the unit will disconnect from your device. 2 To reconnect, simply access the Bluetooth Manager on your Bluetooth device and select the TR Note: 7 In case of the registered TR 2500 cannot connect to the Bluetooth device again, please remove the TR 2500 from the Bluetooth device list, search and connect again. Automatic shutdown If Bluetooth is selected as input source and no Bluetooth device is connected, the TR 2500 switches automatically to Stand-by mode after 15 minutes. ENGLISH 25
26 TIMER MODE Setting the alarm times and mode Note: 7 You can select the»alarm Setup«menu also by pressing and holding down»mode/alarm«in stand by mode. 1 Press»ON/OFF«to switch on the device. Display: e.g.»b5 akt«. 2 Open the menu with»menu«. 3 Select the option»system«with»r Tuning/ Skip e«and confirm by pressing»select/i«. 4 Select the option»alarm«with»r Tuning/ Skip e«and confirm by pressing»select/i«. Display:»Alarm Setup«flash. 5 Press»Select/i«drücken. Display:»Alarm Wizard«and»Alarm Off«. 6 Activate the alarm stand-by with»r Tuning/ Skip e«(»alarm On«) and confirm by pressing»select/i«. Display:»On time«, the hours flash. 7 Set the hours with»r Tuning/Skip e«and confirm by pressing»select/i«. 8 Set the minutes with»r Tuning/Skip e«and confirm by pressing»select/i«. 9 Select the desired alarm mode (Daily, Once, Weekends or Weekdays) with»r Tuning/ Skip e«. Note: 7 If the alarm is set to Once, select the date (day, month and year) with»r Tuning/Skip e«and confirm by pressing»select/i«. 10 Select alarm (»Buzzer«= signal tone,»dab«= DAB station or»fm«= FM station) with»r Tuning/Skip e«and confirm by pressing»select/i«. Note: 7 If the alarm is set to»dab«or»fm«, then select the desired station (only if stations are stored on presets 1 to 10) by using»r Tuning/Skip e«or select the option»last listened«(the last listened station) and press»select/i«to confirm. 11 Select the alarm volume with»r Tuning/ Skip e«and confirm by pressing»select/i«. Display:»Alarm saved«. 12 Press»Menu«to end the setting. Display:»e«or» «. Interrupting the alarm 1 Press any button except»on/off«while the alarm is sounding. Display:»e«or» «flash. The alarm (signal tone or radio) stops. Note: 7 The alarm will sound again depending on how often a button has been pressed (1 time = after 5 minutes, 2 times = 10 minutes, 3 times = 15 minutes, 4 times = 30 minutes. The total alarm time in 90 minutes. Cancelling alarm stand-by 1 Press»ON/OFF«while the alarm is sounding. Display: the current time and»e«or» «. The alarm (signal tone or radio) stops, but the alarm function remains activated for the next day at the same time. Activating and deactivating the alarm 1 Press»ON/OFF«to switch off the device. 2 Press»»Mode/Alarm««to deactivate the alarm stand-by. Display:»Alarm off«and»e«or» «disappears. The set alarm time is saved 3 Press»Mode/Alarm«to reactivate the alarm stand-by. Display:»Alarm on«and»e«or» «. 26 ENGLISH
Start Here USB *CC * *CC * USB USB
 1 USB Start Here USB 11 USB WARNING: To ensure that the software is installed correctly, do not connect the USB cable until step 11. 11 USB 2 a. b. Lower both the paper tray and the print cartridge door.
ELSEMA 1, 2, 4-Channel 27MHz Transmitter FMT312E, FMT31202E, FMT31204E
 FMT-312E, FMT-31202E, FMT-31204E 12V 1Watt 27MHz Transmitter Features 3 versions available 1-channel (FMT-312E), 2-channel (FMT- 31202E) and 4-channel (FMT-31204E) 1 Watt Transmitter with current consumption
Windlass Control Panel
 SIDE-POWER 86-08955 Windlass Control Panel v1.0.2 Windlass Systems Installasjon manual SLEIPNER MOTOR AS P.O. Box 519 N-1612 Fredrikstad Norway Tel: +47 69 30 00 60 Fax: +47 69 30 00 70 w w w. s i d e
Exercise 1: Phase Splitter DC Operation
 Exercise 1: DC Operation When you have completed this exercise, you will be able to measure dc operating voltages and currents by using a typical transistor phase splitter circuit. You will verify your
Elektronisk termostat med spareprogram. Lysende LCD display øverst på ovnen for enkel betjening.
 Elektronisk termostat med spareprogram. Lysende LCD display øverst på ovnen for enkel betjening. 27.5 LCD Electronic thermostat with program setting. Bright LCD display placed at the top of the heater
HONSEL process monitoring
 6 DMSD has stood for process monitoring in fastening technology for more than 25 years. HONSEL re- rivet processing back in 990. DMSD 2G has been continuously improved and optimised since this time. All
Information search for the research protocol in IIC/IID
 Information search for the research protocol in IIC/IID 1 Medical Library, 2013 Library services for students working with the research protocol and thesis (hovedoppgaven) Open library courses: http://www.ntnu.no/ub/fagside/medisin/medbiblkurs
Unit Relational Algebra 1 1. Relational Algebra 1. Unit 3.3
 Relational Algebra 1 Unit 3.3 Unit 3.3 - Relational Algebra 1 1 Relational Algebra Relational Algebra is : the formal description of how a relational database operates the mathematics which underpin SQL
DAB+ Clock Radio. DAB+ klokkeradio. Art.no Model 18-2914 NE-6200 36-5832 NE-6200 Ver. 20140611. English. Norsk
 DAB+ Clock Radio DAB+ klokkeradio English Norsk Art.no Model 18-2914 NE-6200 36-5832 NE-6200 Ver. 20140611 English DAB+ Clock Radio Art.no 18-2914 Model NE-6200 36-5832 NE-6200 Please read the entire instruction
Institutt for biovitenskap
 Institutt for biovitenskap Oppslag for alle avtrekksskap: Alle avtrekksskap skal ha forklaring på alarmsystem på det enkelte skap. Dette varier fra skap til skap. e.g. på IBV finnes det minst 3 ulike typer.
Wissenstest Minivariante 2
 Wissenstest Minivariante 2 Lernziele Mit Modul 4 können die Schüler noch einmal ihr im Medienführerschein erworbenes Wissen im Überblick testen. Die zusammenfassende Befragung ermöglicht den Lehrerinnen
Brukerveiledning på tysk for Dymista Nesespray, suspensjon 137 mikrogram / 50 mikrogram per spray (azelastinhydroklorid/flutikasonpropionat)
") Brukerveiledning på tysk for Dymista Nesespray, suspensjon 137 mikrogram / 50 mikrogram per spray (azelastinhydroklorid/flutikasonpropionat) BEDIENUNGSANLEITUNG Dymista Nasenspray 137 Mikrogramm/50 Mikrogramm
Brukerveiledning på tysk for Dymista Nesespray, suspensjon 137 mikrogram / 50 mikrogram per spray (azelastinhydroklorid/flutikasonpropionat) BEDIENUNGSANLEITUNG Dymista Nasenspray 137 Mikrogramm/50 Mikrogramm
User Manual. Tiny Audio M6. Please read this user manual carefully before using receiver
 User Manual Tiny Audio M6 Please read this user manual carefully before using receiver LOCATION OF CONTROLS 1. LCD Display Window 4. 3.5mm Antenna Input Socket 2. IR Remote Control Sensor 5. DC socket
TRAININGSPROGRAMME. Sitz und Haltung am Klavier SPIELSTUFE. Alle Übungen können für das Üben zu Hause oder für den Unterricht ausgedruckt werden.
 Alle Übungen können für das Üben zu Hause oder für den Unterricht ausgedruckt werden. Trainingsprogramm Klavierschule, S. Sitz und Haltung am Klavier. Atme tief ein und aus. Sei entspannt. Nun setz dich
KartenSpiel ZahlenMonster: 6
 KartenSpiel ZahlenMonster: 6 Karten mit beidseitigem Druck ausdrucken ausgedruckten Seite folieren Spielkarten ausschneiden ist es, so schnell wie möglich alle Spielkarten zu sammeln, aus der sich die
KartenSpiel ZahlenMonster: 8
 KartenSpiel ZahlenMonster: 8 Karten mit beidseitigem Druck ausdrucken ausgedruckten Seite folieren Spielkarten ausschneiden ist es, so schnell wie möglich alle Spielkarten zu sammeln, aus d4r sich die
RF Power Capacitors Class kV Discs with Moisture Protection
 RF Power Capacitors Class 0-20kV Discs with Moisture Protection T H E C E R A M I C E X P E R T S RF Power Capacitors Class 0-20kV Discs with Moisture Protection The CeramTec Group is a world leader in
Smart High-Side Power Switch BTS730
 PG-DSO20 RoHS compliant (green product) AEC qualified 1 Ω Ω µ Data Sheet 1 V1.0, 2007-12-17 Data Sheet 2 V1.0, 2007-12-17 Ω µ µ Data Sheet 3 V1.0, 2007-12-17 µ µ Data Sheet 4 V1.0, 2007-12-17 Data Sheet
Trådløsnett med Windows Vista. Wireless network with Windows Vista
 Trådløsnett med Windows Vista Wireless network with Windows Vista Mai 2013 Hvordan koble til trådløst nettverk eduroam med Windows Vista? How to connect to the wireless networkeduroam with Windows Vista?
Justeringsanvisninger finnes på de to siste sidene.
 d Montering av popup spredere Justeringsanvisninger finnes på de to siste sidene. Link til monteringsfilm på youtube: http://youtu.be/bjamctz_kx4 Hver spreder har montert på en "svinkobling", det vil si
Trådløsnett med Windows XP. Wireless network with Windows XP
 Trådløsnett med Windows XP Wireless network with Windows XP Mai 2013 Hvordan koble til trådløsnettet eduroam med Windows XP Service Pack 3? How to connect to the wireless network eduroam with Windows XP
INSTRUKSJONER FOR TILBEREDNING OG INJEKSJON AV CIMZIA PÅ TYSK ANWEISUNG ZUR VORBEREITUNG UND VERABREICHUNG EINER INJEKTION VON CIMZIA
 INSTRUKSJONER FOR TILBEREDNING OG INJEKSJON AV CIMZIA PÅ TYSK (certolizumab pegol) ANWEISUNG ZUR VORBEREITUNG UND VERABREICHUNG EINER INJEKTION VON CIMZIA Veiledningen er hentet fra EMA (European Medicines
RF Power Capacitors Class1. 5kV Discs
 RF Power Capacitors Class 5kV Discs T H E C E R A M C E X P E R T S RF Power Capacitors Class 5kV Discs The CeramTec Group is a world leader in the design and manufacture of complex electronic ceramic
Für zwischen und eingestellte Kräfte: Anhang H TVÖD (inkl. 2,00% Leistungsentgelt)
") Für zwischen 01.01.2007 und 31.12.2008 eingestellte Kräfte: Anhang H TVÖD (inkl. 2,00% Leistungsentgelt) nach 1 Jahr nach 3 Jahren nach 6 Jahren nach 10 Jahren nach 15 Jahren 15 65.880,88 72.657,71 75.180,62
Für zwischen 01.01.2007 und 31.12.2008 eingestellte Kräfte: Anhang H TVÖD (inkl. 2,00% Leistungsentgelt) nach 1 Jahr nach 3 Jahren nach 6 Jahren nach 10 Jahren nach 15 Jahren 15 65.880,88 72.657,71 75.180,62
RCJ18 Flush-mounted dimmer for LEDs
 D RCJ18 Flush-mounted dimmer for LEDs Model _ 12-48 V DC RCJ18E5001A01 Technical data Frequency: 868.30 MHz Modulation: FSK Coding: Easywave EasywavePlus Dimming procedure: PWM Voltage supply: 12-48 V
INSTALLATION GUIDE FTR Cargo Rack Regular Ford Transit 130" Wheelbase ( Aluminum )
") INSTALLATION GUIDE 1505-FTR Cargo Rack Regular Ford Transit 130" Wheelbase ( Aluminum ) QUICK START GUIDE Phase 1 - Assembly q 1.1 Setup... q 1.2 Cargo Rack Assembly... 3-4 5-6 Phase 2 - Installation q
INSTALLATION GUIDE 1505-FTR Cargo Rack Regular Ford Transit 130" Wheelbase ( Aluminum ) QUICK START GUIDE Phase 1 - Assembly q 1.1 Setup... q 1.2 Cargo Rack Assembly... 3-4 5-6 Phase 2 - Installation q
User manual English Svenska Norsk
 User manual English Svenska Norsk Copyright This manual is the copyright of CI no 556520-4137. No part of this manual may be revised, copied or transmitted in any way without written permission from CI
RF Power Capacitors Class , 20 & 30 mm Barrel Transmitting Types
 RF Power Capacitors Class 2.7, 20 & 30 mm Barrel Transmitting Types T H E C E R A M I C E X P E R T S RF Power Capacitors Class 2.7, 20 & 30 mm Barrel Transmitting Types The CeramTec Group is a world leader
Bruksanvisning CRL Før du tar i bruk dette produktet, må du lese hele denne bruksanvisningen grundig.
 Bruksanvisning Klokkeradio CRL-330 www.denver-electronics.com Før du tar i bruk dette produktet, må du lese hele denne bruksanvisningen grundig. Produktinformasjon EN NO Correctly set the stand in specially
Diese Anleitung bezieht sich auf FixFoto, V 3.30. In älteren oder neueren Versionen könnte die Arbeitsweise anders sein.
 Beispiele für Seitenlayouts Stand: Februar 2012 Diese Anleitung bezieht sich auf FixFoto, V 3.30. In älteren oder neueren Versionen könnte die Arbeitsweise anders sein. Inhalt Ordner A4... 1 Ordner Collagen...
25 Monate Garantiebedingungen 25 mois conditions de garantie 25 months warranty conditions
 Wireless Transmitter de Bedienungsanleitung en Instructions for use fr Mode d emploi it Istruzioni per l uso nl Gebruiksaanwijzing es Modo de empleo pt Manual de instruções sv Bruksanvisning no Instruksjonsbok
Windows 2000-Scheduler
 Windows 2000-Scheduler Referent: Viktor Witt am 13.06.05 Viktor Witt Proseminar KVBK 1 Überblick Funktionsweise und Begriffe Prioritätsstufen (Welche Prioritäten gibt es? Wie kommen sie zustande?) Threadzustände
LIFESTYLE RoomMate POWERED SPEAKER SYSTEM
 LIFESTYLE RoomMate POWERED SPEAKER SYSTEM Svenska Nederlands Italiano Français Español Deutsch Dansk English SAFETY INFORMATION Please read this owner s guide. Please take the time to follow the instructions
TriCOM XL / L. Energy. Endurance. Performance.
 TriCOM XL / L Energy. Endurance. Performance. L and XL - the new generation Sample charging station with chargers TriCOM L / XL Innovative charging technology The new TriCOM L - XL chargers are controlled
Trigonometric Substitution
 Trigonometric Substitution Alvin Lin Calculus II: August 06 - December 06 Trigonometric Substitution sin 4 (x) cos (x) dx When you have a product of sin and cos of different powers, you have three different
REMOVE CONTENTS FROM BOX. VERIFY ALL PARTS ARE PRESENT READ INSTRUCTIONS CAREFULLY BEFORE STARTING INSTALLATION
 2011-2014 FORD EXPLORER PARTS LIST Qty Part Description Qty Part Description 1 Bull Bar 2 12mm x 35mm Bolt Plates 1 Passenger/Right Mounting Bracket 2 12mm Nut Plate 1 Driver/Left Mounting Bracket 2 12mm
PORTABLE RADIO / REISERADIO
 PORTABLE RADIO / REISERADIO The travelling companion Begleiter auf Reisen Light enough to carry in your rucksack and robust enough to take out into the courtyard. Once you ve washed the car and the lawn
Windows Server 2008 Hyper-V, Windows Server 2008 Server Core Installation Notes
 Windows Server 2008 Hyper-V, Hyper-V Server 2008, and Windows Server 2008 Server Core Installation Notes Installing Dell UPS Management Software on a Hypervisor-Based Server Environment w w w. d e l l.
Slope-Intercept Formula
 LESSON 7 Slope Intercept Formula LESSON 7 Slope-Intercept Formula Here are two new words that describe lines slope and intercept. The slope is given by m (a mountain has slope and starts with m), and intercept
KROPPEN LEDER STRØM. Sett en finger på hvert av kontaktpunktene på modellen. Da får du et lydsignal.
 KROPPEN LEDER STRØM Sett en finger på hvert av kontaktpunktene på modellen. Da får du et lydsignal. Hva forteller dette signalet? Gå flere sammen. Ta hverandre i hendene, og la de to ytterste personene
SkillGuide. Brukerveiledning. Norsk
 SkillGuide Brukerveiledning Norsk SkillGuide SkillGuide er en feedback-enhet som gir tilbakemelding på HLR-kvalitet, både i sanntid og ved en oppsummering i etterkant. www.laerdal.com Hva følger med SkillGuide
TANA L-1 QUICK START GUIDE
 TANA L-1 QUICK START GUIDE EN NO ENGLISH SET UP PROCEDURE: PAIRING THE SPEAKERS To complete this procedure you will need a streamer, for example (TANA SL-1 Speaker & Streamer). Check if the streamer is
PSi Apollo. Technical Presentation
 PSi Apollo Spreader Control & Mapping System Technical Presentation Part 1 System Architecture PSi Apollo System Architecture PSi Customer label On/Off switch Integral SD card reader/writer MENU key Typical
The regulation requires that everyone at NTNU shall have fire drills and fire prevention courses.
 1 The law The regulation requires that everyone at NTNU shall have fire drills and fire prevention courses. 2. 3 Make your self familiar with: Evacuation routes Manual fire alarms Location of fire extinguishers
Vedlegg 2 Dokumentasjon fra TVM leverandør
 (Step 7) Payment selection or date modification state This screen is displayed after validation of a date in the calendar screen. The customer can: - Modify again the date by pressing the Validity begin:
Brukerveiledning. Tiny Audio M6+ Les denne brukerveiledningen nøye før bruk.
 Brukerveiledning Tiny Audio M6+ Les denne brukerveiledningen nøye før bruk. OVERSIKT 1. LCD-skjerm 4. Antenne 2. IR-vindu 5. DC-kontakt 3. Linje ut 6. På/av Fjernkontroll: 1. POWER: Sette radioen i standby-modus.
INSTALLATION GUIDE FTR Cargo Rack Regular Ford Transit 130" Wheelbase ( Aluminum )
") INSTALLATION GUIDE 1505-FTR Cargo Rack Regular Ford Transit 130" Wheelbase ( Aluminum ) QUICK START GUIDE Phase 1 - Assembly q 1.1 Setup... q 1.2 Cargo Rack Assembly... 3-4 5-6 Phase 2 - Installation q
INSTALLATION GUIDE 1505-FTR Cargo Rack Regular Ford Transit 130" Wheelbase ( Aluminum ) QUICK START GUIDE Phase 1 - Assembly q 1.1 Setup... q 1.2 Cargo Rack Assembly... 3-4 5-6 Phase 2 - Installation q
229 SONATA Manual NO_ENG 1.04
 -SONATA 2 SONATA SONATA Informasjon og sikkerhet ADVARSEL -Bruk bare strømforsyning som er godkjent av COMMidt, for bruk sammen med denne enheten. Bruk av andre typer kan oppheve all godkjenning og garanti,
Rom-Linker Software User s Manual
 Rom-Linker Software User s Manual Tel.: +886-2-2274-1347 Fax. +886-2-2273-3014 Http://www.hmt.com.tw e-mail: hmtsales@hmt.com.tw Contents Catalogue Page (1) Rom-Linker Starting Screen... 01 (2) Rom-Linker
UPPLEVA. Design and Quality IKEA of Sweden
 UPPLEVA EN GB FI CN SV DK GR NO Design and Quality IKEA of Sweden ENGLISH 4 DEUTSCH 21 FRANÇAIS 38 NEDERLANDS 55 DANSK 72 ÍSLENSKA 89 NORSK 106 ENGLISH 4 Contents 1 Important...5 Safety and important
Bærbar DAB+/DAB/FM-radio
 Bærbar DAB+/DAB/FM-radio Modell nr. DAB14 1 SIKKERHETSFORANSTALTNINGER Advarsel: For å unngå skader som kan føre til brann eller elektrisk støt, må apparatet ikke eksponeres for regn eller fuktighet. FORSIKTIG
User Guide
 User Guide Micro USB port Back up new data Restore previously backed up data More settings Enable or disable a SIM card Select 4G/3G SIM Select default SIM for data services Configure SIM
SERVICE BULLETINE 2008-4
 S e r v i c e b u l l e t i n e M a t e r i e l l Materiellsjef F/NLF kommuniserer påminnelse omkring forhold som ansees som vesentlige for å orientere om viktige materiellforhold. Målgruppen for Servicbulletinen
SHORE POWER CONVERTER LIST 2018
 2018 POWER AT YOUR CONTROL Shore cord capacities These tables provide a approximate indication of the amount of kva capacity of different amperage shore cords at common worldwide voltages. Use these tables
LCD TV. user manual. imagine the possibilities.
 Contact SAMSUNG WORLDWIDE If you have any questions or comments relating to Samsung products, please contact the SAMSUNG customer care centre. Country Customer Care Centre Web Site AUSTRIA 0800-SAMSUNG
Unterrichtsphase Das Quartett eignet sich sowohl zur Einübung als auch zur Wiederholung der Ordnungszahlen.
 Quartett Berømte nordmenn Lernziel Einübung der Ordnungszahlen Wiederholung Satzstellung Vorbereitungen Sie benötigen einen Satz Spielkarten für 4 Spieler bei Gruppen von 3 Spielern werden nur 24 Karten
TABLE RADIO TR 2200 DAB+ DE EN FR DA SV FI NO
 TABLE RADIO TR 2200 DAB+ DE EN FR DA SV FI NO -----------------------------------------------------------------------------------------------------------------------------------------------------------------------------
Norsk. Tiny Audio C11+ DAB+ adapter med display for skjult montering. Brukerveiledning. Vennligst les nøye før produktet tas i bruk
 Norsk Tiny Audio C11+ DAB+ adapter med display for skjult montering. Brukerveiledning Vennligst les nøye før produktet tas i bruk 1 Sikkerhetsinstrukser Utsett ikke radioen for regn eller fuktighet. Følg
TB-615 / TB-617 Wireless slim keyboard. EN User guide SE Användarhandledning FI Käyttöohje DK Brugervejledning NO Bruksanvisning
 TB-615 / TB-617 Wireless slim keyboard EN User guide SE Användarhandledning FI Käyttöohje DK Brugervejledning NO Bruksanvisning EN User guide You have bought a wireless keyboard to use with Windows XP,
EMS 1. Music Streamer. Owner's Manual
 EMS 1 Music Streamer Owner's Manual EN N 2 ENG About the EMS 1 Electrocompaniet Music Streamer This unit is designed to work with the Electrocompaniet PD 1 DAC only. A radio link is established between
Replacing the batteries
 ASSEMBLY INSTRUCTION Replacing the batteries EN NO 9010189A 5.2.14 9010189 Replacing the batteries Preparation Switch off the wheelchair via the remote control. Remove the fuses from the battery compartment
User Guide. Parrot MKi9200. English. Parrot MKi9200 User guide 1
 User Guide Parrot MKi9200 English Parrot MKi9200 User guide 1 Content Content... 2 Introduction... 4 Installing the Parrot MKi9200... 5 Using the Parrot MKi9200 for the 1st time...10 Using the Voice Recognition
KH N Bruksanvisning. D Bedienungsanleitung
 KH 2244 N Bruksanvisning D Bedienungsanleitung Kompernaß Handelsgesellschaft mbh Burgstraße 21 D 44867 Bochum Deutschland/Germany www.kompernass.com KH 2244 No/De v.1.1 10-27-2004 Indeks 1. Sikkerhetshenvisninger...
TriCOM XL / L. Energie. Ausdauer. Leistung.
 TriCOM XL / L Energie. Ausdauer. Leistung. L und XL - die neue Generation Beispiel-Ladestation mit Ladegeräten TriCOM L / XL Innovative Ladetechnik Die neuen Ladegeräte TriCOM L - XL werden von einer hochmodernen
DC/AC inverters DC/AC invertere
 DC/AC inverters DC/AC invertere Mascot range of DC/AC inverters Using a 12V or 24V battery, these inverters are ideal for applications such TV, video, smaller household appliances, and tools for camping,
GLOBALCOMSERVER HP 9100C DIGITAL SENDER GATEWAY ADMINISTRATOR S GUIDE 1998 AVM INFORMATIQUE (UPDATED: AUGUST 22, 2006)
") PAGE 1 / 13 GLOBALCOMSERVER HP 9100C DIGITAL SENDER GATEWAY ADMINISTRATOR S GUIDE 1998 AVM INFORMATIQUE (UPDATED: AUGUST 22, 2006) PAGE 2 / 13 LICENSE LICENSE Information in this document is subject to
PAGE 1 / 13 GLOBALCOMSERVER HP 9100C DIGITAL SENDER GATEWAY ADMINISTRATOR S GUIDE 1998 AVM INFORMATIQUE (UPDATED: AUGUST 22, 2006) PAGE 2 / 13 LICENSE LICENSE Information in this document is subject to
 TROPIC 2000 TROPIC 2000 TROPIC 2000 Functions: The device can be operated in three different modes: 1. Thermostatically controlled heating whereby the system and the fan are controlled by the thermostat
FIRST LEGO League. Härnösand 2012
 FIRST LEGO League Härnösand 2012 Presentasjon av laget IES Dragons Vi kommer fra Härnosänd Snittalderen på våre deltakere er 11 år Laget består av 4 jenter og 4 gutter. Vi representerer IES i Sundsvall
Software applications developed for the maritime service at the Danish Meteorological Institute
 Software applications developed for the maritime service at the Danish Meteorological Institute Anne Marie Munk Jørgensen (ammj@dmi.dk), Ove Kjær, Knud E. Christensen & Morten L. Mortensen Danish Meteorological
VELKOMMEN INN I DITT NYE TV-UNIVERS. Foto: Jens Haugen / ANTI
 VELKOMMEN INN I DITT NYE TV-UNIVERS Foto: Jens Haugen / ANTI I esken / In the box 1 Huawei Q22 tv-dekoder / Huawei Q22 STB 2 3 4 HDMI 2.0-kabel / HDMI 2.0 cable Nettverkskabel / Ethernet cable Strømforsyning
manual Plexgear L14 Item: Plexgear
 manual Plexgear L14 Item: 61647-61649 EN NO SV Plexgear ENGLISH 3 4 5 2 1 1. On/off switch 2. Battery hatch 3. Left button Specifications Compatible: Windows and Mac Connection: Wireless Range: Up to 8
Norsk (English below): Guide til anbefalt måte å printe gjennom plotter (Akropolis)
: Guide til anbefalt måte å printe gjennom plotter (Akropolis)") Norsk (English below): Guide til anbefalt måte å printe gjennom plotter (Akropolis) 1. Gå til print i dokumentet deres (Det anbefales å bruke InDesign til forberedning for print) 2. Velg deretter print
Norsk (English below): Guide til anbefalt måte å printe gjennom plotter (Akropolis) 1. Gå til print i dokumentet deres (Det anbefales å bruke InDesign til forberedning for print) 2. Velg deretter print
English TINY AUDIO C3+ With Service Following. Please read carefully before using this product. Side 1
 English TINY AUDIO C3+ With Service Following Please read carefully before using this product Side 1 Safety Instructions: 1. Do not use this radio near water. 2. Clean with dry cloth. 3. Do not block any
Brukerveiledning // User Manual
 Brukerveiledning // User Manual DAB+/FM Radio Innhold Eskens innhold P.3 P.4 Volumkontroll / Endre Stasjon (DAB) / Endre Stasjon (FM) P.5 Meny / Sildeshow P.6 P.7 Innsovning P.8 P.9 P.10 P.11 Tid/Dato
Administrasjon av postnummersystemet i Norge Post code administration in Norway. Frode Wold, Norway Post Nordic Address Forum, Iceland 5-6.
 Administrasjon av postnummersystemet i Norge Frode Wold, Norway Post Nordic Address Forum, Iceland 5-6. may 2015 Postnumrene i Norge ble opprettet 18.3.1968 The postal codes in Norway was established in
Hvordan føre reiseregninger i Unit4 Business World Forfatter:
 Hvordan føre reiseregninger i Unit4 Business World Forfatter: dag.syversen@unit4.com Denne e-guiden beskriver hvordan du registrerer en reiseregning med ulike typer utlegg. 1. Introduksjon 2. Åpne vinduet
Du kan bruke det vedlagte skjemaet Egenerklæring skattemessig bosted 2012 når du søker om frikort.
 Skatteetaten Saksbehandler Deres dato Vår dato 28.10.2011 Telefon Deres Vår referanse For information in English see page 3 Skattekort for 2012 Du fikk helt eller delvis skattefritak ved likningen for
RF Power Capacitors Class1 5kV Discs
 RF Power Capacitors Class 5kV Discs Morgan Advanced Materials is a world leader in the design and manufacture of complex electronic ceramic components and assemblies used in a wide range of applications
Product Facts. Product code example
 ESAM Smoke control damper for multi Rectangular smoke control damper ESAM is specifically designed for use in multi fire compartment applications as a closing or as an opening damper for smoke extract
Elektronisk innlevering/electronic solution for submission:
 VIKINGTIDSMUSEET Plan- og designkonkurranse/design competition Elektronisk innlevering/electronic solution for submission: Det benyttes en egen elektronisk løsning for innlevering (Byggeweb Anbud). Dette
RF Power Capacitors Class kV Discs
 RF Power Capacitors Class 0-5kV Discs Morgan Advanced Materials is a world leader in the design and manufacture of complex electronic ceramic components and assemblies used in a wide range of applications
D Mobiler MP3/CD-Player KH 2339 Bedienungsanleitung
 c D Mobiler MP3/CD-Player KH 2339 Bedienungsanleitung KOMPERNASS GMBH BURGSTRASSE 21 D-44867 BOCHUM www.kompernass.com ID-Nr.: KH 2339-05/07-V2 KH 2339 3$ 4! 4) 3( 3% 3^ 3& 3) 2( 2*2&2^ 2% 2$ 2# 2@ 2!
Fuktighet og vann Ikke la radioen stå i lave temperaturer der fuktighet kan dannes inne i produktet, noe som kan skade kretskortet.
 Bruksanvisning TM Innhold Sikkerhetsinformasjon 3 Bli kjent med ditt POPadapter 6 9 DAB-radiomodus 9 FM-modus 15 AUX-modus 20 Annen informasjon 30 Produktstøtte 31 Garanti 33 Sikkerhetsinformasjon Strømkilde
User Guide. Parrot MKi9000. English. Parrot MKi9000 User guide 1
 User Guide Parrot MKi9000 English Parrot MKi9000 User guide 1 Content Content... 2 Introduction... 4 Installing the Parrot MKi9000... 5 Using the PARROT MKi9000 for the 1st time... 9 Using the voice recognition
Midnight BBQ Light USER MANUAL
 Midnight BBQ Light USER MANUAL Instructions The Midnight BBQ Light uses 4 x LR44 / AG13 batteries, included in the package. Unscrew the bottom cover and insert the included batteries and align the battery
Dagens tema: Eksempel Klisjéer (mønstre) Tommelfingerregler
 Tommelfingerregler") UNIVERSITETET I OSLO INF1300 Introduksjon til databaser Dagens tema: Eksempel Klisjéer (mønstre) Tommelfingerregler Institutt for informatikk Dumitru Roman 1 Eksempel (1) 1. The system shall give an overview
UNIVERSITETET I OSLO INF1300 Introduksjon til databaser Dagens tema: Eksempel Klisjéer (mønstre) Tommelfingerregler Institutt for informatikk Dumitru Roman 1 Eksempel (1) 1. The system shall give an overview
Wonderland 904. Regulerbar seng Electrical adjustable bed. my bed - my wonderland
 Wonderland 904 Regulerbar seng Electrical adjustable bed my bed - my wonderland Lykke til med valget av ditt nye Wonderland produkt. Wonderland produserer individuelt tilpassede sengeløsninger med unike
Monitoring water sources.
 Monitoring water sources. Generell Informasjon Versjon 2 Url http://com.mercell.com/permalink/38336681.aspx Ekstern anbuds ID 223314-2013 Konkurranse type: Tildeling Dokument type Kontraktstildeling Prosedyre
AC10. Brukermanual Brugsanvisning Bruksanvisning User Manual. Spenningsdetektor Voltage Detector. English Norsk
 Spenningsdetektor Voltage Detector Brukermanual Brugsanvisning Bruksanvisning User Manual English Norsk ELIT AS - 2010 Innhold: 1. Generelle applikasjoner. 2. Beskrivelse av instrumentet. 3. Sikkerhetsinformasjon
ID-Nr.: KH /06-V2
 KOMPERNASS GMBH BURGSTRASSE 21 D-44867 BOCHUM www.kompernass.com ID-Nr.: KH3229-09/06-V2 D Maßband mit Markierungslaser KH 3229 Bedienungsanleitung N Målebånd med markeringslaser KH3229 Bruksanvisning
KH2027_2028_IB_UK_V :44 Uhr Seite 1
 KH2027_2028_IB_UK_V6 20.02.2006 9:44 Uhr Seite 1 KH2027_2028_IB_UK_V6 20.02.2006 9:44 Uhr Seite 2 UK Kompernaß GmbH Burgstraße 21 D-44867 Bochum www.kompernass.com ID Nr.: KH2027/2028-0206/V6 KH2027_2028_IB_UK_V6
Hybrid Cloud and Datacenter Monitoring with Operations Management Suite (OMS)
") Hybrid Cloud and Datacenter Monitoring with Operations Management Suite (OMS) Varighet: 5 Days Kurskode: M10996 Version: A Opplæringsmetoder: Virtuell opplæring Beskrivelse: This five-day course will provide
Hybrid Cloud and Datacenter Monitoring with Operations Management Suite (OMS) Varighet: 5 Days Kurskode: M10996 Version: A Opplæringsmetoder: Virtuell opplæring Beskrivelse: This five-day course will provide
Endelig ikke-røyker for Kvinner! (Norwegian Edition)
") Endelig ikke-røyker for Kvinner! (Norwegian Edition) Allen Carr Click here if your download doesn"t start automatically Endelig ikke-røyker for Kvinner! (Norwegian Edition) Allen Carr Endelig ikke-røyker
Endelig ikke-røyker for Kvinner! (Norwegian Edition) Allen Carr Click here if your download doesn"t start automatically Endelig ikke-røyker for Kvinner! (Norwegian Edition) Allen Carr Endelig ikke-røyker
Norsk TINY AUDIO C3+ Les veiledningen nøye før produktet tas i bruk. Side 1
 Norsk TINY AUDIO C3+ Les veiledningen nøye før produktet tas i bruk Side 1 Sikkerhetsinstruksjoner: 1. Ikke bruk radioen i nærheten av vann. 2. Rengjør med tørr klut. 3. Ikke blokker ventilasjonsåpninger.
Hegel H4A High End Power Amplifier
 Hegel H4A High End Power Amplifier www.hegel.com info@hegel.com Bruksanvisning Gratulerer med ditt nye Hegel produkt! Våre produkter er basert på en enkel filosofi: Komponentene skal reprodusere det originale
Blackwire 215/225. Analogt hodesett med ledning. Brukerhåndbok
 Blackwire 215/225 Analogt hodesett med ledning Brukerhåndbok Innhold Velkommen 3 Trenger du mer hjelp? 3 Hva er det i esken 4 Integrerte kontroller 5 Bruke hodesettet 6 Justere hodebøylen 6 Plassere mikrofonbøylen
Søker du ikke om nytt frikort, vil du bli trukket 15 prosent av din pensjonsutbetaling fra og med januar 2014.
 Skatteetaten Saksbehandler Deres dato Vår dato 31.10.2013 Telefon Deres referanse Vår referanse For information in English see page 3 Skattekort for 2014 Du fikk helt eller delvis skattefritak ved likningen
DAB1380 Bærbar CD/MP3/USB DAB & PLL FM Radio. Bruksanvisning. Forhåndsregler for sikkerhet
 Forhåndsregler for sikkerhet DAB1380 Bærbar CD/MP3/USB DAB & PLL FM Radio Bruksanvisning Vennligst les alle instruksjoner nøye før du tar i bruk enheten og oppbevar dem for fremtidig referanse. Ta vare
NEWSLETTER 7/10
 NEWSLETTER 7/10 NEWSLETTER 7/10 NEWSLETTER 7/10 NEWSLETTER 7/10 FAZ, 13.11.2010 Auswärtiges Amt - Staatsministerin Pieper: Im nächsten Jahr acht Millionen zusätzlich für die Spracharbeit des Goethe-Instituts