HD7872, HD7870 User manual Brugervejledning Benutzerhandbuch Mode d emploi Gebruiksaanwijzing Brukerhåndbok
|
|
|
- Eskil Gunnar Paulsen
- 8 år siden
- Visninger:
Transkript
1 HD7872, HD7870 User manual Brugervejledning Benutzerhandbuch Mode d emploi Gebruiksaanwijzing Brukerhåndbok For more support go to:

2

3
4

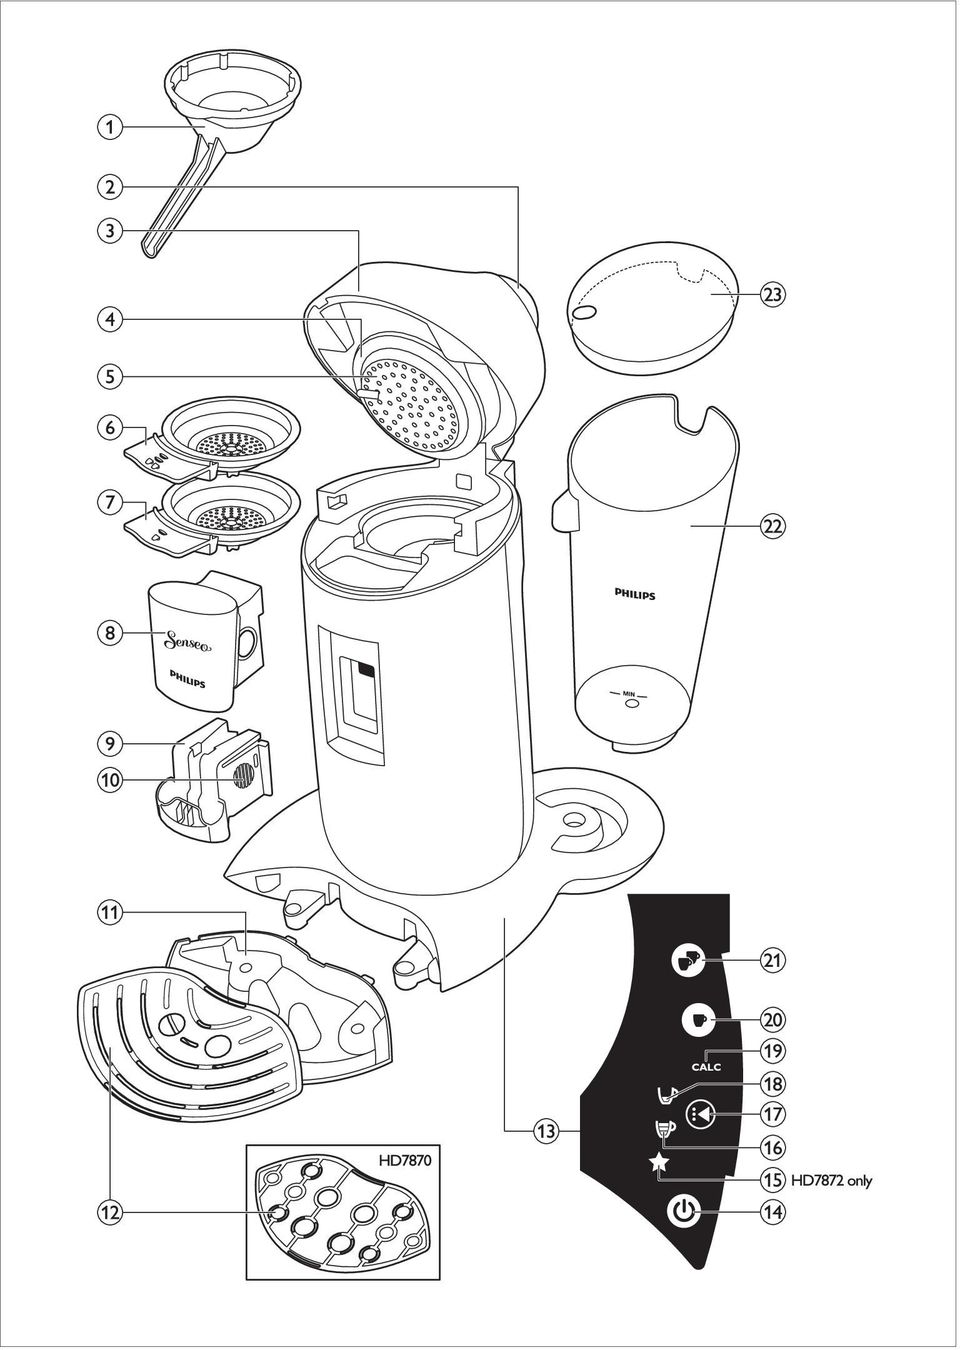
5 Table of contents 1 Introduction 5 2 General description 5 3 Important 6 4 Flushing the machine before first use 6 5 Brewing SENSEO coffee 9 6 Cleaning 13 7 Descaling 14 8 Frost-free storage 17 9 Ordering accessories Environment Guarantee and service Troubleshooting 18 1 Introduction Congratulations on your purchase and welcome to Philips! To fully benefit from the support that Philips offers, register your product at SENSEO coffee system Make your coffee moments truly special with SENSEO. This unique system combines the easy-to-use Philips SENSEO coffee machine with the specially developed Douwe Egberts SENSEO coffee pods, giving you a full, smooth coffee with a delicious foam layer. Douwe Egberts coffee in convenient SENSEO coffee pods and Philips unique new SENSEO brewing system are perfectly matched to ensure that the best taste and aroma are extracted from the coffee. Discover all SENSEO coffee blends at To ensure a smooth and full coffee taste, you should keep the following things in mind: Fresh coffee pods Use the SENSEO coffee pods that have been specially developed by Douwe Egberts for your SENSEO coffee machine for a full, round taste. Douwe Egberts SENSEO coffee pods stay fresh longer if you store them in an airtight storage container. Fresh water Use fresh water every day. If you have not used the coffee machine for one day, you have to flush it with fresh water before you use it again (see chapter Brewing SENSEO coffee, section Flushing the machine after a day of non-use ). 2 General description (Fig. 1) 1 Coffee collector 2 Lid lever 3 Lid with brewing chamber 4 Sealing ring 5 Water distribution disc 6 2-cup pod holder qq 7 1-cup pod holder q 8 Coffee spout cover 9 Coffee spout 10 Spout release buttons 11 Removable drip tray 12 Cup tray 13 Touch panel 14 On/off button 15 Personal coffee memory symbol (HD7872 only) 16 Regular coffee symbol 17 Selection button 18 Strong coffee symbol 19 CALC light 20 1-cup button q 21 2-cup button qq 22 Water reservoir 23 Water reservoir lid 5 English

6 3 Important Read this user manual carefully before you use the machine and save it for future reference. Danger Never immerse the machine in water or any other liquid. Warning Check if the voltage indicated on the bottom of the machine corresponds to the local mains voltage before you connect the machine. This machine is not intended for use by persons (including children) with reduced physical, sensory or mental capabilities, or lack of experience and knowledge, unless they have been given supervision or instruction concerning use of the machine by a person responsible for their safety. Children should be supervised to ensure that they do not play with the machine. Do not use the machine if the plug, the mains cord or the machine itself is damaged. If the mains cord is damaged, you must have it replaced by Philips, a service centre authorised by Philips or similarly qualified persons in order to avoid a hazard. Caution After unpacking the machine, never put your SENSEO machine on its side. Always keep it in upright position, also during transport. Always return the machine to a service centre authorised by Philips for examination or repair. Do not attempt to repair the machine yourself, otherwise your guarantee becomes invalid. Do not use the machine in combination with a transformer, as this could cause hazardous situations. Always put the machine on a flat and stable surface. Do not use the machine at altitudes higher than 2200 metres above sea level. Never pour milk, coffee, hot water or carbonated water into the water reservoir. Never flush the machine or let it brew coffee when the spout is not in place. This machine is intended for normal household use only. It is not intended for use in environments such as staff kitchens of shops, offices, farms or other work environments. Nor is it intended to be used by clients in hotels, motels, bed and breakfasts and other residential environments. 3.1 Compliance with standards This machine complies with all standards regarding electromagnetic fields (EMF). If handled properly and according to the instructions in this user manual, the machine is safe to use based on scientific evidence available today. The energy consumption of this machine in off mode is less than 1 watt. This means that this machine complies with European Directive 2009/125/EC, which sets the ecological design requirements for energy-using products. 4 Flushing the machine before first use It is important that you flush your SENSEO coffee machine before first use. After the flushing cycle (which only takes approx. 2 minutes), the machine is ready for brewing SENSEO coffee. C Caution: Never interrupt the flushing cycle halfway. If you do, the boiler does not fill itself properly. 1 Attach the spout to the machine. Grab the two ridges of the inner part of the spout and squeeze them lightly (1). Place the spout on the machine and release the two ridges (2). 6

7 C Caution: Never flush the machine or let it brew coffee when the spout is not in place. 2 Tilt the top of the water reservoir backwards (1) and lift the water reservoir off the machine (2). 5 Tilt the water reservoir and place the bottom back onto the machine (1). Then press the top of the water reservoir towards the machine (2). English 6 Remove the drip tray. 3 Fill the water reservoir to the top with cold tap water. 7 Place a bowl with a capacity of at least 1.5 litres under the coffee spout. 4 Place the lid on the water reservoir before you put the water reservoir back onto the machine. 1.5L 8 Make sure a pod holder, without pod or pods, is in place. 7

8 9 Put the plug in an earthed wall socket. 10 Press the on/off button 3. The button lights up to indicate that you have to flush the machine. When all the water in the water reservoir has been used up, the flushing cycle is finished and the machine switches off. 11 To start flushing, press the 1-cup button q and the 2-cup button qq briefly at the same time. 12 Fill the water reservoir with fresh tap water, put the lid on it and place it back onto the machine. The on/off button starts flashing to indicate that the flushing cycle has started. During the flushing cycle, the boiler fills itself with water from the water reservoir and cold water comes out of the coffee spout. During the flushing cycle, the machine produces more noise than during a regular brewing cycle. Your SENSEO machine is now ready for use so that you can brew your first cup of delicious coffee. 8

9 5 Brewing SENSEO coffee While the SENSEO coffee machine is heating up, you can select the coffee strength you prefer and the number of cups you want to brew. The machine then brews the cup or cups immediately after it has heated up. 1 Make sure that the water reservoir is filled with fresh cold tap water beyond the MIN level and that the lid is on the water reservoir. 4 Pull the lid lever upwards to open the lid. The lid opens automatically. 5 If you want to make one cup of SENSEO coffee, place the 1-cup pod holder q in the machine (1). If you want to make two cups, put the 2-cup pod holder qq in the machine (2). Make sure the pod holder is clean. English E Tip: Use fresh water every day. 2 Put the plug in an earthed wall socket. 3 Press the on/off button 3. The on/off button flashes slowly while the water heats up. 6 Place 1 coffee pod in the 1-cup pod holder q (1) or place 2 coffee pods in the 2-cup pod holder qq (2). Place the pod or pods properly in the centre of the pod holder, with the convex side pointing downwards. Press the pod or pods lightly into the pod holder. D Note: If the on/off button flashes rapidly, the water reservoir does not contain enough water for brewing one cup of coffee. 9
.")
10 D Note: Make sure the coffee in the pod or pods is evenly distributed. C Caution: Never put normal ground coffee or use torn pods in the SENSEO machine, as this causes it to become blocked. 7 Close the lid (1) and lock the lever (2). 9 Press the selection button to select the desired coffee strength. Select the cup symbol with three bars for a regular cup of coffee (125ml) (1). Select the cup symbol with one bar for a strong cup of coffee (60ml) (2). B Warning: Make sure the lid is closed properly and the lid lever is locked before you start brewing coffee. 8 Place one cup or two cups under the spout openings. You can adjust the height of the coffee spout by sliding it upwards or downwards. You can also remove the drip tray to be able to place higher cups. 10 When you have selected the desired coffee strength, press the 1-cup button q for one cup (1) or press the 2-cup button qq for two cups (2). 11 When the water has heated up and the on/ off button lights up continuously, the machine starts brewing coffee. D Note The cups you use should have a capacity of at least 150ml when you brew regular coffee or 100ml when you brew strong coffee. Do not use cups that are too large, as they cause the coffee to get cold more quickly. E Tip: You can interrupt the brewing cycle at any time. To do this, press the same cup button (1- cup button or 2-cup button) that you pressed to start brewing coffee. However, if you do this, the machine does not complete the interrupted brewing cycle if you switch it on again or press the same cup button again. D Note: Do not remove the water reservoir during a brewing cycle. 10

11 12 When the coffee is ready, remove the used coffee pod or pods. Simply lift the pod holder out of the machine and empty it. C Caution: There may still be some hot water/coffee on the coffee pod or pods. 13 After use, press the on/off button 3 to switch off the machine. 2 To enter the programming mode, first select the personal coffee memory symbol (star symbol) with the selection button (1). Keep the selection button pressed for 2 seconds until the star symbol starts flashing (2) and you hear a beep. Then release the selection button. English D Note: If you do not use the machine, it switches off automatically after 15 minutes to save energy. 5.1 Personal coffee memory (HD7872 only) You can program the machine to brew the amount of coffee you prefer (up to 145ml). Simply experiment and find out what you like best. We advise you to brew at least 60ml for optimal taste and temperature. While programming, you can only use the 1-cup button. When you have completed the programming process, you will be able to brew one or two cups with the programmed amount of coffee. D Note: It is not possible to program your personal coffee memory while the machine is heating up. Wait until the on/off button lights up continuously. 1 Place 1 coffee pod in the 1-cup pod holder and place 1 cup under the spout openings. 3 Press the 1-cup button to make the coffee flow into the cup (1). When the cup contains the amount of coffee you prefer, press the 1-cup button again (2). Your preferred amount of coffee has been set. From now on, your SENSEO machine brews one or two cups with this amount of coffee when you select the personal coffee memory symbol with the selection button. D Note: If you want to change the set amount of coffee, simply perform steps 1-3 again. 11
 and you hear a beep. Then release the selection button.")
12 5.2 Flushing the machine after a day of non-use If you have not used the coffee machine for one day, flush it to make sure that the boiler is filled with fresh water. To flush the machine, brew two cups of hot water in the following way: 1 Fill the water reservoir with cold tap water beyond the MIN level (1). Put the lid on it (2) and put it the water reservoir back onto the machine. 5 Press the on/off button 3. The on/off button flashes slowly while the water heats up. 6 Make sure that the coffee strength you have selected is regular coffee (cup symbol with three bars). 7 Press the 2-cup button qq to brew two cups of hot water. 2 Put the 1-cup pod holder q or the 2-cup pod holder qq in the machine without pods. 8 When the water has heated up, the on/off button lights up continuously and the coffee machine starts operating. 9 Throw away the water in the cups. Now the machine is ready for use again. 3 Close the lid and lock the lever. 4 Put two cups or a large mug under the coffee spout to collect the water. 12
. 7 Press the 2-cup button qq to brew two cups of hot water.")
13 6 Cleaning Regular cleaning of your SENSEO is important to ensure that the SENSEO coffee always tastes optimally and to optimise the lifetime of the coffee machine. B Warning: Never immerse the SENSEO coffee machine in water. 1 Always unplug the machine before you clean it. 2 Clean the outside of the machine with a moist cloth. 3 Remove the coffee collector. 5 To disassemble the coffee spout, grab the two ridges of the inner part of the spout and squeeze them lightly (1). Move the inner part downwards to remove it from the outer part of the spout (2). 6 Clean the water reservoir and its lid, the coffee spout, the coffee collector, the drip tray, the cup tray and the pod holders in hot water or in the dishwasher. English 4 To remove the coffee spout, press the release buttons (1) and pull the coffee spout off the machine (2). C Caution: Be careful not to damage the valve in the bottom of the water reservoir if you use a washing-up brush to clean the water reservoir. D Note: Check if the sieve in the centre of the pod holder is clogged. If this is the case, unclog the sieve by rinsing the pod holder under the tap. If necessary, use a washing-up brush to clean the sieve 13

14 7 Clean the water distribution disc and the rubber sealing ring with a moist cloth. When to descale Descale the SENSEO coffee machine as described below when the CALC light goes on (after you have brewed approx. 400 cups of SENSEO coffee). C Caution: Do not remove the rubber sealing ring and be careful not to damage the tab on the water distribution disc. 8 Clean the water inlet on the machine with a moist cloth. 7 Descaling Scale builds up inside the machine during use. It is essential to descale the SENSEO coffee machine when the CALC light goes on. Use SENSEO Descaler (HD7012, HD7011, HD7006) only. Why to descale Your reasons to descale: It prolongs the life of your SENSEO coffee machine It ensures maximum cup volume It ensures maximum coffee temperature The machine produces less sound during brewing It prevents malfunctioning If the descaling procedure is not performed correctly, scale residue remains behind in the machine. This causes scale to build up more quickly and may cause permanent and irreparable damage to the machine. Use the correct descaling agent Use SENSEO Descaler (HD7012, HD7011, HD7006) only. It has been developed to ensure better machine performance and operation. Each descaling mixture can be used only once. For more information about this descaler, visit our website B Warning: Never use a descaling agent based on mineral acids such as sulphuric acid, hydrochloric acid, sulphamic acid and acetic acid (e.g. vinegar). These descaling agents may damage your SENSEO coffee machine Descaling procedure The descaling procedure consists of a descaling cycle and two flushing cycles. Do not interrupt the descaling cycle and do not switch off the machine before you have performed the two flushing cycles.
 only.")
15 1 Mix 50 grams of citric acid with 1 litre of water in a measuring jug. Stir until the powder has dissolved. Fill the water reservoir with the descaling mixture. 4 Place the 1-cup pod holder q with a used coffee pod in it in the coffee machine. Close the lid and make sure it is properly locked. English 2 Tilt the water reservoir and place the bottom back onto the machine (1). Then press the top of the water reservoir towards the machine (2). D Note: Always put a used coffee pod in the pod holder when you descale the machine. This pod serves as a filter to prevent the sieve or hole in the pod holder from getting clogged with scale residue. B Warning: Make sure the lid is closed properly and the lid lever is locked before you start descaling. 5 Remove the drip tray. 3 Press the on/off button 3. The on/off button flashes slowly while the water heats up. The machine is ready for descaling when the on/ off button lights up continuously. 6 Put a bowl with a capacity of at least 1.5 litres under the spout to collect the descaling mixture. 1.5L 15

16 7 When the on/off button lights up continuously, press the 1-cup button q and the 2-cup button qq at the same time for 3 seconds until you hear a beep. Release the buttons as soon as their lights as well as the selected strength go out. This means that the descaling procedure has been activated correctly. D Notes: Do not refill the water reservoir with used hot water or the used descaling mixture. 2 Tilt the water reservoir and place the bottom back onto the machine (1). Then press the top of the water reservoir towards the machine (2). The CALC light and the on/off button start flashing to indicate that the descaling cycle is in progress. During the descaling cycle, the water comes out of the machine in intervals. When all the water in the water reservoir has been used up, the descaling cycle is finished. The on/off button starts to flash rapidly. D Note: If you press the 1-cup and 2-cup button longer than 3 seconds, the machine does not start the descaling cycle. If this happens, press the 1-cup button and the 2-cup button at the same time for 3 seconds again. 3 Place the 1-cup pod holder q with a used coffee pod in it in the coffee machine. Close the lid and make sure it is properly locked. 4 Put a bowl with a capacity of at least 1.5 litres under the spout to collect the water. 7.2 Flushing after descaling 1 Rinse the water reservoir under the tap and then fill it to the top with fresh tap water. 1.5L 16
. The CALC light and the on/off button start flashing to indicate that the descaling cycle is in progress.")
17 5 Press the 1-cup button q and the 2-cup button qq at the same time for 3 seconds until you hear a beep to start the flushing cycle. 10 Environment Do not throw away the machine with the normal household waste at the end of its life, but hand it in at an official collection point for recycling. By doing this, you help to preserve the environment. English 6 Remove the used pod and clean the pod holder after the flushing cycle to prevent the sieve in the centre from getting clogged. 7 Repeat steps 1 to 6 once more to ensure a clean machine. 8 After the descaling cycle and the flushing cycles, the CALC light goes out and the machine switches off automatically. 8 Frost-free storage After you have flushed the machine for the first time (see chapter Flushing the machine before first use ), it may only be used and stored in a frost-free place to prevent damage. 9 Ordering accessories To purchase accessories for this machine, please visit our online shop at If the online shop is not available in your country, go to your Philips dealer or a Philips service centre. If you have any difficulties obtaining accessories for your machine, please contact the Philips Consumer Care Centre in your country. You find its contact details in the worldwide guarantee leaflet. 11 Guarantee and service If you need service or information or if you have a problem, please visit the Philips website at or contact the Philips Consumer Care Centre in your country. You find its phone number in the worldwide guarantee leaflet. If there is no Consumer Care Centre in your country, go to your local Philips dealer. The purchase of the Philips SENSEO coffee machine does not exhaust any of the rights of Sara Lee/Douwe Egberts or Philips under any of their patents nor does it confer upon the purchaser a licence under these patents. Always return the machine to a service centre authorised by Philips for examination or repair. Do not attempt to repair the machine yourself, otherwise your guarantee becomes invalid. 17

18 12 Troubleshooting 12.1 SENSEO coffee machine This chapter summarises the most common problems you could encounter with the machine. If you are unable to solve the problem with the information below, visit for a list of frequently asked questions or contact the Consumer Care Centre in your country. Problem My cup overflowed when I used the machine for the first time. Water continued to flow from the spout when I used the machine for the first time. The on/off button flashes slowly. The CALC light flashes. Solution You probably tried to brew a cup of coffee without flushing the machine first. Before you start brewing coffee, you have to flush the machine. When you switch on the machine again, the on/off button either lights up continuously or flashes slowly or rapidly. If the on/off button lights up continuously, you have to carry out the flushing procedure (see chapter Flushing the machine before first use ). If the on/off button flashes slowly or rapidly, you do NOT have to carry out the flushing procedure. If the on/off button flashes slowly, the water is heating up. If it flashes rapidly, there is not enough water in the water reservoir or the water reservoir is not placed on the machine properly. If water continued to flow from the spout until the water reservoir was empty, the machine was performing the flushing cycle. Before you start brewing coffee, you have to flush the machine. When you switch on the machine again, the on/off button either lights up continuously or flashes slowly or rapidly. If the on/off button lights up continuously, you have to carry out the flushing procedure (see chapter Flushing the machine before first use ). If the on/off button flashes slowly or rapidly, you do NOT have to carry out the flushing procedure. If the on/off button flashes slowly, the water is heating up. If it flashes rapidly, there is not enough water in the water reservoir or the water reservoir is not placed on the machine properly. You have used the SENSEO coffee machine at an altitude higher than 2200 metres above sea level. This has caused the water in the machine to start boiling before it has reached the required temperature, which prevents the machine from functioning properly. Switch off the machine and no longer use it at altitudes higher than 2200 metres above sea level. You have pressed the 1-cup button and the 2-cup button at the same time. This started the descaling cycle. If you did not intend to start the descaling cycle, simply press the on/off button to switch off the machine. If you did intend to start the descaling cycle, do not interrupt this cycle but let the appliance operate until the water reservoir is empty. 18

19 Problem The CALC light does not go out after descaling. The on/off button continues to flash rapidly. Water leaks from the coffee machine. Solution The CALC light does not go out if the descaling procedure has not been performed correctly. To perform the descaling procedure correctly: 1. Make sure that you do not interrupt the descaling cycle or switch off or unplug the machine during the descaling cycle. During the descaling cycle, hot water comes out of the coffee spout at intervals and the machine stops descaling 3 to 4 times to let the descaling mixture act and to heat up again. 2. Make sure that you start the descaling cycle by pressing the 1-cup button and the 2-cup button at the same time. See chapter Descaling for a complete description of the descaling procedure. 3. Make sure that you use three full water reservoirs to complete the descaling procedure: one reservoir filled with descaling mixture and two reservoirs filled with fresh water. Make sure that there is enough water in the water reservoir and that the water reservoir is placed properly. Make sure that the ambient temperature is not lower than 5 C. If it is, the machine does not function properly. If you notice coffee or water leaking from your SENSEO machine, try to establish where the leakage occurs. This is important, as the location of the leakage determines the solution. 1. If the leakage occurs near the lid or the spout, make sure that: 1a. The sieve in the centre of the pod holder is not clogged. If it is, unclog the sieve by holding the pod holder under a running tap. 1b. The coffee pod has been put properly in the centre of the pod holder. 1c. The sealing ring has not got stuck under the edge of the water distribution disc (see figure 1 at the beginning of this user manual). 1d. The spout and the coffee collector have been placed correctly. 2. If the leakage occurs near the bottom of the water reservoir or under the machine, make sure that: 2a. There is not too much water in the water reservoir. 2b. You do not place the water reservoir onto the machine too roughly. If you place the water reservoir too roughly, water may splash out of the water reservoir. 2c. The water reservoir is not damaged or broken. Normally, water should not start to drip from the water outlet in the bottom of the water reservoir within 30 seconds after filling. English 19

20 Problem I cannot open the lid. The coffee machine produces less coffee than before. I cannot close the lid properly. The SENSEO coffee is not strong enough. Solution A vacuum may have temporarily formed under the lid. Switch off the machine. Pull up the lever and wait 24 hours before you open the lid.you may need to use quite some force. Make sure that you do not move the SENSEO machine. Moving the machine, placing it outdoors or in a cool or cold environment does not accelerate the unlocking of the lid. For this not to happen again, always make sure that the pod holders are clean and that the sieve in the centre of the pod holders is not clogged. Perhaps the sieve in the centre of the pod holder is clogged. If this is the case, unclog the sieve by rinsing the pod holder under a running tap. Use a washing-up brush to clean the sieve, if necessary. Descale the machine (see chapter Descaling ). Check if a used coffee pod is sticking to the water distribution disc. If this is the case, remove the used pod. Check if you used the correct pod holder. Use 2 pods in combination with the deeper 2-cup pod holder qq. Make sure that you have selected the coffee strength that you prefer. You can choose between regular and strong coffee. You can also increase or decrease the coffee strength by setting your preferred amount of coffee with the personal coffee memory function (HD7872 only). Make sure that you have used the correct number of pods and have pressed the right button. Use 2 pods in combination with the 2-cup pod holder qq and the 2-cup button qq. Make sure that you have placed the coffee pod or pods properly in the centre of the pod holder, to prevent water from escaping along the edge of the pod or pods. When you use two coffee pods on top of each other, make sure that the convex sides of both pods point downwards and press the pods lightly into the pod holder. Make sure that you have not used the same coffee pod twice by accident. Make sure that the coffee in the pod is evenly distributed. If you prefer a more robust flavour, SENSEO coffee pods with a stronger blend are available. 20

21 Problem The coffee is not hot enough. The touch panel does not work. I accidentally activate the touch panel when I clean it. HD7872 only: The personal coffee memory button does not produce the amount of coffee I prefer. Solution If you have used the machine for quite some time and the temperature of the coffee decreases, we advise you to descale the machine. See chapter Descaling. Descale your SENSEO coffee machine regularly. Do not use cups that are too large, as they cause the coffee to get cold more quickly. Make sure that the cups have a capacity of at least 150ml. Use thin-walled cups. Thin-walled cups absorb less heat from the coffee than thick-walled cups. Make sure the size of the cup matches the amount of coffee. Do not brew a small amount of coffee in a large cup. If you drink coffee with fresh milk, preheat the milk in the cup in a microwave. You can preheat the coffee machine by first brewing a cup of coffee without placing a coffee pod in the pod holder. In this way you also heat up your coffee cup. If there is water on the touch panel, the buttons do not work. Make sure that the touch panel is dry and also make sure your hands are dry when you use the touch panel. Make sure that you press the selection button and not the symbols to the left of the selection button. This happens because the touch panel is very sensitive and the buttons only require a light touch to be activated. There is no problem when this happens, the machine will not start brewing coffee. Unplug the machine before you clean it. Please read section Personal coffee memory in chapter Brewing SENSEO coffee and try to set the amount of coffee you prefer again. English 21
22 Indholdsfortegnelse 1 Introduktion 22 2 Generel beskrivelse 22 3 Vigtigt 23 4 Gennemskylning af maskinen før brug første gang 23 5 Brygning af SENSEO -kaffe 26 6 Rengøring 29 7 Afkalkning 31 8 Frostfri opbevaring 34 9 Bestilling af tilbehør Miljøhensyn Reklamationsret og service Fejlfinding 35 1 Introduktion Tillykke med dit køb og velkommen til Philips! For at få fuldt udbytte af den support, Philips tilbyder, skal du registrere dit produkt på SENSEO -kaffesystem Få en helt særlig kaffeoplevelse med SENSEO. Dette enestående system kombinerer Philips brugervenlige SENSEO -kaffemaskine med de specialudviklede Merrild SENSEO -kaffepuder, der giver en fyldig, rund smag med et lækkert skumlag. Merrild-kaffen i de praktiske SENSEO -kaffepuder og Philips nye unikke SENSEO -bryggesystem passer perfekt sammen og sikrer, at den bedste smag og aroma trækkes ud af 22 kaffen. Se alle SENSEO -kaffeblandingerne på For at være sikker på at få den fyldige og runde smag skal du huske følgende: Friske kaffepuder Benyt SENSEO -kaffepuderne, der er specielt udviklet af Merrild til din SENSEO -kaffemaskine, og som giver en fyldig og rund smag. Merrild SENSEO -kaffepuderne holder sig friske længere, hvis de opbevares i en lufttæt beholder. Frisk vand Brug frisk vand hver dag. Hvis du ikke har brugt kaffemaskinen i én dag, skal du skylle den igennem med frisk vand, før du bruger den igen (se kapitlet Brygning af SENSEO -kaffe, afsnit Gennemskylning af maskinen efter en dag, hvor den ikke er blevet brugt ). 2 Generel beskrivelse (fig. 1) 1 Tragt 2 Udløser til låg 3 Låg med bryggekammer 4 Tætningsring 5 Vandtilførselsplade 6 2-kops-pudeholder qq 7 1-kops-pudeholder q 8 Dæksel til kaffeudløb 9 Kaffeudløb 10 Udløserknapper til udløb 11 Aftagelig drypbakke 12 Koprist 13 Touch-panel 14 On/off-knap 15 Symbol til hukommelse for individuelt kaffevalg (kun HD7872) 16 Almindelig kaffe-symbol 17 Funktionsknap 18 Symbol for stærk kaffe 19 CALC-indikator 20 1-kops-knap q 21 2-kops-knap qq 22 Vandtank 23 Låg til vandtank
23 3 Vigtigt Læs denne brugervejledning omhyggeligt igennem, inden maskinen tages i brug, og gem den til eventuel senere brug. Fare Kom aldrig maskinen ned i vand eller anden væske. Advarsel Før maskinen tages i brug, skal du kontrollere, om spændingsangivelsen i bunden af maskinen svarer til den lokale netspænding. Denne maskine er ikke beregnet til at blive brugt af personer (herunder børn) med nedsatte fysiske og mentale evner, nedsat følesans eller manglende erfaring og viden, medmindre de er blevet vejledt eller instrueret i maskinens anvendelse af en person, der er ansvarlig for deres sikkerhed. Hold maskinen uden for børns rækkevidde for at sikre, at de ikke kan komme til at lege med den. Brug aldrig maskinen, hvis stik, netledning eller selve maskinen er beskadiget. Hvis netledningen beskadiges, må den kun udskiftes af Philips, et autoriseret Philips-serviceværksted eller en tilsvarende kvalificeret fagmand for at undgå enhver risiko. Forsigtig Læg aldrig SENSEO -kaffemaskinen på siden, når den er pakket ud. Den skal altid opbevares i lodret position, også under transport. Reparation og eftersyn af maskinen skal altid foretages på et autoriseret Philipsserviceværksted. Forsøg ikke selv at reparere maskinen, da garantien i så fald bortfalder. Brug ikke maskinen i kombination med en transformer, da dette kan resultere i en farlig situation. Stil altid maskinen på et fladt og stabilt underlag. Brug ikke maskinen steder, der ligger højere end meter over havets overflade. Hæld aldrig mælk, kaffe, varmt eller destilleret vand i vandtanken. Gennemskyl aldrig maskinen, og lad den heller aldrig brygge kaffe, når udløbet ikke er på plads. Denne maskine er kun beregnet til normal anvendelse i hjemmet. Den er ikke beregnet til brug i miljøer som personalekøkkener i butikker, på kontorer, på gårde eller andre arbejdspladser. Den er heller ikke beregnet til brug af gæster på hoteller, moteller, bed and breakfasts eller i andre værelser til udlejning. 3.1 Overholdelse af standarder Denne maskine overholder alle standarder for elektromagnetiske felter (EMF). Ved korrekt anvendelse i overensstemmelse med instruktionerne i denne brugervejledning er maskinen sikker at anvende ifølge den videnskabelige viden, der er tilgængelig i dag. Energiforbruget for denne maskine i slukket tilstand er mindre end 1 watt. Det betyder, at maskinen overholder EU-direktivet 2009/125/ EC, der angiver de økologiske designkrav for energiforbrugende produkter. 4 Gennemskylning af maskinen før brug første gang Det er vigtigt, at du gennemskyller din SENSEO - kaffemaskine før brug første gang. Efter skyllecyklussen (som kun tager ca. 2 minutter) er maskinen klar til at brygge SENSEO -kaffe. C Forsigtig: Afbryd aldrig skylningsprocessen midt i forløbet, da vandkogeren i så fald ikke fyldes ordentligt. Dansk 23
24 1 Sæt udløbet på maskinen. Tag fat i de to riller på den inderste del af udløbet, og tryk let på dem (1). Placer udløbet på maskinen, og slip de to riller (2). 4 Placer låget på vandtanken, før du sætter den tilbage på maskinen. C Forsigtig: Gennemskyl aldrig maskinen, og lad den heller aldrig brygge kaffe, når udløbet ikke er på plads. 2 Vip toppen af vandtanken bagover (1), og løft den af maskinen (2). 5 Vip vandtanken, og sæt bunden tilbage på plads på maskinen (1). Tryk derefter toppen af vandtanken ind mod maskinen (2). 6 Fjern drypbakken. 3 Fyld vandtanken op med koldt vand fra hanen. 24
25 7 Placer en skål med en kapacitet på mindst 1,5 liter på kaffeudløbet. 11 Tryk kort på 1-kops-knappen q og 2-kops-knappen qq samtidig for at starte gennemskylningen. 1.5L Dansk 8 Sørg for, at pudeholderen, uden pude eller puder, er på plads. On/off-knappen begynder at blinke for at indikere, at gennemskylningsprocessen er startet. Under gennemskylningsprocessen fyldes vandkogeren automatisk med vand fra vandtanken, og der kommer koldt vand ud af kaffeudløbet. Under gennemskylningsprocessen støjer maskinen mere end under en almindelig bryggeproces. 9 Sæt stikket i en stikkontakt med jordforbindelse. 10 Tryk på on/off-knappen 3. Knappen lyser op for at indikere, at du skal gennemskylle maskinen. Når alt vandet i vandtanken er blevet brugt, er gennemskylningsprocessen færdig, og maskinen slukkes. 25
26 12 Fyld vandtanken med frisk vand fra hanen, sæt låget på, og sæt den tilbage på maskinen. 3 Tryk på on/off-knappen 3. On/off-knappen blinker langsomt, mens vandet varmes op. Din SENSEO -maskine er nu klar til brug, så du kan brygge din første kop velsmagende kaffe. 5 Brygning af SENSEO -kaffe Mens SENSEO -kaffemaskinen varmer op, kan du vælge den kaffestyrke, du foretrækker, og det antal kopper, du gerne vil brygge. Så brygger maskinen koppen eller kopperne straks efter, den er varmet op. 1 Kontroller, at vandtanken er fyldt med friskt, koldt vand fra hanen mindst til MINmarkeringen, og at låget er sat på vandtanken. D Bemærk: Hvis on/off-knappen blinker hurtigt, indeholder vandtanken ikke nok vand til at brygge en kop kaffe. 4 Træk låget opad for at åbne det. Låget åbnes automatisk. 5 Hvis du vil lave en kop SENSEO -kaffe, skal du placere 1-kops-pudeholderenq i maskinen (1). Hvis du vil lave to kopper, skal du lægge 2-kops-pudeholderen qq i maskinen (2). Kontroller, at pudeholderen er ren. E Tip: Brug friskt vand hver dag. 2 Sæt stikket i en stikkontakt med jordforbindelse. 26
27 6 Placer 1 kaffepude i 1-kops-pudeholderen q (1), eller placer 2 kaffepuder i 2-kopspudeholderen qq (2). Placer puden eller puderne helt i centrum af pudeholderen med den buede side nedad. Tryk puden eller puderne let ned i pudeholderen. 8 Stil en eller to kopper under udløbsåbningerne. Du kan justere højden på kaffeudløbene ved at skubbe dem op eller ned. Du kan også fjerne drypbakken for at kunne benytte højere kopper. Dansk D Bemærk: Kontroller, at kaffen i puden eller puderne er jævnt fordelt. C Forsigtig: Kom aldrig almindelig formalet kaffe eller beskadigede kaffepuder i SENSEO -maskinen, da den vil stoppe til. 7 Luk låget (1), og tryk låseklemmen ned (2). D Bemærk De kopper, du bruger, skal kunne rumme mindst 150 ml, når du brygger almindelig kaffe, eller 100 ml, når du brygger stærk kaffe. Brug ikke for store kopper, da kaffen så bliver hurtigere kold. 9 Tryk på funktionsknappen for at vælge den ønskede kaffestyrke. Vælg kopsymbolet med tre søjler for en almindelig kop kaffe (125 ml) (1). Vælg kopsymbolet med én søjle for en stærk kop kaffe (60 ml) (2). B Advarsel: Sørg for, at låget er lukket korrekt, og lågudløseren sidder fast, før du starter brygningen. 10 Når du har valgt den ønskede kaffestyrke, skal du trykke på 1-kops-knappen q for én kop (1) eller på 2-kops-knappen qq for to kopper (2). 27
28 11 Når vandet er varmet op, og on/off-knappen lyser konstant, begynder maskinen at brygge kaffe. E Tip: Du kan afbryde bryggeprocessen på et hvilket som helst tidspunkt. Du skal bare trykke på den samme kop-knap (1-kops-knap eller 2-kops-knap), som du trykkede på for at starte bryggeprocessen. Hvis du gør det, fuldfører maskinen dog ikke den afbrudte bryggeproces, hvis du tænder den igen eller trykker på den samme knap igen. D Bemærk: Fjern ikke vandtanken under brygningen. 12 Når kaffen er klar, skal du fjerne den eller de brugte kaffepuder(r). Du skal blot løfte pudeholderen ud af maskinen og tømme den. C Forsigtig: Der kan stadig være lidt varmt vand eller kaffe i kaffepuden/-puderne. 13 Efter brug skal du trykke på on/off-knappen for at slukke maskinen Hukommelse for individuelt kaffevalg (kun HD7872) Du kan programmere maskinen til at brygge den mængde kaffe, du foretrækker (op til 145 ml). Du kan eksperimentere og finde ud af, hvad du bedst kan lide. Vi anbefaler, at du brygger mindst 60 ml for at få den optimale smag og temperatur. Når du programmerer, skal du kun bruge 1-kopsknappen. Når du er færdig med at programmere, kan du brygge en eller to kopper med den programmerede mængde kaffe. D Bemærk: Det er ikke muligt at programmere din hukommelse til individuelt kaffevalg, mens maskinen varmer op. Vent, indtil on/off-knappen lyser konstant. 1 Placer 1 kaffepude i 1-kops pudeholderen, og placer 1 kop under udløbsåbningerne. 2 For at aktivere programmeringstilstanden skal du først vælge symbolet til hukommelse for individuelt kaffevalg (stjernesymbolet) med funktionsknappen (1). Hold funktionsknappen inde i 2 sekunder, indtil stjernesymbolet begynder at blinke (2), og der lyder et bip. Slip derefter knappen. D Bemærk: Hvis du ikke bruger maskinen, slukkes der automatisk for den efter 15 minutter for at spare energi. 3 Tryk på 1-kops-knappen, så begynder kaffen at løbe ned i koppen (1). Når der er så meget kaffe i koppen, som du ønsker, skal du trykke på 1-kops-knappen igen (2). Dermed har du indstillet den mængde kaffe, du foretrækker. 28
29 Fra nu af brygger SENSEO -maskinen denne mængde kaffe, når du vælger symbolet til hukommelse for individuelt kaffevalg med funktionsknappen. D Bemærk: Hvis du ønsker at ændre på indstillingen for mængden af kaffe, skal du blot udføre trin 1-3 igen. 5.2 Gennemskylning af maskinen efter en dag, hvor den ikke er blevet brugt Hvis du ikke har brugt kaffemaskinen en dag, skal du gennemskylle den for at være sikker på, at vandkogeren fyldes med frisk vand. For at gennemskylle af maskinen skal du brygge to kopper kogende vand som følger: 1 Fyld vandtanken med koldt vand fra hanen mindst til MIN-markeringen (1). Sæt låget på (2), og sæt vandtanken tilbage på maskinen. 4 Sæt to kopper eller et stort krus under kaffeudløbet for at opsamle vandet. 5 Tryk på on/off-knappen 3. On/off-knappen blinker langsomt, mens vandet varmes op. Dansk 6 Kontroller, at den valgte kaffestyrke er almindelig kaffe (kopsymbol med tre søjler). 7 Tryk på 2-kops-knappen qq for at brygge to kopper varmt vand. 2 Sæt 1-kops-pudeholderen q eller 2-kopspudeholderen qq i maskinen uden puder. 3 Luk låget og tryk låseklemmen ned. 8 Når vandet er varmet op, lyser on/off-knappen konstant, og maskinen begynder at brygge kaffe. 9 Smid vandet i kopperne væk. Nu er maskinen klar til brug igen. 29
30 6 Rengøring Regelmæssig rengøring af din SENSEO er vigtig for at sikre, at SENSEO -kaffen altid smager optimalt. Desuden forlænger det kaffemaskinens levetid. B Advarsel: SENSEO -kaffemaskinen må aldrig kommes ned i vand. 1 Tag altid stikket ud af stikkontakten, inden maskinen rengøres. 2 Maskinen rengøres udvendigt med en fugtig klud. 3 Fjern tragten. 5 For at skille kaffeudløbet ad skal du tage fat i de to riller på indersiden af udløbet og trykke let på dem (1). Før den indre del nedad for at skille den fra den ydre del af udløbet (2). 6 Rengør vandtanken og det tilhørende låg, kaffeudløbet, tragten, drypbakken, kopristen og pudeholderne i varmt vand eller i opvaskemaskinen. 4 For at fjerne kaffeudløbet skal du trykke på udløserknapperne (1) og trække kaffeudløbet af maskinen (2). C Forsigtig: Pas på, at du ikke kommer til at beskadige ventilen i bunden af vandtanken, hvis du bruger en opvaskebørste til at rengøre vandtanken. 30 D Bemærk: Kontroller, om sien i midten af pudeholderen er tilstoppet. Er dette tilfældet, fjernes tilstoppelsen ved at skylle pudeholderen under vandhanen. Brug om nødvendigt en opvaskebørste til at rense sien.
31 7 Rengør vandtilførselspladen og gummitætningsringen med en fugtig klud. C Forsigtig: Undlad at fjerne gummitætningsringen, og vær opmærksom på ikke at komme til at beskadige tappen på vandtilførselspladen. 8 Rengør maskinens vandindtag med en fugtig klud. 7 Afkalkning Kalk aflejres inde i maskinen under brug. Det er vigtigt at afkalke SENSEO -kaffemaskinen, når CALCindikatoren begynder at lyse. Brug kun SENSEO - afkalkningsmiddel (HD7012, HD7011, HD7006). Tid til afkalkning Afkalk SENSEO -kaffemaskinen som beskrevet nedenfor, når CALC-indikatoren begynder at lyse (når du har brygget ca. 400 kopper SENSEO -kaffe). Gode grunde til at huske afkalkning: Det forlænger din SENSEO -kaffemaskines levetid Det sikrer den rette kopmængde Det sikrer kaffens temperatur Maskinen afgiver mindre støj under brygning Det forebygger funktionsfejl Hvis afkalkningen ikke udføres korrekt, vil kalkpartikler blive efterladt i maskinen. Dette gør, at ny kalk hurtigere vil sætte sig fast, og det kan føre til varig og uoprettelig skade på maskinen. Brug det rette afkalkningsmiddel Brug kun SENSEO -afkalkningsmiddel (HD7012, HD7011, HD7006). Det er udviklet for at sikre en bedre ydeevne og drift for maskinen. Hver afkalkningsblanding kan kun bruges én gang. Yderligere oplysninger om dette afkalkningsmiddel findes på vores websted B Advarsel: Brug aldrig et afkalkningsmiddel, der er baseret på mineralsk syre som f.eks. svovlsyre, saltsyre, sulfaminsyre eller eddikesyre (f.eks. eddike). Disse afkalkningsmidler kan skade din SENSEO - kaffemaskine. 7.1 Afkalkningsprocedure Afkalkningsproceduren består af en afkalkningscyklus og to skyllecyklusser. Du må ikke afbryde afkalkningscyklussen, og du må ikke slukke for maskinen, før de to skyllecyklusser er gennemført. 1 Bland 50 g citronsyre med 1 l vand i et litermål. Rør rundt, indtil pulveret er opløst. Fyld vandtanken med afkalkningsblandingen. Dansk 31
32 2 Vip vandtanken, og sæt bunden tilbage på plads på maskinen (1). Tryk derefter toppen af vandtanken ind mod maskinen (2). B Advarsel: Sørg for, at låget er lukket korrekt, og lågudløseren sidder fast, før du begynder at afkalke maskinen.. 5 Fjern drypbakken. 3 Tryk på on/off-knappen 3. On/off-knappen blinker langsomt, mens vandet varmes op. Kaffemaskinen er klar til afkalkning, når on/offknappen lyser konstant 6 Sæt en skål, der kan rumme mindst 1,5 l, under udløbet til opsamling af afkalkningsblandingen. 1.5L 4 Placer 1-kops-pudeholderen q med en brugt kaffepude i i kaffemaskinen. Luk låget, og kontroller, at det er ordentligt lukket. 7 Når on/off-knappen lyser konstant, skal du trykke på 1-kops-knappen q og 2-kopsknappen qq samtidigt i 3 sekunder, indtil der lyder et bip. Slip knapperne lige så snart, de ikke lyser længere, og der slukkes for den valgte styrke. Det betyder, at afkalkningsproceduren er aktiveret korrekt. D Bemærk: Læg altid en brugt kaffepude i pudeholderen, når maskinen afkalkes. Puden vil fungere som et filter, så det undgås, at sien i pudeholderen tilstoppes af kalkpartikler. 32
33 CALC-indikatoren og on/off-knappen starter med at blinke for at indikere, at afkalkningscyklussen er i gang. Under afkalkningscyklussen kommer der vand ud af maskinen en gang imellem. Når alt vandet i vandtanken er brugt, er afkalkningsprocessen fuldført. On/offknappen begynder at blinke hurtigt. D Bemærk: Hvis du trykker på 1-kops- og 2-kops-knappen ned længere end 3 sekunder, starter maskinen ikke afkalkningscyklussen. Hvis det er tilfældet, skal du trykke på 1-kops-knappen og 2-kopsknappen samtidigt i 3 sekunder igen. 7.2 Gennemskylning efter afkalkning 1 Skyl vandtanken under rindende vand, og fyld den derefter helt op med frisk vand fra hanen. 3 Placer 1-kops-pudeholderen q med en brugt kaffepude i i kaffemaskinen. Luk låget, og kontroller, at det er ordentligt lukket. 4 Sæt en skål, der kan rumme mindst 1,5 l, under kaffeudløbet til opsamling af vandet. Dansk 1.5L 5 Tryk på 1-kops-knappen q og 2-kopsknappen qq samtidigt i 3 sekunder, indtil der lyder et bip, for at starte skyllecyklussen. D Bemærk: Fyld ikke vandbeholderen med varmt vand eller afkalkningsblanding, der har været brugt. 2 Vip vandtanken, og sæt bunden tilbage på plads på maskinen (1). Tryk derefter toppen af vandtanken ind mod maskinen (2). 6 Fjern den brugte kaffepude, og rengør pudeholderen efter skyllecyklussen for at undgå tilstoppelse af sien i midten. 7 Gentag trin 1 til 6 endnu en gang for at sikre, at maskinen er ren. 8 Efter afkalkningscyklussen og skyllecyklussen slukkes CALC-indikatoren, og maskinen slukkes automatisk. 33
34 8 Frostfri opbevaring Når maskinen er blevet gennemskyllet første gang (se kapitlet Gennemskylning af maskinen før brug første gang ), må den kun bruges og opbevares, hvor temperaturen ikke kommer under frysepunktet, for at undgå skader. 9 Bestilling af tilbehør Hvis du vil købe tilbehør til denne maskine, skal du besøge vores onlinebutik på Hvis onlinebutikken ikke er tilgængelig i dit land, skal du gå til din Philips-forhandler eller et Philips Kundecenter. Hvis du har problemer med at skaffe tilbehør til apparatet, kan du kontakte dit lokale Philips Kundecenter. Du kan finde kontaktoplysningerne i folderen World-Wide Guarantee. 11 Reklamationsret og service Hvis du har brug for hjælp eller oplysninger, eller hvis der opstår et problem, skal du besøge Philips websted på eller kontakte dit lokale Philips Kundecenter. Telefonnumre findes i vedlagte worldwide guarantee -folder. Hvis der ikke findes et kundecenter i dit land, bedes du kontakte din lokale Philips-forhandler. Ved køb af Philips SENSEO -kaffemaskinen afgiver Sara Lee/Merrild eller Philips ingen af deres patentrettigheder ligesom køber ikke opnår licens i henhold til disse patenter. Reparation og eftersyn af maskinen skal altid foretages på et autoriseret Philips-serviceværksted. Forsøg ikke selv at reparere maskinen, da garantien i så fald bortfalder. 10 Miljøhensyn Maskinen må ikke smides ud sammen med det almindelige husholdningsaffald, når den til sin tid kasseres. Aflevér den i stedet på en kommunal genbrugsstation. På den måde er du med til at beskytte miljøet. 34
35 12 Fejlfinding 12.1 SENSEO -kaffemaskine Dette kapitel opsummerer de mest almindelige problemer, der kan forekomme ved brug af maskinen. Har du brug for yderligere hjælp og vejledning, så besøg for en liste af ofte stillede spørgsmål eller kontakt dit lokale Philips Kundecenter. Problem Min kop løb over, da jeg brugte maskinen første gang. Vandet blev ved med at løbe ud af udløbet, da jeg brugte maskinen første gang. On/off-knappen blinker langsomt. CALC-indikatoren blinker. Løsning Du har formentlig prøvet at brygge en kop kaffe uden at gennemskylle maskinen først. Før du starter med at brygge kaffe, skal du gennemskylle maskinen. Når du tænder for maskinen igen, lyser on/off-knappen enten konstant eller blinker hurtigt eller langsomt. Hvis on/off-knappen lyser konstant, skal du foretage skylleproceduren (se kapitlet Gennemskylning af maskinen før brug første gang ). Hvis on/off-knappen blinker langsomt eller hurtigt, behøver du IKKE foretage skylleproceduren. Hvis on/off-knappen blinker langsomt, er vandet ved at varme op. Hvis den blinker hurtigt, er der ikke nok vand i vandtanken, eller også er vandtanken ikke sat ordentligt på maskinen. Hvis vandet blev ved med at løbe ud af udløbet, indtil vandtanken var tom, foretager maskinen en skyllecyklus. Før du går i gang med at brygge kaffe, skal du gennemskylle maskinen. Når du tænder for maskinen igen, lyser on/ off-knappen konstant eller blinker langsomt eller hurtigt. Hvis on/off-knappen lyser konstant, skal du foretage skylleproceduren (se kapitlet Gennemskylning af maskinen før brug første gang ). Hvis on/off-knappen blinker langsomt eller hurtigt, behøver du IKKE foretage skylleproceduren. Hvis on/off-knappen blinker langsomt, er vandet ved at varme op. Hvis den blinker hurtigt, er der ikke nok vand i vandtanken, eller også er vandtanken ikke sat ordentligt på maskinen. Du har brugt SENSEO -kaffemaskinen i over 2200 meter over havets overflade. Dette har bevirket, at vandet i kaffemaskinen er begyndt at koge, inden det har nået den ønskede temperatur, hvilket afholder maskinen fra at fungere korrekt. Sluk maskinen, og brug den efterfølgende kun steder, der ligger under 2200 meter over havets overflade. Du har trykket på 1-kops-knappen og 2-kops-knappen samtidigt. Det startede afkalkningsprocessen. Hvis du ikke ønskede at starte afkalkningsprocessen, skal du bare trykke på on/off-knappen for at slukke for maskinen. Hvis du ønskede at starte afkalkningsprocessen, skal du ikke afbryde processen, men lade maskinen køre, indtil vandtanken er tom. Dansk 35
Elektronisk termostat med spareprogram. Lysende LCD display øverst på ovnen for enkel betjening.
 Elektronisk termostat med spareprogram. Lysende LCD display øverst på ovnen for enkel betjening. 27.5 LCD Electronic thermostat with program setting. Bright LCD display placed at the top of the heater
 Register your product and get support at www.philips.com/welcome HD7835 A 1 B S R Q P CD E F G H O N M J K L I English 6 Dansk 24 Norsk 42 HD7835 6 English Table of contents Introduction 6 General description
The regulation requires that everyone at NTNU shall have fire drills and fire prevention courses.
 1 The law The regulation requires that everyone at NTNU shall have fire drills and fire prevention courses. 2. 3 Make your self familiar with: Evacuation routes Manual fire alarms Location of fire extinguishers
REMOVE CONTENTS FROM BOX. VERIFY ALL PARTS ARE PRESENT READ INSTRUCTIONS CAREFULLY BEFORE STARTING INSTALLATION
 2011-2014 FORD EXPLORER PARTS LIST Qty Part Description Qty Part Description 1 Bull Bar 2 12mm x 35mm Bolt Plates 1 Passenger/Right Mounting Bracket 2 12mm Nut Plate 1 Driver/Left Mounting Bracket 2 12mm
Slope-Intercept Formula
 LESSON 7 Slope Intercept Formula LESSON 7 Slope-Intercept Formula Here are two new words that describe lines slope and intercept. The slope is given by m (a mountain has slope and starts with m), and intercept
TB-615 / TB-617 Wireless slim keyboard. EN User guide SE Användarhandledning FI Käyttöohje DK Brugervejledning NO Bruksanvisning
 TB-615 / TB-617 Wireless slim keyboard EN User guide SE Användarhandledning FI Käyttöohje DK Brugervejledning NO Bruksanvisning EN User guide You have bought a wireless keyboard to use with Windows XP,
GYRO MED SYKKELHJUL. Forsøk å tippe og vri på hjulet. Hva kjenner du? Hvorfor oppfører hjulet seg slik, og hva er egentlig en gyro?
 GYRO MED SYKKELHJUL Hold i håndtaket på hjulet. Sett fart på hjulet og hold det opp. Det er lettest om du sjølv holder i håndtakene og får en venn til å snurre hjulet rundt. Forsøk å tippe og vri på hjulet.
Unit Relational Algebra 1 1. Relational Algebra 1. Unit 3.3
 Relational Algebra 1 Unit 3.3 Unit 3.3 - Relational Algebra 1 1 Relational Algebra Relational Algebra is : the formal description of how a relational database operates the mathematics which underpin SQL
HD7812, HD7811, HD7810, HD7805
 HD7812, HD7811, HD7810, HD7805 2 3 1 HD7811 HD7812, HD7810 4 Dansk 6 Norsk 20 HD7812, HD7811, HD7810, HD7805 6 Dansk Introduktion Med SENSEO kan du nyde en perfekt kop kaffe med en lækker cremet overflade,
Institutt for biovitenskap
 Institutt for biovitenskap Oppslag for alle avtrekksskap: Alle avtrekksskap skal ha forklaring på alarmsystem på det enkelte skap. Dette varier fra skap til skap. e.g. på IBV finnes det minst 3 ulike typer.
Start Here USB *CC * *CC * USB USB
 1 USB Start Here USB 11 USB WARNING: To ensure that the software is installed correctly, do not connect the USB cable until step 11. 11 USB 2 a. b. Lower both the paper tray and the print cartridge door.
 Register your product and get support at www.philips.com/welcome HD7853 1 English 6 Dansk 28 Deutsch 50 Français (Belgique) 73 Magyar 96 Nederlands 118 Norsk 141 HD7853 6 English Table of contents Introduction
KROPPEN LEDER STRØM. Sett en finger på hvert av kontaktpunktene på modellen. Da får du et lydsignal.
 KROPPEN LEDER STRØM Sett en finger på hvert av kontaktpunktene på modellen. Da får du et lydsignal. Hva forteller dette signalet? Gå flere sammen. Ta hverandre i hendene, og la de to ytterste personene
HD7812, HD7811, HD7810, HD7805
 Register your product and get support at www.philips.com/welcome 1 HD7812, HD7811, HD7810, HD7805 2 3 4 5 6 7 8 A 9 CLICK B 10 11 12 13 14 15 16 17 18 19 20 21 22 23 24 25 26 4222.200.0525.2 Dansk Introduktion
Exercise 1: Phase Splitter DC Operation
 Exercise 1: DC Operation When you have completed this exercise, you will be able to measure dc operating voltages and currents by using a typical transistor phase splitter circuit. You will verify your
Justeringsanvisninger finnes på de to siste sidene.
 d Montering av popup spredere Justeringsanvisninger finnes på de to siste sidene. Link til monteringsfilm på youtube: http://youtu.be/bjamctz_kx4 Hver spreder har montert på en "svinkobling", det vil si
HD7828 HD7826 HD7825
 1 HD7828 HD7826 HD7825 4222.200.0439.4 ENGLISH Introduction Congratulations on your purchase and welcome to Philips! To fully benefit from the support that Philips offers, register your product at www.philips.com/
Dynamic Programming Longest Common Subsequence. Class 27
 Dynamic Programming Longest Common Subsequence Class 27 Protein a protein is a complex molecule composed of long single-strand chains of amino acid molecules there are 20 amino acids that make up proteins
3 3 A B S R Q P G H C D E F O N M J K L I
 HD7835 2 3 3 A B S R Q P C D E F G H O N M J K L I 4 English 6 Dansk 28 Norsk 50 HD7835 6 English Introduction Congratulations on your purchase and welcome to Philips! To fully benefit from the support
HD7818 HD7817 6 7 8 A 4222.200.0525.5
 1 HD7818 HD7817 1 2 3 11 4 10 5 6 9 7 8 2 3 4 5 6 7 8 A 9 B 10 11 12 13 14 15 16 17 18 19 20 21 22 23 4222.200.0525.5 DANSK Introduktion Tillykke med dit køb og velkommen til Philips! For at få fuldt udbytte
Endelig ikke-røyker for Kvinner! (Norwegian Edition)
") Endelig ikke-røyker for Kvinner! (Norwegian Edition) Allen Carr Click here if your download doesn"t start automatically Endelig ikke-røyker for Kvinner! (Norwegian Edition) Allen Carr Endelig ikke-røyker
Endelig ikke-røyker for Kvinner! (Norwegian Edition) Allen Carr Click here if your download doesn"t start automatically Endelig ikke-røyker for Kvinner! (Norwegian Edition) Allen Carr Endelig ikke-røyker
INSTALLATION GUIDE FTR Cargo Rack Regular Ford Transit 130" Wheelbase ( Aluminum )
") INSTALLATION GUIDE 1505-FTR Cargo Rack Regular Ford Transit 130" Wheelbase ( Aluminum ) QUICK START GUIDE Phase 1 - Assembly q 1.1 Setup... q 1.2 Cargo Rack Assembly... 3-4 5-6 Phase 2 - Installation q
INSTALLATION GUIDE 1505-FTR Cargo Rack Regular Ford Transit 130" Wheelbase ( Aluminum ) QUICK START GUIDE Phase 1 - Assembly q 1.1 Setup... q 1.2 Cargo Rack Assembly... 3-4 5-6 Phase 2 - Installation q
Norsk (English below): Guide til anbefalt måte å printe gjennom plotter (Akropolis)
: Guide til anbefalt måte å printe gjennom plotter (Akropolis)") Norsk (English below): Guide til anbefalt måte å printe gjennom plotter (Akropolis) 1. Gå til print i dokumentet deres (Det anbefales å bruke InDesign til forberedning for print) 2. Velg deretter print
Norsk (English below): Guide til anbefalt måte å printe gjennom plotter (Akropolis) 1. Gå til print i dokumentet deres (Det anbefales å bruke InDesign til forberedning for print) 2. Velg deretter print
Trigonometric Substitution
 Trigonometric Substitution Alvin Lin Calculus II: August 06 - December 06 Trigonometric Substitution sin 4 (x) cos (x) dx When you have a product of sin and cos of different powers, you have three different
Perpetuum (im)mobile
mobile") Perpetuum (im)mobile Sett hjulet i bevegelse og se hva som skjer! Hva tror du er hensikten med armene som slår ut når hjulet snurrer mot høyre? Hva tror du ordet Perpetuum mobile betyr? Modell 170, Rev.
Perpetuum (im)mobile Sett hjulet i bevegelse og se hva som skjer! Hva tror du er hensikten med armene som slår ut når hjulet snurrer mot høyre? Hva tror du ordet Perpetuum mobile betyr? Modell 170, Rev.
Din bruksanvisning PHILIPS HD7870 http://no.yourpdfguides.com/dref/4546692
 Du kan lese anbefalingene i bruksanvisningen, de tekniske guide eller installasjonen guide for. Du vil finne svar på alle dine spørsmål på i bruksanvisningen (informasjon, spesifikasjoner, sikkerhet råd,
Hvordan føre reiseregninger i Unit4 Business World Forfatter:
 Hvordan føre reiseregninger i Unit4 Business World Forfatter: dag.syversen@unit4.com Denne e-guiden beskriver hvordan du registrerer en reiseregning med ulike typer utlegg. 1. Introduksjon 2. Åpne vinduet
SHORT POT KETTLE. User Guide KE4520 KE4520K KE4520R
 SHORT POT KETTLE User Guide KE4520 KE4520K KE4520R Contents Sunbeam s Safety Precautions 1 Features of your Short Pot Kettle 2 Using your Short Pot Kettle 4 Sunbeam s 3-Way Safety System 5 Care and Cleaning
Duke Energy Seminar September 3 5, 2008 Concord, NC
 Duke Energy Seminar September 3 5, 2008 Concord, NC Ron Richard Senior Consultant RE Consulting -1- Ball Mills -2- Limestone Fineness Some of the FGD vendors have stated that one of the biggest causes
Midnight BBQ Light USER MANUAL
 Midnight BBQ Light USER MANUAL Instructions The Midnight BBQ Light uses 4 x LR44 / AG13 batteries, included in the package. Unscrew the bottom cover and insert the included batteries and align the battery
Neural Network. Sensors Sorter
 CSC 302 1.5 Neural Networks Simple Neural Nets for Pattern Recognition 1 Apple-Banana Sorter Neural Network Sensors Sorter Apples Bananas 2 Prototype Vectors Measurement vector p = [shape, texture, weight]
Windlass Control Panel
 SIDE-POWER 86-08955 Windlass Control Panel v1.0.2 Windlass Systems Installasjon manual SLEIPNER MOTOR AS P.O. Box 519 N-1612 Fredrikstad Norway Tel: +47 69 30 00 60 Fax: +47 69 30 00 70 w w w. s i d e
stjerneponcho for voksne star poncho for grown ups
 stjerneponcho for voksne star poncho for grown ups www.pickles.no / shop.pickles.no NORSK Størrelser XS (S) M (L) Garn Pickles Pure Alpaca 300 (350) 400 (400) g hovedfarge 100 (100) 150 (150) g hver av
5 E Lesson: Solving Monohybrid Punnett Squares with Coding
 5 E Lesson: Solving Monohybrid Punnett Squares with Coding Genetics Fill in the Brown colour Blank Options Hair texture A field of biology that studies heredity, or the passing of traits from parents to
Safering / Safeplus Retrofit of Ronis key for disconnector Interlock type EL11AP V and Sv modules
 Safering / Safeplus Retrofit of Ronis key for disconnector Interlock type EL11AP V and Sv modules Installation instructions www.abb.com Document status Responsible RELEASED NODIS Location Date Name Prepared
Replacing the batteries
 ASSEMBLY INSTRUCTION Replacing the batteries EN NO 9010189A 5.2.14 9010189 Replacing the batteries Preparation Switch off the wheelchair via the remote control. Remove the fuses from the battery compartment
Product Manual Produkthåndbok
 BEAM Product Manual Produkthåndbok BEAM Technical Specifications Tekniske Spesifikasjoner Description Product number Mode Voltage Current Vehicle interface Cable length Encapsulation Operating temperature
25 Monate Garantiebedingungen 25 mois conditions de garantie 25 months warranty conditions
 Wireless Transmitter de Bedienungsanleitung en Instructions for use fr Mode d emploi it Istruzioni per l uso nl Gebruiksaanwijzing es Modo de empleo pt Manual de instruções sv Bruksanvisning no Instruksjonsbok
0:7 0:2 0:1 0:3 0:5 0:2 0:1 0:4 0:5 P = 0:56 0:28 0:16 0:38 0:39 0:23
 UTKAST ENGLISH VERSION EKSAMEN I: MOT100A STOKASTISKE PROSESSER VARIGHET: 4 TIMER DATO: 16. februar 2006 TILLATTE HJELPEMIDLER: Kalkulator; Tabeller og formler i statistikk (Tapir forlag): Rottman: Matematisk
AC10. Brukermanual Brugsanvisning Bruksanvisning User Manual. Spenningsdetektor Voltage Detector. English Norsk
 Spenningsdetektor Voltage Detector Brukermanual Brugsanvisning Bruksanvisning User Manual English Norsk ELIT AS - 2010 Innhold: 1. Generelle applikasjoner. 2. Beskrivelse av instrumentet. 3. Sikkerhetsinformasjon
Den som gjør godt, er av Gud (Multilingual Edition)
") Den som gjør godt, er av Gud (Multilingual Edition) Arne Jordly Click here if your download doesn"t start automatically Den som gjør godt, er av Gud (Multilingual Edition) Arne Jordly Den som gjør godt,
Den som gjør godt, er av Gud (Multilingual Edition) Arne Jordly Click here if your download doesn"t start automatically Den som gjør godt, er av Gud (Multilingual Edition) Arne Jordly Den som gjør godt,
2018 ANNUAL SPONSORSHIP OPPORTUNITIES
 ANNUAL SPONSORSHIP OPPORTUNITIES MVP SPONSORSHIP PROGRAM CALLING ALL VENDORS! Here is your chance to gain company exposure while strengthening your dealer Association at the same time. Annual Sponsorship
INSTALLATION GUIDE FTR Cargo Rack Regular Ford Transit 130" Wheelbase ( Aluminum )
") INSTALLATION GUIDE 1505-FTR Cargo Rack Regular Ford Transit 130" Wheelbase ( Aluminum ) QUICK START GUIDE Phase 1 - Assembly q 1.1 Setup... q 1.2 Cargo Rack Assembly... 3-4 5-6 Phase 2 - Installation q
INSTALLATION GUIDE 1505-FTR Cargo Rack Regular Ford Transit 130" Wheelbase ( Aluminum ) QUICK START GUIDE Phase 1 - Assembly q 1.1 Setup... q 1.2 Cargo Rack Assembly... 3-4 5-6 Phase 2 - Installation q
Full Automatic Espresso Maker HD5730
 Full Automatic Espresso Maker HD5730 2 A 1 B C D E F G 3 2 A B I C 1 2 3 4 J K 8 D 1 2 3 4 5 6 7 E F L G H M N O P 4 English 6 Dansk 32 Suomi 58 Norsk 83 Svenska 109 HD5730 6 English Introduction Congratulations
KAMPANJE APK : APK-5: Skifte pakninger mellom turbo og CCDPF
 KAMPANJE APK-5 20150722: APK-5: Skifte pakninger mellom turbo og CCDPF Berørte modeller for APK-5: Vitara APK416D, totalt 66 biler. Liste med chassisnummer legges ikke ved, bruk Forhandlerweb til å sjekke
https://sandefjord.ist-asp.com/sandefjordpub/login.htm
 Søknad om plass i barnehage eller SFO i Sandefjord kommune Application for a place in kindergarten or day care facilities for school children, this will be referred to as SFO. Søknad om plass skal legges
Databases 1. Extended Relational Algebra
 Databases 1 Extended Relational Algebra Relational Algebra What is an Algebra? Mathematical system consisting of: Operands --- variables or values from which new values can be constructed. Operators ---
klassisk angoragenser classic angora sweater
 klassisk angoragenser classic angora sweater www.pickles.no / shop.pickles.no NORSK Størrelser XS (S) M (L) XL (XXL) Garn Pickles Angora 150 (175) 200 (225) 250 (275) g Pinner 80 og 40 cm rundpinne og
SERVICE BULLETINE 2008-4
 S e r v i c e b u l l e t i n e M a t e r i e l l Materiellsjef F/NLF kommuniserer påminnelse omkring forhold som ansees som vesentlige for å orientere om viktige materiellforhold. Målgruppen for Servicbulletinen
Information search for the research protocol in IIC/IID
 Information search for the research protocol in IIC/IID 1 Medical Library, 2013 Library services for students working with the research protocol and thesis (hovedoppgaven) Open library courses: http://www.ntnu.no/ub/fagside/medisin/medbiblkurs
Roma Garden Art.no: FP-ROMGR-100 Last updated: 12.07.13
 NOMonteringsanvisning 2 GB Assembly instructions 3 Roma Garden Art.no: FP-ROMGR-100 Last updated: 12.07.13 Roma Garden Vekt Krav til gulvplate 352 kg 670 mm Ta kontakt med en faghandler om du trenger tips
Han Ola of Han Per: A Norwegian-American Comic Strip/En Norsk-amerikansk tegneserie (Skrifter. Serie B, LXIX)
") Han Ola of Han Per: A Norwegian-American Comic Strip/En Norsk-amerikansk tegneserie (Skrifter. Serie B, LXIX) Peter J. Rosendahl Click here if your download doesn"t start automatically Han Ola of Han Per:
Han Ola of Han Per: A Norwegian-American Comic Strip/En Norsk-amerikansk tegneserie (Skrifter. Serie B, LXIX) Peter J. Rosendahl Click here if your download doesn"t start automatically Han Ola of Han Per:
SafeRing / SafePlus Retrofit of under voltage coil V Module
 SafeRing / SafePlus Retrofit of under voltage coil V Module Installation Instructions www.abb.com Document status Responsible RELEASED NODIS Location Date Name Prepared NODIS 2008-12-15 BJGU/GUSO Checked
Trådløsnett med Windows XP. Wireless network with Windows XP
 Trådløsnett med Windows XP Wireless network with Windows XP Mai 2013 Hvordan koble til trådløsnettet eduroam med Windows XP Service Pack 3? How to connect to the wireless network eduroam with Windows XP
EMS 1. Music Streamer. Owner's Manual
 EMS 1 Music Streamer Owner's Manual EN N 2 ENG About the EMS 1 Electrocompaniet Music Streamer This unit is designed to work with the Electrocompaniet PD 1 DAC only. A radio link is established between
PARABOLSPEIL. Still deg bak krysset
 PARABOLSPEIL Stå foran krysset på gulvet og se inn i parabolen. Hvordan ser du ut? Still deg bak krysset på gulvet. Hva skjer? Hva skjer når du stiller deg på krysset? Still deg bak krysset Det krumme
MONTERING OG BRUKERVEILEDNING Elektrisk infravarmer for utendørs bruk Art nr og (SH1685FAL - SH1265EL)
") MONTERING OG BRUKERVEILEDNING Elektrisk infravarmer for utendørs bruk Art nr 421240 og 421250 (SH1685FAL - SH1265EL) NO Bruksanvisning 1-3 EN Instruction Manual 4-6 No. Part Name No. Part Name 1 Skrue
MONTERING OG BRUKERVEILEDNING Elektrisk infravarmer for utendørs bruk Art nr 421240 og 421250 (SH1685FAL - SH1265EL) NO Bruksanvisning 1-3 EN Instruction Manual 4-6 No. Part Name No. Part Name 1 Skrue
Oppgave. føden)? i tråd med
? i tråd med") Oppgaver Sigurd Skogestad, Eksamen septek 16. des. 2013 Oppgave 2. Destillasjon En destillasjonskolonne har 7 teoretiske trinn (koker + 3 ideelle plater under føden + 2 ideellee plater over føden + partielll
Oppgaver Sigurd Skogestad, Eksamen septek 16. des. 2013 Oppgave 2. Destillasjon En destillasjonskolonne har 7 teoretiske trinn (koker + 3 ideelle plater under føden + 2 ideellee plater over føden + partielll
Newtons fargeskive. Regnbuens farger blir til hvitt. Sett skiva i rask rotasjon ved hjelp av sveiva.
 Newtons fargeskive Regnbuens farger blir til hvitt. Sett skiva i rask rotasjon ved hjelp av sveiva. Se hva som skjer med fargene. Hvitt lys består av en blanding av alle farger. Når fargeskiva roterer
Independent Inspection
 Independent Inspection Odd Ivar Johnsen Vidar Nystad Independent Inspection Mål: Felles forståelse og utøvelse av "Independent Inspection" i forbindelse med "Critical Maintenance Task". Independent Inspection
NÅR FAGKUNNSKAP & KOMPETANSE TELLER BRUKERMANUAL ELIT AC10 SPENNINGSDETEKTOR USER MANUAL ELIT AC10 VOLTAGE DETECTOR. English Norsk
 NÅR FAGKUNNSKAP & KOMPETANSE TELLER BRUKERMANUAL ELIT AC10 SPENNINGSDETEKTOR USER MANUAL ELIT AC10 VOLTAGE DETECTOR English Norsk WWW.ELIT.NO Innhold: NORSK 1. Generelle applikasjoner. 2. Beskrivelse av
SafeRing / SafePlus Retrofit of auxiliary switch S9 for fuse blown indication F module
 SafeRing / SafePlus Retrofit of auxiliary switch S9 for fuse blown indication F module Installation instructions www.abb.com Document status Responsible RELEASED NODIS Location Date Name Prepared NODIS
Prosjektet Digital kontaktinformasjon og fullmakter for virksomheter Digital contact information and mandates for entities
 Prosjektet Digital kontaktinformasjon og fullmakter for virksomheter Digital contact information and mandates for entities Nordisk Adressemøte / Nordic Address Forum, Stockholm 9-10 May 2017 Elin Strandheim,
SHORE POWER CONVERTER LIST 2018
 2018 POWER AT YOUR CONTROL Shore cord capacities These tables provide a approximate indication of the amount of kva capacity of different amperage shore cords at common worldwide voltages. Use these tables
Dagens tema: Eksempel Klisjéer (mønstre) Tommelfingerregler
 Tommelfingerregler") UNIVERSITETET I OSLO INF1300 Introduksjon til databaser Dagens tema: Eksempel Klisjéer (mønstre) Tommelfingerregler Institutt for informatikk Dumitru Roman 1 Eksempel (1) 1. The system shall give an overview
UNIVERSITETET I OSLO INF1300 Introduksjon til databaser Dagens tema: Eksempel Klisjéer (mønstre) Tommelfingerregler Institutt for informatikk Dumitru Roman 1 Eksempel (1) 1. The system shall give an overview
Trådløsnett med. Wireless network. MacOSX 10.5 Leopard. with MacOSX 10.5 Leopard
 Trådløsnett med MacOSX 10.5 Leopard Wireless network with MacOSX 10.5 Leopard April 2010 Slå på Airport ved å velge symbolet for trådløst nettverk øverst til høyre på skjermen. Hvis symbolet mangler må
FIRST LEGO League. Härnösand 2012
 FIRST LEGO League Härnösand 2012 Presentasjon av laget IES Dragons Vi kommer fra Härnosänd Snittalderen på våre deltakere er 11 år Laget består av 4 jenter og 4 gutter. Vi representerer IES i Sundsvall
NEOREST Hybrid (Toilet bowl) NEOREST Hybrid. Installation manual. Safety Cautions Precaution before installation. Included parts.
 NEOREST Hybrid. Installation manual. Safety Cautions Precaution before installation. Included parts.") Installation manual NEOREST Hybrid (Toilet bowl) NEOREST Hybrid Safety Cautions Precaution before installation Included parts Part diagram Installation procedure EN Install the product properly according
Installation manual NEOREST Hybrid (Toilet bowl) NEOREST Hybrid Safety Cautions Precaution before installation Included parts Part diagram Installation procedure EN Install the product properly according
Appendix B, not for publication, with screenshots for Fairness and family background
 Appendix B, not for publication, with screenshots for Fairness and family background Ingvild Almås Alexander W. Cappelen Kjell G. Salvanes Erik Ø. Sørensen Bertil Tungodden This document shows screenshots
229 SONATA Manual NO_ENG 1.04
 -SONATA 2 SONATA SONATA Informasjon og sikkerhet ADVARSEL -Bruk bare strømforsyning som er godkjent av COMMidt, for bruk sammen med denne enheten. Bruk av andre typer kan oppheve all godkjenning og garanti,
GEF2200 Atmosfærefysikk 2017
 GEF2200 Atmosfærefysikk 2017 Løsningsforslag til sett 3 Oppgaver hentet fra boka Wallace and Hobbs (2006) er merket WH06 WH06 3.18r Unsaturated air is lifted (adiabatically): The rst pair of quantities
Elektronisk innlevering/electronic solution for submission:
 VIKINGTIDSMUSEET Plan- og designkonkurranse/design competition Elektronisk innlevering/electronic solution for submission: Det benyttes en egen elektronisk løsning for innlevering (Byggeweb Anbud). Dette
Bestille trykk av doktoravhandling Ordering printing of PhD Thesis
 Bestille trykk av doktoravhandling Ordering printing of PhD Thesis Brukermanual / User manual Skipnes Kommunikasjon ntnu.skipnes.no PhD Thesis NTNU LOG IN NOR: Gå inn på siden ntnu.skipnes-wtp.no, eller
Bostøttesamling
 Bostøttesamling 2016 Teresebjerke@husbankenno 04112016 2 09112016 https://wwwyoutubecom/watch?v=khjy5lwf3tg&feature=youtube 3 09112016 Hva skjer fremover? 4 09112016 «Gode selvbetjeningsløsninger» Kilde:
Vekeplan 4. Trinn. Måndag Tysdag Onsdag Torsdag Fredag AB CD AB CD AB CD AB CD AB CD. Norsk Matte Symjing Ute Norsk Matte M&H Norsk
 Vekeplan 4. Trinn Veke 39 40 Namn: Måndag Tysdag Onsdag Torsdag Fredag AB CD AB CD AB CD AB CD AB CD Norsk Engelsk M& Mitt val Engelsk Matte Norsk Matte felles Engelsk M& Mitt val Engelsk Norsk M& Matte
Fitting instruction. devi-pipeheat / devi-flexheat Assembly between cold tail and selflimiting. Montering av tilledning på selvbegrensende varmekabel
 GB/NO Fitting instruction devi-pipeheat / devi-flexheat Assembly between cold tail and selflimiting heating cable Item no. 19806415 Montering av tilledning på selvbegrensende varmekabel Art. nr. 19806415
kjell-aksel og iselin-genser kjell-aksel and iselin sweaters
 kjell-aksel og iselin-genser kjell-aksel and iselin sweaters www.pickles.no / shop.pickles.no NORSK Størrelser 1 (2) 3-4 (5-6) 7-8 år Garn Pickles Tweedy Hovedfarge Iselin: 200 (200) 300 (300) 300 g Hovedfarge
Vedlegg 2 Dokumentasjon fra TVM leverandør
 (Step 7) Payment selection or date modification state This screen is displayed after validation of a date in the calendar screen. The customer can: - Modify again the date by pressing the Validity begin:
Speak with Us! - Kindergarten
 SPEAK WITH US! Heftet er gitt ut av Nasjonalt senter for fremmedspråk i opplæringen. Ansvarlig redaktør: R. Steinar Nybøle Redaktør: Karin Dahlberg Pettersen Forfatter: Katrine Kjæreng Kolstad Alle bilder
Macbeth: Frozen Scenes
 Macbeth: Frozen Scenes Using Frozen Scenes There are several ways to use these scenes 1. Along with the scene one can give the students the lines from the play and ask them to perform their scene with
Instruksjons manual Instruction manual
 knm Copyright c - 2011 knm Side. 1 BRUK AV UTSTYRET Utstyret er designet for løft, trekk, folding/bøying, kutting, støtteoperasjoner etc, og krever, med sitt høye operasjonstrykk og tunge arbeids last,
SiS GO ELECTROLYTE POWDERS
 VOSS BERGEN-VOSS Energibehov til Bergen-Voss er et regnestykke. For å gjøre opplevelsen best mulig, må kroppen opprettholde væskebalansen og få energitilskudd for å unngå kramper og holde kraften oppe.
IMPORTANT! HOLD ON THIS DOCUMENT FOR LATER REFERENCE! READ CAREFULLY! VIKTIG! BEHOLD DETTE DOKUMENTET FOR FREMTIDIG BRUK! LES NØYE IGJENNOM!
 GB IMPORTANT! HOLD ON THIS DOCUMENT FOR LATER REFERENCE! READ CAREFULLY! NOR VIKTIG! BEHOLD DETTE DOKUMENTET FOR FREMTIDIG BRUK! LES NØYE IGJENNOM! Produktmål, materiale: 135x77x72 cm Furu Proper use This
// Translation // KLART SVAR «Free-Range Employees»
 // Translation // KLART SVAR «Free-Range Employees» Klart Svar is a nationwide multiple telecom store, known as a supplier of mobile phones and wireless office solutions. The challenge was to make use
SafeRing / SafePlus Retrofit of auxiliary switch S9 for relay trip indication V module
 SafeRing / SafePlus Retrofit of auxiliary switch S9 for relay trip indication V module Installation instructions www.abb.com Document status Responsible RELEASED NODIS Location Date Name Prepared NODIS
Instructions for the base (B)-treatment and the elicitation (E)-treatment of the experiment
-treatment and the elicitation (E)-treatment of the experiment") Appendix Instructions for the base (B)-treatment and the elicitation (E)-treatment of the experiment We here provide the instructions given to the participants at the beginning of the session and throughout
Appendix Instructions for the base (B)-treatment and the elicitation (E)-treatment of the experiment We here provide the instructions given to the participants at the beginning of the session and throughout
STILLAS - STANDARD FORSLAG FRA SEF TIL NY STILLAS - STANDARD
 FORSLAG FRA SEF TIL NY STILLAS - STANDARD 1 Bakgrunnen for dette initiativet fra SEF, er ønsket om å gjøre arbeid i høyden tryggere / sikrere. Både for stillasmontører og brukere av stillaser. 2 Reviderte
ELSEMA 1, 2, 4-Channel 27MHz Transmitter FMT312E, FMT31202E, FMT31204E
 FMT-312E, FMT-31202E, FMT-31204E 12V 1Watt 27MHz Transmitter Features 3 versions available 1-channel (FMT-312E), 2-channel (FMT- 31202E) and 4-channel (FMT-31204E) 1 Watt Transmitter with current consumption
PHIL 102, Fall 2013 Christina Hendricks
 PHIL 102, Fall 2013 Christina Hendricks Peter Singer Australian, now at Princeton University Clip from a documentary called Examined Life, giving an overview of Singer s views on poverty and ethical treatment
SJEKKESKOLEN: EN STEG-FOR-STEG GUIDE TIL TILTREKNING AV FANTASTISKE JENTER (NORWEGIAN EDITION) BY ANDREAS GODE VIBBER
 BY ANDREAS GODE VIBBER") SJEKKESKOLEN: EN STEG-FOR-STEG GUIDE TIL TILTREKNING AV FANTASTISKE JENTER (NORWEGIAN EDITION) BY ANDREAS GODE VIBBER DOWNLOAD EBOOK : SJEKKESKOLEN: EN STEG-FOR-STEG GUIDE TIL EDITION) BY ANDREAS GODE
SJEKKESKOLEN: EN STEG-FOR-STEG GUIDE TIL TILTREKNING AV FANTASTISKE JENTER (NORWEGIAN EDITION) BY ANDREAS GODE VIBBER DOWNLOAD EBOOK : SJEKKESKOLEN: EN STEG-FOR-STEG GUIDE TIL EDITION) BY ANDREAS GODE
Software applications developed for the maritime service at the Danish Meteorological Institute
 Software applications developed for the maritime service at the Danish Meteorological Institute Anne Marie Munk Jørgensen (ammj@dmi.dk), Ove Kjær, Knud E. Christensen & Morten L. Mortensen Danish Meteorological
Safety a t t h e f A c t o r y
 Safety a t t h e f A c t o r y Sikkerhet på fabrikken Safety at the factory NÅ har du god tid til å lese denne brosjyren! I en krisesituasjon har du ikke like god tid You have plenty of time to read this
Brukerveiledning på engelsk for Dymista Nesespray, suspensjon 137 mikrogram / 50 mikrogram per spray (azelastinhydroklorid/flutikasonpropionat)
") Brukerveiledning på engelsk for Dymista Nesespray, suspensjon 137 mikrogram / 50 mikrogram per spray (azelastinhydroklorid/flutikasonpropionat) Instruction for use Dymista Nasal Spray 137 micrograms /
Brukerveiledning på engelsk for Dymista Nesespray, suspensjon 137 mikrogram / 50 mikrogram per spray (azelastinhydroklorid/flutikasonpropionat) Instruction for use Dymista Nasal Spray 137 micrograms /
Of all the places in the world, I love to stay at Grandma Genia and
 Of all the places in the world, I love to stay at Grandma Genia and Grandpa Yuda s house. I spend all my vacations there away from my nagging sister, away from my parents without ever having to wake up
SafeRing / SafePlus Retrofit of auxiliary switch S10 for position indication of earthing switch De module
 SafeRing / SafePlus Retrofit of auxiliary switch S10 for position indication of earthing switch De module Installation instructions www.abb.com Document status Responsible RELEASED NODIS Location Date
Level Set methods. Sandra Allaart-Bruin. Level Set methods p.1/24
 Level Set methods Sandra Allaart-Bruin sbruin@win.tue.nl Level Set methods p.1/24 Overview Introduction Level Set methods p.2/24 Overview Introduction Boundary Value Formulation Level Set methods p.2/24
Rom-Linker Software User s Manual
 Rom-Linker Software User s Manual Tel.: +886-2-2274-1347 Fax. +886-2-2273-3014 Http://www.hmt.com.tw e-mail: hmtsales@hmt.com.tw Contents Catalogue Page (1) Rom-Linker Starting Screen... 01 (2) Rom-Linker
PATIENCE TÅLMODIGHET. Is the ability to wait for something. Det trenger vi når vi må vente på noe
 CARING OMSORG Is when we show that we care about others by our actions or our words Det er når vi viser at vi bryr oss om andre med det vi sier eller gjør PATIENCE TÅLMODIGHET Is the ability to wait for
UNIVERSITETET I OSLO ØKONOMISK INSTITUTT
 UNIVERSITETET I OSLO ØKONOMISK INSTITUTT BOKMÅL Eksamen i: ECON1210 - Forbruker, bedrift og marked Eksamensdag: 26.11.2013 Sensur kunngjøres: 18.12.2013 Tid for eksamen: kl. 14:30-17:30 Oppgavesettet er