Fitting Kit K993W. Fitting Instructions for Basic Carrier Monteringsanvisning for takstativ. x 1 x 1 x 1 x 1. x 1 x 1 x 1 x 1.
|
|
|
- Edvard Halvard Knutsen
- 6 år siden
- Visninger:
Transkript

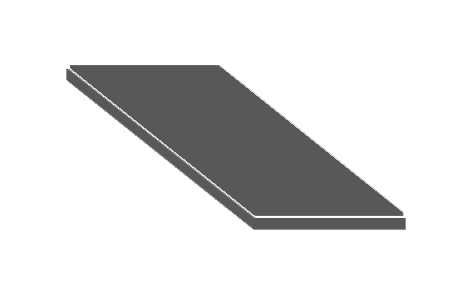
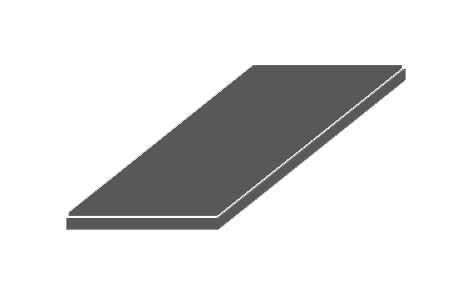
1 Fitting Kit EN NO Fitting Instructions for Basic Carrier Monteringsanvisning for takstativ x 1 x 1 x 1 x 1 x 1 x 1 x 1 x 1 x 1 x 1 x 1 x 1 Revision No: 1A 1

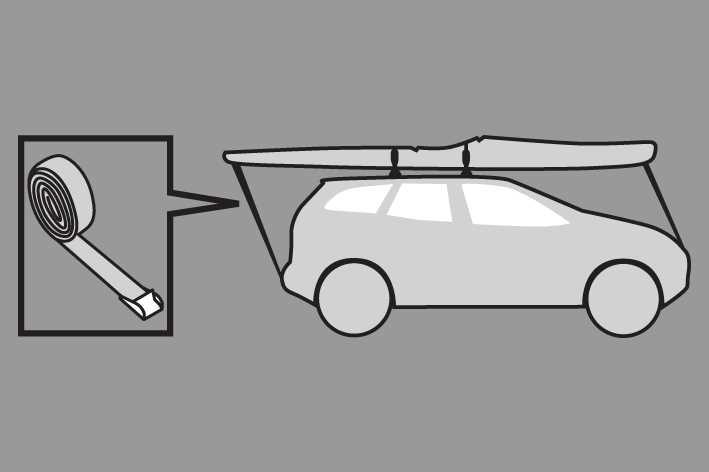
 50 kgs (110")
2 MAX kgs (lbs) W/P WHD Mazda 2, 4dr Sedan Oct 15-+ AU 50 kgs (110 lbs) 50 kgs (110 lbs) 2
3 A B C , 4dr Sedan Oct 15-+ (AU) -235mm 450mm - 815mm 795mm /4ths" 17 11/16ths" /16ths" 31 5/16ths" - X 3
4 EN First Time Installation Remove parts from inside the package and check. Contact your dealer if any parts are missing or damaged. This kit fits type A, B, C and D. These instructions show type A crossbar fitted. They also apply to type B, C and D. NOTE: Clamp images in these instructions may not be representative of the clamps in this kit 4
5 EN Use keys to remove covers. Use hex screwdriver to reverse adjusting screw 10 turns. Press adjusting screw and pull crossbar legs out. Refer to the crossbar instructions for crossbar adjustment method. Ensure each end of the crossbar is adjusted equally. 5
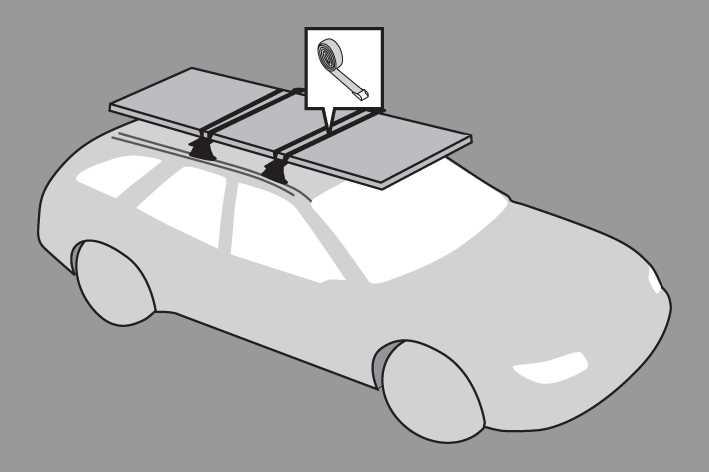
6 EN Remove locking screw. Apply protective strip as shown. Trim if required. It is important to put the clamps in the correct position on the vehicle. Letters refer to the part numbers stamped on clamps. Clamp Part Number: A = A681 B = A682 C = A839 D = A840 6
7 EN Attach clamp to each leg. NOTE; clamps may have labels showing their positions on the vehicle (For example; "Front Right"). Refit locking screw so that it goes through the hole in the clamp. Do not begin to tighten the locking screw. Refer to the underside of the pad for the part number. 7
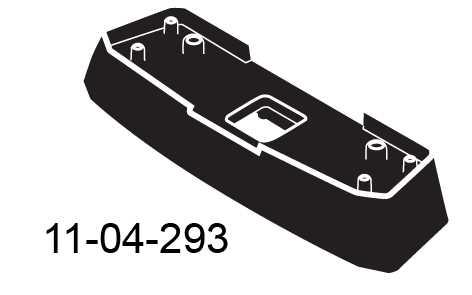
8 EN It is important to put the pads in the correct position on the vehicle. Letters refer to the pad part numbers and position. Pad Part Number: A = 293 B = 294 C = 295 D = 296 Place rubber pads (supplied with fitting kit) on the vehicle roof. Pad may vary in shape to that shown. Make sure the pad fits into the holes underneath the foot. 8
9 EN Fitment Clamps directly to edge of roof under the doors Please check the front of this manual for information relating specifically to your vehicle. Place crossbar on vehicle. Minimum recommended spacing between the bars is 700mm (27 1/2") (unless otherwise stated). Adjust the legs on the crossbar so that they are positioned equally from the ends of the crossbar, and the clamps engage firmly on the body work of the vehicle. Tighten adjusting screw to 2 Nm (1.5 ft lb) hand tight. 9
10 EN Tighten locking screw on both legs evenly, 2.5 Nm (1.8 ft lb). Check crossbar is securely attached to the vehicle. Use keys to fit and lock covers 10
11 EN CAUTION: Recheck all fasteners immediately after a load is applied to the crossbars. Regularly check screws are tight. 11
12 EN Maintenance Clean the car roof and surfaces of the product that will be in contact with the car roof. Follow the fitting instructions for fitting the product to your vehicle. Make sure all steps are carried out in order. Set crossbars a minimum distance of 700mm (27 1/2") apart where no other distance is specified in the fitting instructions. This is especially important when carrying long loads. Check unit is securely attached whenever you refit it to the vehicle. If the unit feels loose, refer to the fitting instructions and readjust. Some glass/panoramic roofs and radio antennae may not be able to be used when the product is fitted. Do not modify this product. Refer to the maximum permitted load capacity specified in the fitting instructions. Do not exceed the vehicle manufacturers roof load rating if it is lower than the maximum load capacity specified in the fitting instructions. Loads should not overhang the sides of the product and be evenly distributed with the lowest possible centre of gravity. Long loads should be secured with nonelastic straps to the front and rear of the vehicle. Objects with pointed ends (e.g. ski poles) should be carried with the pointed ends to the rear of the vehicle. Remove all loose or removable objects from the load prior to loading. Make sure all loads are securely fastened with non-elastic straps. Check regularly during longer journeys. A loaded roof rack system can alter the performance of your vehicle. Be especially aware of the effects of side winds, changing of direction, and braking performance. Avoid rapid acceleration and deceleration. Drive carefully. Note that the total height of the vehicle increases when upright loads are carried. Products should be locked during transport if they have locks fitted. 12
13 EN Check and replace worn out or defective parts. Keep the product clean and maintained. Never drive into a car wash with the roof rack system fitted. Lubricate locks and adjusting screws at regular intervals. Remove the products from the vehicle when not in use. Make sure all loose parts are stored safely. Yakima Europe Coöperatief U.A. Archimedesbaan ME Nieuwegein The Netherlands Yakima Products, Inc Kruse Way, Lake Oswego, OR USA

14 NO Montering første gang Pakk ut delene og kontroller innholdet. Kontakt din forhandler hvis deler mangler eller er skadet. Dette monteringssettet passer type A, B, C og D. Denne bruksanvisningen viser montering av stativ type A. den gjelder også for type B, C og D. Merk: bilde av brakett i bruksanvisningen ker muligens ikke representativt for braketter i dette monteringskitet 14


15 NO Bruk nøklene for å ta av dekslene Bruk unbracoskrutrekker for å skru ut justeringsskruen 10 omdreininger. Trykk inn justeringsskruen og dra ut fttene på stativet. Bruk bruksanvisningen for riktig justering av stativet. Forsikre deg om at stativet er justert likt i hver ende i forhold til. 15

16 NO Fjern låseskruen. Påfør beskyttende tape som vist Beskjær hvis nødvendig Det er viktig å plassere braketter i riktig posisjon på bilen. Bokstaver refererer til delenummer påstemplet på brakett. Delenummer brakett: A = A681 B = A682 C = A839 D = A840 16

 Monter tilbake")

17 NO Fest brakett til hver fot. Merk: brakettene kan være merket med anvisning for hvor braketten skal brukes på bilen (eksempel: "front right") Monter tilbake låseskruen så den går gejnnom hullet i braketten. Ikke skru til låseskruen enda. Se undersiden av gummifoten for korrekt delenummer. 17

 på taket av bilen.")
18 NO Det er viktig å plassere gummifot i riktig posisjon på bilen. Bokstavene referer til delenummer på fot og posisjon. Delenummer gummifot: A = 293 B = 294 C = 295 D = 296 Plasser gummifot (kommer med monteringssettet) på taket av bilen. Gummiføttene kan variere i utførelse i forhold til bildet. Forsikre om at gummifoten passer i hullene på foten på tativet. 18


19 NO Montering Festes direkte til kanten av taket under dørene Vennligst les foran av denne bruksanvisningen for informasjon som er spesifikk for din bil. Plasser stengene på bilen. Minimum anbefalt avstand er 700mm (om ikke annet er oppgitt). Juster føttene på stativet slik at avstanden er likt fordelt i forhold til lengden, og at klemmene har god kontakt med bilens karosseri. Trekk til justeringskruen med et moment på 2Nm / 1.5 ft lb. 19


20 NO Skru til låseskruen på begge føtter likt, 2.5Nm / 1.8 ft lb. Forsikre om at takstativet er sikkert festte til bilen. Bruk nøkkelen og sett på dekslene 20
21 NO Advarsel: undersøk regelmessig at skruer er festet og strammet korrekt. 21
22 NO Vedlikehold Rengjør grundig taket og alle overflater på produktet som kommer i kontakt med taket på bilen. Følg bruksanvisningen når du monterer produktet på bilen. Sørg for at trinn følges i rett rekkefølge. Avstanden mellom stengene skal være minimum 700 mm hvis noe annet ikke er spesifisert i bruksanvisningen. Dette er spesielt viktig der det skal transporteres lange gjenstander. Kontroller at takstativet er sikkert festet hver gang du monterer det på bilen. Hvis stativet føles løst bør bruksanvisningen følges og etterjuster. Enkelte soltak og antenner kan ikke være i bruk når takstativ er montert. Ikke modifiser dette produktet. Se maksimalt tillatte lastekapasitet i bruksanvisningen. Man skal likevel aldri gå over anbefalt totalvekt for bilens tak. Last skal ikke henge utover siden på takstativet og alltid være jevnt plassert med tyngdepunkt så lavt som mulig. Lange gjenstander bør alltd festes med elastiske stropper både foran og bak på bilen. Gjenstander med spiss ende bør alltid fraktes med den spisse enden bakover. Fjern alle løse gjenstander fra lasten før den festes på taket. Forsikre deg om at all last er festet med ikke elastiske stropper og kontroller regelmessig under lange turer. Last på taket kan endre kjøregenskapene på bilen. Det er viktig å være oppmerksom på sidevind, unnamanøvre og bremseegenskaper. Kjør forsiktig. Vær oppmerksom på at høyden på bilen ofte øker betraktelig med last på taket. Produkter bør løses under transport hvis mulig. Kontroller og bytt ut slitte eller defekte deler. Hold produktet rent og vedlikeholdt. Kjør aldri inn i en bilvaskemaskin med takstativet på. 22
23 NO Smør låsene og juster skruer hvis nødvendig med jevne intervaller. Demonter produktet hvis det ikke er bruk. Sørg for å lagre alle løse deler forsvarlig. Yakima Europe Coöperatief U.A. Archimedesbaan ME Nieuwegein The Netherlands Yakima Products, Inc Kruse Way, Lake Oswego, OR USA 23
K323W. Fitting Kit. Monteringsanvisning for takstativ. x 4 x 8 x 1 x 1. x 4 x 4 x 4 x 4. x 8. Revision No: 5C 1
 Fitting Kit Monteringsanvisning for takstativ x 4 x 8 x 1 x 1 x 4 x 4 x 4 x 4 x 8 Revision No: 5C 1 Montering første gang Pakk ut delene og kontroller innholdet. Kontakt din forhandler hvis deler mangler
INSTALLATION GUIDE FTR Cargo Rack Regular Ford Transit 130" Wheelbase ( Aluminum )
") INSTALLATION GUIDE 1505-FTR Cargo Rack Regular Ford Transit 130" Wheelbase ( Aluminum ) QUICK START GUIDE Phase 1 - Assembly q 1.1 Setup... q 1.2 Cargo Rack Assembly... 3-4 5-6 Phase 2 - Installation q
INSTALLATION GUIDE 1505-FTR Cargo Rack Regular Ford Transit 130" Wheelbase ( Aluminum ) QUICK START GUIDE Phase 1 - Assembly q 1.1 Setup... q 1.2 Cargo Rack Assembly... 3-4 5-6 Phase 2 - Installation q
Monteringsanvisning. Assembly instructions. Ledsagerbrems / Drum brake. Artikkelnummer/ Item no.
 Monteringsanvisning Assembly instructions Exigo 30 Emineo Ledsagerbrems / Drum brake Beskrivelse/Description 20 Flexel/Compact 84417 20 Luft/Pneumatic 84416 20 Pur 84419 22 Flexel/Compact 84437 22 Luft/Pneumatic
REMOVE CONTENTS FROM BOX. VERIFY ALL PARTS ARE PRESENT READ INSTRUCTIONS CAREFULLY BEFORE STARTING INSTALLATION
 2011-2014 FORD EXPLORER PARTS LIST Qty Part Description Qty Part Description 1 Bull Bar 2 12mm x 35mm Bolt Plates 1 Passenger/Right Mounting Bracket 2 12mm Nut Plate 1 Driver/Left Mounting Bracket 2 12mm
Handicare Emineo Ledsagerbrems Basic / Drum brake Basic
 Monteringsanvisning Assembly instructions Handicare Emineo Ledsagerbrems Basic / Drum brake Basic Beskrivelse/Description Art. nr / Item no. 20 Flexel/Compact 84417 20 Luft/Pneumatic 84416 22 Flexel/Compact
Replacing the tube and/or tyre of a drive wheel, indoor/outdoor
 ASSEMBLY INSTRUCTION Replacing the tube and/or tyre of a drive wheel, indoor/outdoor EN NO 9010182A 5.2.7 9010182 Replacing the tube and/or tyre of a drive wheel, indoor/outdoor Preparation Be sure that
MONTASJEANVISNING INSTRUCTIONS FOR ASSEMBLY AND USE
 MONTASJEANVISNING INSTRUCTIONS FOR ASSEMBLY AND USE Småvarereol R 3000 Shelving unit R 3000 ZERTIFIZIER T 1. Gavl / Upright frame 2. Hylle / Dividing shelf 3. Krysstag / Back braces 4. Gitter bakvegg /
Midnight BBQ Light USER MANUAL
 Midnight BBQ Light USER MANUAL Instructions The Midnight BBQ Light uses 4 x LR44 / AG13 batteries, included in the package. Unscrew the bottom cover and insert the included batteries and align the battery
Safering / Safeplus Retrofit of Ronis key for disconnector Interlock type EL11AP V and Sv modules
 Safering / Safeplus Retrofit of Ronis key for disconnector Interlock type EL11AP V and Sv modules Installation instructions www.abb.com Document status Responsible RELEASED NODIS Location Date Name Prepared
#89853 Command Center
 1 #89853 Command Center Portable AV Center Assembly Instructions #89853 Command Center Portable AV Center Part rawing escription Qty Part rawing escription Qty Hardware List A Socket Screw M6X9mm 16 A
Justeringsanvisninger finnes på de to siste sidene.
 d Montering av popup spredere Justeringsanvisninger finnes på de to siste sidene. Link til monteringsfilm på youtube: http://youtu.be/bjamctz_kx4 Hver spreder har montert på en "svinkobling", det vil si
Replacing the carbon brushes
 ASSEMBLY INSTRUCTION Replacing the carbon brushes EN NO 9010180A 5.2.4 9010180 Replacing the carbon brushes (Puma 20/40) Preparation Switch off the wheelchair via the remote control. Be sure that the
KAMPANJE APK : APK-8: Bytte bakaksel bolter
 KAMPANJE APK-8 20160222: APK-8: Bytte bakaksel bolter Berørte modeller for APK-8: Vitara APK, S-cross AKK, og Swift AZG. Totalt 454 biler på det norske markedet. Liste med chassisnummer legges ikke ved,
SafeRing / SafePlus Retrofit of under voltage coil V Module
 SafeRing / SafePlus Retrofit of under voltage coil V Module Installation Instructions www.abb.com Document status Responsible RELEASED NODIS Location Date Name Prepared NODIS 2008-12-15 BJGU/GUSO Checked
Windlass Control Panel
 SIDE-POWER 86-08955 Windlass Control Panel v1.0.2 Windlass Systems Installasjon manual SLEIPNER MOTOR AS P.O. Box 519 N-1612 Fredrikstad Norway Tel: +47 69 30 00 60 Fax: +47 69 30 00 70 w w w. s i d e
Start Here USB *CC * *CC * USB USB
 1 USB Start Here USB 11 USB WARNING: To ensure that the software is installed correctly, do not connect the USB cable until step 11. 11 USB 2 a. b. Lower both the paper tray and the print cartridge door.
IMPORTANT! HOLD ON THIS DOCUMENT FOR LATER REFERENCE! READ CAREFULLY! VIKTIG! BEHOLD DETTE DOKUMENTET FOR FREMTIDIG BRUK! LES NØYE IGJENNOM!
 GB IMPORTANT! HOLD ON THIS DOCUMENT FOR LATER REFERENCE! READ CAREFULLY! NOR VIKTIG! BEHOLD DETTE DOKUMENTET FOR FREMTIDIG BRUK! LES NØYE IGJENNOM! Produktmål, materiale: 135x77x72 cm Furu Proper use This
Mounting the electrically elevating legrest
 ASSEMBLY INSTRUCTION Mounting the electrically elevating legrest EN NO 9000A ..8 9000 Mounting the electrically elevating legrest Preparation Note! Switch off the wheelchair via remote control. Instructions
Replacing the batteries
 ASSEMBLY INSTRUCTION Replacing the batteries EN NO 9010189A 5.2.14 9010189 Replacing the batteries Preparation Switch off the wheelchair via the remote control. Remove the fuses from the battery compartment
KAMPANJE APK : APK-5: Skifte pakninger mellom turbo og CCDPF
 KAMPANJE APK-5 20150722: APK-5: Skifte pakninger mellom turbo og CCDPF Berørte modeller for APK-5: Vitara APK416D, totalt 66 biler. Liste med chassisnummer legges ikke ved, bruk Forhandlerweb til å sjekke
SERVICE BULLETINE 2008-4
 S e r v i c e b u l l e t i n e M a t e r i e l l Materiellsjef F/NLF kommuniserer påminnelse omkring forhold som ansees som vesentlige for å orientere om viktige materiellforhold. Målgruppen for Servicbulletinen
SafeRing / SafePlus Retrofit of auxiliary switch S10 for position indication of earthing switch De module
 SafeRing / SafePlus Retrofit of auxiliary switch S10 for position indication of earthing switch De module Installation instructions www.abb.com Document status Responsible RELEASED NODIS Location Date
Unit Relational Algebra 1 1. Relational Algebra 1. Unit 3.3
 Relational Algebra 1 Unit 3.3 Unit 3.3 - Relational Algebra 1 1 Relational Algebra Relational Algebra is : the formal description of how a relational database operates the mathematics which underpin SQL
bondura dual 36 Ø50mm - Ø200mm assembly & inspection manual art rev A
 bondura dual 36 Ø50mm - Ø200mm assembly & inspection manual art. 103803 rev. 27.04.2016 A TABLE OF CONTENT / INNHOLD 1/ assembly montering 2/ technical specifications/torque tekniske data/tiltrekkingsmoment
SafeRing / SafePlus Retrofit of auxiliary switch S9 for relay trip indication V module
 SafeRing / SafePlus Retrofit of auxiliary switch S9 for relay trip indication V module Installation instructions www.abb.com Document status Responsible RELEASED NODIS Location Date Name Prepared NODIS
SafeRing / SafePlus Retrofit of auxiliary switch S7 & S10 for position indication of load break switch and earthing switch C, F and SI modules
 SafeRing / SafePlus Retrofit of auxiliary switch S7 & S10 for position indication of load break switch and earthing switch C, F and SI modules Installation instructions www.abb.com Document status Responsible
MONTASJEBESKRIVELSE INSTALLATION GUIDE
 MONTASJEBESKRIVELSE INSTALLATION GUIDE ADVARSEL WARNINGS Dette armaturet er et Klasse II produkt som IKKE SKAL TILKOBLES JORD. This device is a class II product: DO NOT CONNECT THE LAMP and the pole to
Tema Fusion Monteringsanvisning
 Monteringsanvisning Assembly instruction N-6230 SYKKYLVEN - NORWAY TLF. 70 25 59 00 - TELEFAX. 70 25 59 01 E-POST: post@tema.no Målsetting Dimensions Monter fast skrogene på veggen før du monterer skuffer,
- Vennlig hilsen gründerne bak retyre
 Etter to år med utvikling og testing er retyre endelig klar for å møte den norske vinteren. Det begynte med en idé om en enkel sykkelkjetting, og endte opp med verdens første modulære sykkeldekk. Vi håper
SafeRing / SafePlus Retrofit of auxiliary switch S9 for fuse blown indication F module
 SafeRing / SafePlus Retrofit of auxiliary switch S9 for fuse blown indication F module Installation instructions www.abb.com Document status Responsible RELEASED NODIS Location Date Name Prepared NODIS
GYRO MED SYKKELHJUL. Forsøk å tippe og vri på hjulet. Hva kjenner du? Hvorfor oppfører hjulet seg slik, og hva er egentlig en gyro?
 GYRO MED SYKKELHJUL Hold i håndtaket på hjulet. Sett fart på hjulet og hold det opp. Det er lettest om du sjølv holder i håndtakene og får en venn til å snurre hjulet rundt. Forsøk å tippe og vri på hjulet.
Du vil trenge: Umbraco Nøkkel (Inkludert); Skiftnøkkel/Fastnøkkel sett (For styrestem bolten og de 4 styreboltene),pumpe
; Skiftnøkkel/Fastnøkkel sett (For styrestem bolten og de 4 styreboltene),pumpe") Pawtrekker DOG SCOOTERS / SPARKSYKKEL Monteringsanvisning Du vil trenge: Umbraco Nøkkel (Inkludert); Skiftnøkkel/Fastnøkkel sett (For styrestem bolten og de 4 styreboltene),pumpe Vi anbefaler å montere
Pawtrekker DOG SCOOTERS / SPARKSYKKEL Monteringsanvisning Du vil trenge: Umbraco Nøkkel (Inkludert); Skiftnøkkel/Fastnøkkel sett (For styrestem bolten og de 4 styreboltene),pumpe Vi anbefaler å montere
The regulation requires that everyone at NTNU shall have fire drills and fire prevention courses.
 1 The law The regulation requires that everyone at NTNU shall have fire drills and fire prevention courses. 2. 3 Make your self familiar with: Evacuation routes Manual fire alarms Location of fire extinguishers
bondura Multi Tool 200 Hydraulic Ø200mm - Ø320mm user manual - for disassembly
 bondura Multi Tool 200 Hydraulic Ø200mm - Ø320mm user manual - for disassembly 1/ cone sleeve removal demontering av konhylse 2/ pin removal demontering av bolt 3/ additional Ø140mm - Ø195mm tillegg for
Kullsett/Coal Set for Jøtul GF 100 BF2 Jøtul GF 3 BF2
 Jøtul GF 100BF2/GF 3 BF2 Jøtul GI 160 BF Kullsett/Coal Set for Jøtul GF 100 BF2 Jøtul GF 3 BF2 Jøtul GI 160 BF Monterings- og bruksanvisning - Norsk 2 Installation and Operating Instructions- English 3
User manual English Svenska Norsk
 User manual English Svenska Norsk Copyright This manual is the copyright of CI no 556520-4137. No part of this manual may be revised, copied or transmitted in any way without written permission from CI
Norsk (English below): Guide til anbefalt måte å printe gjennom plotter (Akropolis)
: Guide til anbefalt måte å printe gjennom plotter (Akropolis)") Norsk (English below): Guide til anbefalt måte å printe gjennom plotter (Akropolis) 1. Gå til print i dokumentet deres (Det anbefales å bruke InDesign til forberedning for print) 2. Velg deretter print
Norsk (English below): Guide til anbefalt måte å printe gjennom plotter (Akropolis) 1. Gå til print i dokumentet deres (Det anbefales å bruke InDesign til forberedning for print) 2. Velg deretter print
Fitting instruction. devi-pipeheat / devi-flexheat Assembly between cold tail and selflimiting. Montering av tilledning på selvbegrensende varmekabel
 GB/NO Fitting instruction devi-pipeheat / devi-flexheat Assembly between cold tail and selflimiting heating cable Item no. 19806415 Montering av tilledning på selvbegrensende varmekabel Art. nr. 19806415
Montering av Lian Skyvedør Installation of Lian Sliding Door
 Montering av Lian Skyvedør Installation of Lian Sliding Door Les dette før du starter monteringen! Read these instructions carefully before installation. Sjekk nøye at produktet stemmer med bestilling
GIMOTA AG. Assembly Instructions Dataconnectors DIN F. Datenstecker Katalog Gimota AG 04/14
 GIMOTA AG Assembly Instructions Dataconnectors DIN F 2019 Datenstecker Katalog Gimota AG 04/14 3 1 Assembly Instructions TRAC DIN-F 1.1 Preparation Standard Part sets Parts sets are supplied corresponding
EMS 1. Music Streamer. Owner's Manual
 EMS 1 Music Streamer Owner's Manual EN N 2 ENG About the EMS 1 Electrocompaniet Music Streamer This unit is designed to work with the Electrocompaniet PD 1 DAC only. A radio link is established between
Independent Inspection
 Independent Inspection Odd Ivar Johnsen Vidar Nystad Independent Inspection Mål: Felles forståelse og utøvelse av "Independent Inspection" i forbindelse med "Critical Maintenance Task". Independent Inspection
AC10. Brukermanual Brugsanvisning Bruksanvisning User Manual. Spenningsdetektor Voltage Detector. English Norsk
 Spenningsdetektor Voltage Detector Brukermanual Brugsanvisning Bruksanvisning User Manual English Norsk ELIT AS - 2010 Innhold: 1. Generelle applikasjoner. 2. Beskrivelse av instrumentet. 3. Sikkerhetsinformasjon
STILLAS - STANDARD FORSLAG FRA SEF TIL NY STILLAS - STANDARD
 FORSLAG FRA SEF TIL NY STILLAS - STANDARD 1 Bakgrunnen for dette initiativet fra SEF, er ønsket om å gjøre arbeid i høyden tryggere / sikrere. Både for stillasmontører og brukere av stillaser. 2 Reviderte
TRAPPETA RN MONTERINGSANVISNING
 [Skriv inn tekst] TRAPPETA RN MONTERINGSANVISNING 3 x 1,6 m Trappetårn Monteringsveiledningen er laget for å gi en beskrivelse på monteringen av Delta TRAPPETÅRN. Delta TRAPPETÅRN er typegodkjent under
Slope-Intercept Formula
 LESSON 7 Slope Intercept Formula LESSON 7 Slope-Intercept Formula Here are two new words that describe lines slope and intercept. The slope is given by m (a mountain has slope and starts with m), and intercept
GIMOTA AG. Assembly Instructions Dataconnectors D-SUB. Datenstecker Katalog Gimota AG 04/14 3
 GIMOTA AG Assembly Instructions Dataconnectors D-SUB 2015 Datenstecker Katalog Gimota AG 04/14 3 1 Assembly Instructions D-SUB TRAC / TRAC H 1.1 Preparation Standard Part sets Standard part sets conclude
Bruksanvisning Modell I-440 Spesialutgave. for brukere med vekt opp til 200 kg
 Bruksanvisning Modell I-440 Spesialutgave for brukere med vekt opp til 200 kg 1 2 Fjern beskyttelstrekk, og løft Evac+Chair fra veggen Plasser en fot på rammen nederst og løft opp håndtak 3 4 Håndtak har
Monteringsprosedyre for Soundstop - lydmatte
 NORSOK STANDARD PIPING AND EQUIPMENT INSULATION R-004 5.7 Guidelines for acoustic insulation The acoustic pipe insulation classes can be met by various combinations of insulation materials and jacketing
60-162-300. Monteringsanvisning Assembly Instructions Monteringsanvisning. Søve Lekemiljø AS 3830 Ulefoss - Norway Tlf: +47 35 94 65 65 www.sove.
 UK Monteringsanvisning Assembly Instructions Monteringsanvisning Produkt nr. / Product no. / Produkt nr. 60-162-300 Ordr. nr. Dato. Sign. Søve Lekemiljø AS 3830 Ulefoss - Norway Tlf: +7 35 9 65 65 www.sove.no
OtisMed Imaging Technique: Graphix for Knee MRI PHILIPS, SIEMENS, & TOSHIBA GRAPHIX MRI SCANNERS
 OtisMed Imaging Technique: PHILIPS, SIEMENS, & TOSHIBA GRAPHIX MRI SCANNERS Positioning for Posterior Alignment Use your box shaped graphix. Follow the steps below for proper placement of slices. See Figures
Elektronisk termostat med spareprogram. Lysende LCD display øverst på ovnen for enkel betjening.
 Elektronisk termostat med spareprogram. Lysende LCD display øverst på ovnen for enkel betjening. 27.5 LCD Electronic thermostat with program setting. Bright LCD display placed at the top of the heater
Trigonometric Substitution
 Trigonometric Substitution Alvin Lin Calculus II: August 06 - December 06 Trigonometric Substitution sin 4 (x) cos (x) dx When you have a product of sin and cos of different powers, you have three different
SafeRing / SafePlus Retrofit of capacitive voltage indication type VPIS C, De, F and V Modules
 We reserve all rights in this document and in the information contained therein: Reproduction, use or disclosure to third parties without SafeRing / SafePlus Retrofit of capacitive voltage indication type
Instruksjons manual Instruction manual
 knm Copyright c - 2011 knm Side. 1 BRUK AV UTSTYRET Utstyret er designet for løft, trekk, folding/bøying, kutting, støtteoperasjoner etc, og krever, med sitt høye operasjonstrykk og tunge arbeids last,
Hvordan føre reiseregninger i Unit4 Business World Forfatter:
 Hvordan føre reiseregninger i Unit4 Business World Forfatter: dag.syversen@unit4.com Denne e-guiden beskriver hvordan du registrerer en reiseregning med ulike typer utlegg. 1. Introduksjon 2. Åpne vinduet
Neural Network. Sensors Sorter
 CSC 302 1.5 Neural Networks Simple Neural Nets for Pattern Recognition 1 Apple-Banana Sorter Neural Network Sensors Sorter Apples Bananas 2 Prototype Vectors Measurement vector p = [shape, texture, weight]
TB-615 / TB-617 Wireless slim keyboard. EN User guide SE Användarhandledning FI Käyttöohje DK Brugervejledning NO Bruksanvisning
 TB-615 / TB-617 Wireless slim keyboard EN User guide SE Användarhandledning FI Käyttöohje DK Brugervejledning NO Bruksanvisning EN User guide You have bought a wireless keyboard to use with Windows XP,
Information search for the research protocol in IIC/IID
 Information search for the research protocol in IIC/IID 1 Medical Library, 2013 Library services for students working with the research protocol and thesis (hovedoppgaven) Open library courses: http://www.ntnu.no/ub/fagside/medisin/medbiblkurs
Purus Line Vinyl Plus
 Norsk Sikre at bransjereglene blir fulgt Vi anbefaler å få installasjonen utført av en autorisert rørlegger. Du finner mer informasjon i bransjereglene. Våtromsnormen, www.byggforsk.no/vaatromsnormen Montering
Christmas in the round A Holiday Prism for Band. Preview Only
 Concert BAND 1 Conductor 3 1st C Flute 3 2nd C Flute 2 Oboe 3 1st Bb Clarinet 3 2nd Bb Clarinet 3 3rd Bb Clarinet 1 Eb Alto Clarinet 2 Bb Bass Clarinet 2 Bassoon 1 1st Eb Alto Saxophone 1 2nd Eb Alto Saxophone
SafeRing / SafePlus Retrofit of opening coil Y1 and auxiliary switch S7 F, C and SI Modules with latched mechanism
 SafeRing / SafePlus Retrofit of opening coil Y1 and auxiliary switch S7 F, C and SI Modules with latched mechanism Installation instructions www.abb.com Document status Responsible RELEASED NODIS Location
Monteringsanvisning Installation manual Taksokkel for LHH og CareLite Ceiling mount for LHH and CareLite
 Monteringsanvisning Installation manual Taksokkel for LHH og CareLite Ceiling mount for LHH and CareLite Art.nr. 05-900-573-00. Page 1 of 9 Norsk Monteringsanvisning taksokkel Denne monteringsmanualen
Utøver går med feil lårnummer (og riktig startnummmer/brikke).
.") CASER Utøver går med feil lårnummer (og riktig startnummmer/brikke). - Arrangørfeil ingen konsekvens Utøver har ikke meldt seg på i rett tid og har reist med fly for å delta på Norges Cup. Hva skal TD
CASER Utøver går med feil lårnummer (og riktig startnummmer/brikke). - Arrangørfeil ingen konsekvens Utøver har ikke meldt seg på i rett tid og har reist med fly for å delta på Norges Cup. Hva skal TD
Safering / Safeplus Retrofit of Ronis key for load break switch Interlock type EL11AP C and Sl modules
 Safering / Safeplus Retrofit of Ronis key for load break switch Interlock type EL11AP C and Sl modules Installation instructions www.abb.com Document status Responsible RELEASED NODIS Location Date Name
Product Manual Produkthåndbok
 BEAM Product Manual Produkthåndbok BEAM Technical Specifications Tekniske Spesifikasjoner Description Product number Mode Voltage Current Vehicle interface Cable length Encapsulation Operating temperature
Exercise 1: Phase Splitter DC Operation
 Exercise 1: DC Operation When you have completed this exercise, you will be able to measure dc operating voltages and currents by using a typical transistor phase splitter circuit. You will verify your
NÅR FAGKUNNSKAP & KOMPETANSE TELLER BRUKERMANUAL ELIT AC10 SPENNINGSDETEKTOR USER MANUAL ELIT AC10 VOLTAGE DETECTOR. English Norsk
 NÅR FAGKUNNSKAP & KOMPETANSE TELLER BRUKERMANUAL ELIT AC10 SPENNINGSDETEKTOR USER MANUAL ELIT AC10 VOLTAGE DETECTOR English Norsk WWW.ELIT.NO Innhold: NORSK 1. Generelle applikasjoner. 2. Beskrivelse av
Perpetuum (im)mobile
mobile") Perpetuum (im)mobile Sett hjulet i bevegelse og se hva som skjer! Hva tror du er hensikten med armene som slår ut når hjulet snurrer mot høyre? Hva tror du ordet Perpetuum mobile betyr? Modell 170, Rev.
Perpetuum (im)mobile Sett hjulet i bevegelse og se hva som skjer! Hva tror du er hensikten med armene som slår ut når hjulet snurrer mot høyre? Hva tror du ordet Perpetuum mobile betyr? Modell 170, Rev.
Bytte til split Collin Lanyard RSL. Obligatorisk - alle rigger skal ha dette montert ved hopping etter 01.01.2015.
 S e r v i c e o r d r e M a t e r i e l l Materiellsjef F/NLF kommuniserer pålegg omkring forhold som ansees som vesentlige for å oppnå de målsettinger som er satt for materiellarbeidet via denne Service
Elektronisk stabilitetskontroll. Få det meste ut av din nye Ford
 36 Elektronisk stabilitetskontroll Få det meste ut av din nye Ford Ford Transit er utstyrt med elektronisk stabilitetskontroll (ESC)Ø1) som standard. Det avanserte systemet overvåker kontinuerlig den retningen
5 E Lesson: Solving Monohybrid Punnett Squares with Coding
 5 E Lesson: Solving Monohybrid Punnett Squares with Coding Genetics Fill in the Brown colour Blank Options Hair texture A field of biology that studies heredity, or the passing of traits from parents to
KAMPANJE AKK : Skifte setetrekk forseter
 KAMPANJE AKK-5 20160411: Skifte setetrekk forseter Berørte modeller: SX4 S-Cross AKK416 / AKK416D, totalt 220 biler. Liste med chassisnummer legges ikke ved, bruk Forhandlerweb til å sjekke om bilen er
Marmi Plus One. Sleek, Essential, Stunning
 MARMI PLUS ONE Marmi Plus One Sleek, Essential, Stunning Marmi Plus One Bianco - DME01 90x90 cm Marmi Plus One Bianco - DME01 60x120 cm Marmi Plus One Bianco MATTE Marmi Plus One Bianco - DME01 60x120
bondura Multi Tool 200
 bondura Multi Tool 200 pin and conical sleeve removal Ø200mm - Ø320mm user manual - for disassembly art. 103807 rev. 16.03.2016 A 1/ bondura 6.6 1.1 conical sleeve removal / demontering av konhylse 1.2
2 APPARATETS MÅL. Apparatets mål (i mm) A Apparatets fulle høyde (inkl. monteringsskinner) 640 B Apparatets fulle bredde 855
 A Apparatets fulle høyde (inkl. monteringsskinner) 640 B Apparatets fulle bredde 855") APPARATETS MÅL Tegningen er bare til illustrasjon D C B A Apparatets mål (i mm) CoolDrawer RB90S A Apparatets fulle høyde (inkl. monteringsskinner) 640 B Apparatets fulle bredde 855 C Apparatets fulle
APPARATETS MÅL Tegningen er bare til illustrasjon D C B A Apparatets mål (i mm) CoolDrawer RB90S A Apparatets fulle høyde (inkl. monteringsskinner) 640 B Apparatets fulle bredde 855 C Apparatets fulle
Eksamen KVT2002 Elenergi og automatiseringssystem/systemer. Programområde: Kulde- og varmepumpeteknikk. Nynorsk/Bokmål
 Eksamen 01.06.2016 KVT2002 Elenergi og automatiseringssystem/systemer Programområde: Kulde- og varmepumpeteknikk Nynorsk/Bokmål Nynorsk Eksamensinformasjon Eksamenstid Hjelpemiddel Eksamen varer i 4 timar.
KAMPANJE APK : APK-4: Kontroll montering EGT-2
 KAMPANJE APK-4 20150722: APK-4: Kontroll montering EGT-2 Berørte modeller for APK-4: Vitara APK416D, totalt 58 biler. Liste med chassisnummer legges ikke ved, bruk Forhandlerweb til å sjekke om bilen er
Brukerveiledning. Rolltalk PowerArm. Rev A NO
 Brukerveiledning Rolltalk PowerArm Rev A NO MONTERING Motoren festes med 4 skruer M6 x 16 til en solid brakett montert på stolen. Braketten må forarbeides / tilpasses i hvert tilfelle, med hensyn til stoltype
Roma Garden Art.no: FP-ROMGR-100 Last updated: 12.07.13
 NOMonteringsanvisning 2 GB Assembly instructions 3 Roma Garden Art.no: FP-ROMGR-100 Last updated: 12.07.13 Roma Garden Vekt Krav til gulvplate 352 kg 670 mm Ta kontakt med en faghandler om du trenger tips
SafeRing / SafePlus Retrofit of Y4 or Y5 relay trip coil V Module
 SafeRing / SafePlus Retrofit of Y4 or Y5 relay trip coil V Module Installation instructions www.abb.com Document status Responsible RELEASED NODIS Location Date Name Prepared NODIS 2008-12-15 BJGU/GUSO
NEOREST Hybrid (Toilet bowl) NEOREST Hybrid. Installation manual. Safety Cautions Precaution before installation. Included parts.
 NEOREST Hybrid. Installation manual. Safety Cautions Precaution before installation. Included parts.") Installation manual NEOREST Hybrid (Toilet bowl) NEOREST Hybrid Safety Cautions Precaution before installation Included parts Part diagram Installation procedure EN Install the product properly according
Installation manual NEOREST Hybrid (Toilet bowl) NEOREST Hybrid Safety Cautions Precaution before installation Included parts Part diagram Installation procedure EN Install the product properly according
Profile handbook. for
 Profile handbook for March 2007 Logo For the logo, we have chosen a shape in conformity with the general visual direction. The logo is inspired by the shape of the product, and the circle also creates
JBV DSB godkjenninger
 JBV DSB godkjenninger Leverandørmøte 2015-02-03 Willy Karlsen Sakkyndig driftsleder Electrical operation manager Eier av JBVs elektriske anlegg Alle jernbaneverkets elektriske anlegg er delt opp på de
2. Sett pa ny laseplate og skru inn skruene. Merk at skruen under lasebolten er lenger enn de andre. Bruk Locktite 243 pa hver skrue.
 ENDRE FUNKSJONER FOR ABLOY EL56, EL561 SKIFTE LASPLATE Fig. G 1. Skru ut lasskruene g fjern lasplaten. 2. Sett pa ny laseplate g skru inn skruene. Merk at skruen under laseblten er lenger enn de andre.
Trådløsnett med. Wireless network. MacOSX 10.5 Leopard. with MacOSX 10.5 Leopard
 Trådløsnett med MacOSX 10.5 Leopard Wireless network with MacOSX 10.5 Leopard April 2010 Slå på Airport ved å velge symbolet for trådløst nettverk øverst til høyre på skjermen. Hvis symbolet mangler må
UNIVERSITY OF OSLO DEPARTMENT OF ECONOMICS
 UNIVERSITY OF OSLO DEPARTMENT OF ECONOMICS Postponed exam: ECON420 Mathematics 2: Calculus and linear algebra Date of exam: Tuesday, June 8, 203 Time for exam: 09:00 a.m. 2:00 noon The problem set covers
SafeRing / SafePlus Retrofit of Ronis key for earthing switch Interlock type EL11AP C, De, F and Sl modules
 We reserve all rights in this document and in the information contained therein: Reproduction, use or disclosure to third parties SafeRing / SafePlus Retrofit of Ronis key for earthing switch Interlock
CAMES. Technical. Skills. Overskrift 27pt i to eller flere linjer teksten vokser opad. Brødtekst 22pt skrives her. Andet niveau.
 CAMES Overskrift 27pt i to eller flere linjer Technical Skills Leizl Joy Nayahangan, RN, MHCM Leizl.joy.nayahangan@regionh.dk IMPORTANCE Challenges Brødtekst 22pt of patient skrives her care Increasing
Owner s Manual Tilt Flat Screen Wall Mount
 Owner s Manual Tilt Flat Screen Wall Mount MODEL: DWT4585X CAUTION: DO NOT EXCEED MAXIMUM LISTED WEIGHT CAPACITY. SERIOUS INJURY OR PROPERTY DAMAGE MAY OCCUR! 200x200/300x300/ 400x200/400x400/ 600x400/800x400
Brukerveiledning på engelsk for Dymista Nesespray, suspensjon 137 mikrogram / 50 mikrogram per spray (azelastinhydroklorid/flutikasonpropionat)
") Brukerveiledning på engelsk for Dymista Nesespray, suspensjon 137 mikrogram / 50 mikrogram per spray (azelastinhydroklorid/flutikasonpropionat) Instruction for use Dymista Nasal Spray 137 micrograms /
Brukerveiledning på engelsk for Dymista Nesespray, suspensjon 137 mikrogram / 50 mikrogram per spray (azelastinhydroklorid/flutikasonpropionat) Instruction for use Dymista Nasal Spray 137 micrograms /
Velkommen om bord i F/F Gunnerus. Welcome on board R/V Gunnerus. Introduksjon F/F Gunnerus
 1 Velkommen om bord i F/F Gunnerus Welcome on board R/V Gunnerus 2 Forberedelse til tokt. Preparation for cruise. Helse miljø og sikkerhet ved NTNU. http://www.ntnu.no/adm/hms Health, safety and environmental
PSi Apollo. Technical Presentation
 PSi Apollo Spreader Control & Mapping System Technical Presentation Part 1 System Architecture PSi Apollo System Architecture PSi Customer label On/Off switch Integral SD card reader/writer MENU key Typical
Administrasjon av postnummersystemet i Norge Post code administration in Norway. Frode Wold, Norway Post Nordic Address Forum, Iceland 5-6.
 Administrasjon av postnummersystemet i Norge Frode Wold, Norway Post Nordic Address Forum, Iceland 5-6. may 2015 Postnumrene i Norge ble opprettet 18.3.1968 The postal codes in Norway was established in
SafeRing / SafePlus Retrofit of Y6 relay trip coil V Module
 SafeRing / SafePlus Retrofit of Y6 relay trip coil V Module Installation instructions www.abb.com Document status Responsible RELEASED NODIS Location Date Name Prepared NODIS 2008-12-15 BJGU/GUSO Checked
Den som gjør godt, er av Gud (Multilingual Edition)
") Den som gjør godt, er av Gud (Multilingual Edition) Arne Jordly Click here if your download doesn"t start automatically Den som gjør godt, er av Gud (Multilingual Edition) Arne Jordly Den som gjør godt,
Den som gjør godt, er av Gud (Multilingual Edition) Arne Jordly Click here if your download doesn"t start automatically Den som gjør godt, er av Gud (Multilingual Edition) Arne Jordly Den som gjør godt,
INSTALLATION INSTRUCTIONS 922 RODA PIVOT HINGES FRAMELESS DOOR CELESTA DRESDEN TRESOR
 INSTALLATION INSTRUCTIONS 922 RODA PIVOT HINGES NEED INSTALLATION HELP? Call 1-800-45-BASCO (452-2726) Monday - Friday 8:00 A.M. - 4:30 P.M. Eastern Time FRAMELESS DOOR CELESTA DRESDEN TRESOR QCI0272 REV.
PATIENCE TÅLMODIGHET. Is the ability to wait for something. Det trenger vi når vi må vente på noe
 CARING OMSORG Is when we show that we care about others by our actions or our words Det er når vi viser at vi bryr oss om andre med det vi sier eller gjør PATIENCE TÅLMODIGHET Is the ability to wait for