Smarty. NO Brukerveiledning 2 GB User manual 10 DK Brugervejledning 15 SE Installations- och bruksanvisning 21 FI Käyttöohje 27
|
|
|
- Svein Arntsen
- 5 år siden
- Visninger:
Transkript

1 Smarty NO Brukerveiledning 2 GB User manual 10 DK Brugervejledning 15 SE Installations- och bruksanvisning 21 FI Käyttöohje 27 Product no: SN xxx Sintef no: RRF no: Last updated:
2 INDEX 1. Prior to assembling the stove 9 Chimney draught 9 Air supply 9 Dimensional drawing Technical information Distance to combustible material Assembly 10 Base options 10 Operating control 11 Flue outlet collar 11 Connection of the flue Lighting the fire for the first time Maintenance 11 Cleaning and inspection 11 Ashes 11 Thermotte Plates 12 Door and glass Warranty Advice on lighting a fire 12 Some advice in case of combustion problems Prior to assembling the stove All our products are tested according to the latest European requirements and also to the Norwegian standard NS 3058 and NS 3059, which include particle tests. However, several European countries have local regulations for installation of fireplaces, which change regularly. It is the responsibility of the client that these regulations are complied with in the country/region where the fireplace is installed. Nordpeis AS is not responsible for incorrect installation. Important to check (please note that this list is not exhaustive): distance from firebox to combustible/flammable materials insulation materials/requirements between fireplace surround and back wall size of floor plates in front of fireplace if required flue connection between firebox and chimney insulation requirements if flue passes through a flammable wall Chimney draught Compared with older models, the clean burning stoves of today put significantly higher demands on the chimney. Even the best stove will not work properly if the chimney does not have the right dimensions or is not in good working order. The draught is mainly controlled by gas temperature, outside temperature, air supply as well as the height and inner diameter of the chimney. The diameter of the chimney should never be less than that of the flue/chimney collar. At nominal effect there should be a negative pressure of 12 to 25 Pascal. The draught increases when: The chimney becomes warmer than the outside air The active length of the chimney over the hearth increases Good air supply to the combustion It can be difficult to obtain the right draught conditions in case the chimney is too large relative to the stove, as the chimney does not heat up well enough. In such cases you may want to contact professional for evaluation of possible measures. Draught that is too strong can be controlled with a damper. If necessary, contact a chimney sweeper. Air supply A set for fresh air supply is available as accessory. This will ensure that the air supply to the combustion chamber is less affected by ventilation systems, kitchen fans and other factors which can create a down-draught in the room. In all new construction, we strongly recommend that it is designed and prepared for direct supply of outside air. In older houses, the use of fresh air supply set is also recommended. Insufficient air supply can cause down-draught and thereby low combustion efficiency and the problems that this entails: soot stains on the glass, inefficient use of the wood and a soot deposits in the chimney. GB 9
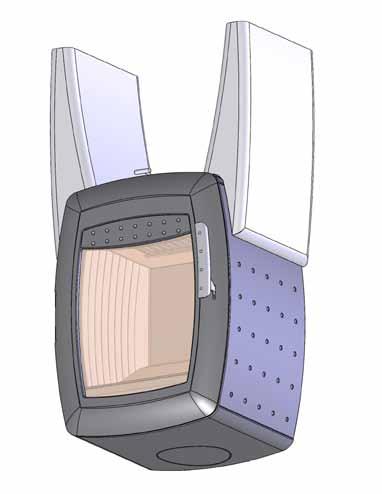
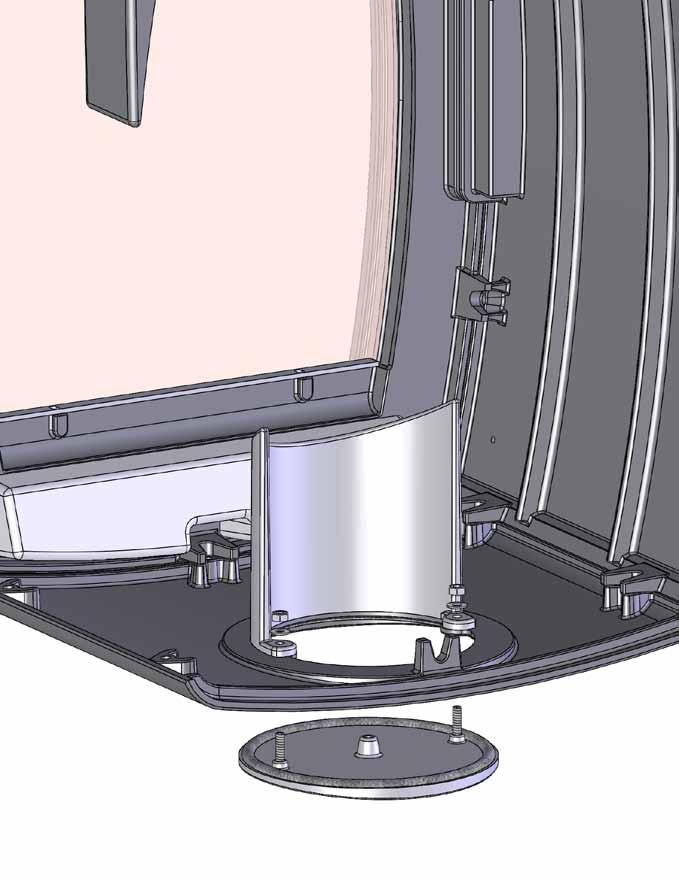
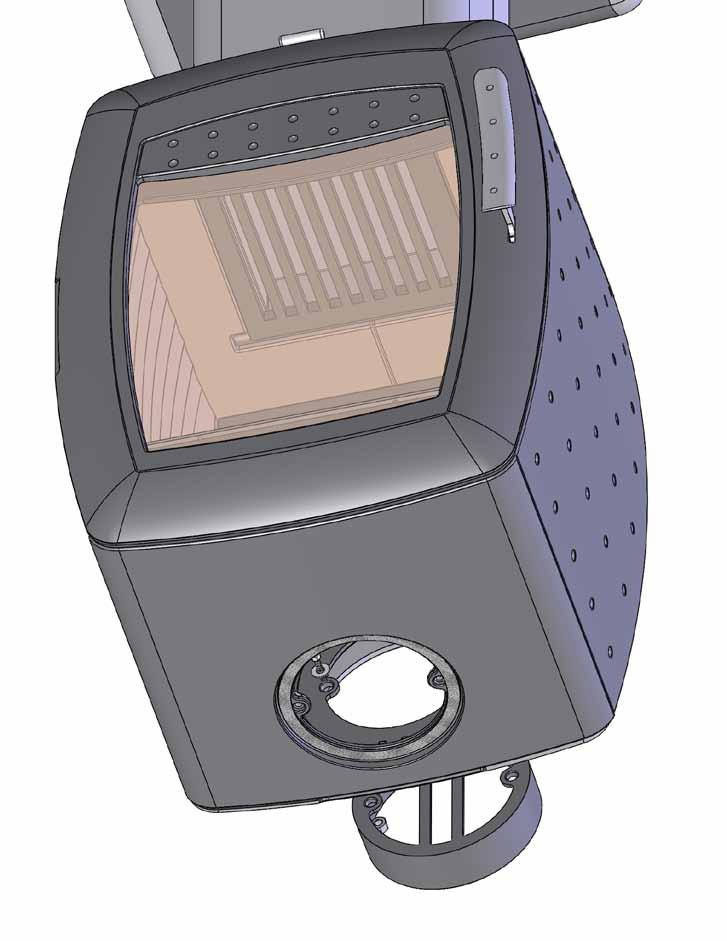
3 Dimensional drawing The illustration indicates the approximate center height of the hole for the flue. Distortions in floors and walls may influence the height. Place the stove for accurate position and height of the flue/chimney connection. We accept no liability for typographical errors and changes. For your own safety, comply with the assembly instructions. All safety distances are minimum distances. Installation of the insert must comply with the rules and regulations of the country where installed. Nordpeis AS is not responsible for wrongly assembled inserts. 2. Technical information The stoves from Nordpeis all have secondary combustion and are clean burning. The combustion takes place in two phases: first the wood burns and then the gases from the fumes are lit by the hot air. This ensures that these new stoves have minimal emissions of soot particles and un-burnt gases (such as CO) and are thus better for the environment. Clean burning stoves require a small amount of wood in order to obtain a good heat output. Use exclusively clean and dry wood. We recommend seasoned hardwood with a maximum moisture content of 20%. Material: Cast iron Surface treatment door/doorframe: Heat resistant varnish Fuel: Wood logs, 30 cm Operating range: 5 kw nominal Efficiency: 81,2% CO 13% O2: 0,07 Draught system: Air vent control Combustion system: Secondary combustion (clean burning) Heating area: m² Flue outlet: Top and rear Inner Ø 150 mm Flue: *Alternative versions exsists due to National requirements Weight of stove: 119 kg Flue gas temperature 306 C Air supply requirements (m³/h): 11 Nominal load size 1,3kg Loading interval 50min Opening of the air vent control 100% Operation Intermittent* * Intermittent combustion refers to normal use of a fireplace, i.e. new wood is inserted when the previous load has burned down to ember. 3. Distance to combustible material Ensure that the safety distances are respected (FIG 1). When connecting a steel chimney to the top outlet use the security distances required from the manufacturer. 4. Assembly The following tools are necessary: 13 mm wrench (Classic and One) 10 mm wrench (Classic, Stone and One) 6 mm Allen key (Stone) 5 mm Allen key (Classic) 3 mm Allen key (Classic) Base options The stove is delivered with a pallet and cardboard which can be used as a protective base when laying the stove down for assembly. The Thermotte plates can be removed In order to make the stove lighter, (FIG 2). In case the Thermotte plates are not removed, the protective transportation insulation must stay in place, this to ensure that the plates do not fall down and break. The stove must be lifted from vertical position. Do not tilt! It can damage the legs/base. Smarty Classic Legs The Thermotte plates must be removed before assembling the legs FIG 3: Remove the Allen screw FIG 4: Assemble the legs with the screws that are included FIG 5: Position the screws under each leg to level the stove Smarty Stone Legs FIG 6: Assemble the legs with the screws that are included FIG 7: Use a wedge of appropriate material to level the stove Smarty One Pedestal FIG 8: Loosen the screws in the bottom of the pedestal in order to fit the column more easily FIG 9: The pedestal is fastened at the top with four screws FIG 10: Position the screws underneath in each corner to level the stove FIG 11: The various heights for the flue outlet FIG 12 A: Custom collar for assembly of 80 mm fresh air supply. Part of the Fresh Air Supply Kit 10 GB
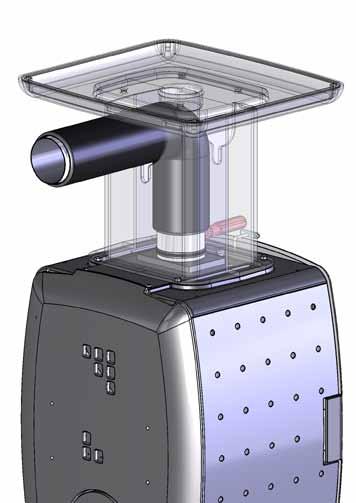
4 FIG 12 B: The lid is used when the fresh air supply is obtained from underneath the floor plate FIG 13 C: The grid is placed when the fresh air supply set is not used Operating control When the stove is in position, check that all functions are easy to manoeuvre and appear satisfactory. Door Handle turned downward Handle turned upward Air vent control (FIG 13) Pulled out Pushed it Closed Opened Open Closed Flue outlet collar Smarty is delivered as standard with a posterior flue outlet collar. In order to change to a top mounted flue outlet: FIG 14: Unscrew the top lid and the smoke baffle FIG 15: Unscrew the posterior collar FIG 16: Fasten the closing lid on the posterior outlet FIG 17: Fasten the collar and the smoke baffle on the top outlet Connection of the flue Please be aware when connecting the 150 mm flue to the smoke dome that the flue is placed inside the flue outlet collar. *Alternative versions exsists due to National requirements For the flue connection to the chimney, follow the recommendations from the chimney manufacturer. Fresh air supply FIG 18-21: The possibility to connect a fresh air supply ducting set. Removing the self-closing mechanism FIG 22 Open the door and gently loosen the small Allen screws with a 3mm Allen key 5. Lighting the fire for the first time When the stove is assembled and all instructions have been observed, a fire can be lit. Take care when inserting logs into the burn chamber, in order not to damage the Thermotte plates. Please note that there might be some humidity in the insulation plates which can result in a slower burn rate the first few times the stove is used. These will be resolved once the humidity has evaporated. Possibly leave the door slightly open the first 2-3 times that the stove is used. It is advisable to ventilate the room well when firing for the first time as the varnish on the stove may release some smoke or smell. Both the smoke and smell will disappear and are not hazardous. Lighting a fire Insert small dry pieces of kindling wood, ignite and ensure that the flames have established on the wood before closing the door. Open the air vent control (FIG 13) before you close the door. Additional ignition air is obtained by keeping the door slightly open. When the flames are stable and the chimney is warm, the air supply is regulated with the air vent control. When there is a glowing layer of ash, new wood logs can be inserted. Pull the hot ember to the front of the combustion chamber when inserting new logs so that the wood is ignited from the front. Keep the door slightly open each time new logs are inserted so that the flames get established. The fire should burn with bright and lively flames. Using the stove with low combustion effect and firing around the clock increase pollution as well as the risk for a fire in the chimney. Never allow the stove or flue to become glowing red. Turn off the air vent control should this happen. Regulation of the air vent control takes some experience, but after a little while a natural rhythm for the fire will be found. IMPORTANT! Always remember to open the air vent control and the door when new wood logs are inserted into a hot burn chamber. Let the flames get established on the wood before the air supply is reduced. When the draught in the chimney is low and the vents are closed, the gas from the firewood can be ignited with a bang. This can cause damages to the product as well as the immediate environment. 6. Maintenance Cleaning and inspection The stove should be inspected thoroughly and cleaned at least once per season (possibly in combination with the sweeping of the chimney and chimney pipes). Ensure that all joints are tight and that the gaskets are rightly positioned. Exchange any gaskets that are worn or deformed. Remember that the stove must always be cold when inspected. Ashes The ashes should be removed at regular intervals. Be aware that the ashes can contain hot ember even several days after the fire is finished. Use a container of non-combustible material to remove the ashes. It is recommended to leave a layer of ashes in the bottom as this further insulates the burn chamber. Take care with the Thermotte plates when the ashes are removed, particularly when using an ash shovel, so as not to damage them. GB 11
5 Thermotte The insulating plates in the burn chamber (FIG 2) contribute to a high combustion temperature, which leads to cleaner combustion of the wood and a higher rate of efficiency. Any fissures in the plates will not reduce their insulation efficiency. If new plates are needed, contact your dealer. Please In case the Thermotte plates need to be replaced, lift the smoke baffle (A) in order to remove the sideplates. A. Smoke baffle B. Right side plate C. Left side plate D. Ash grate E. Ash tray F. Bottom plate, two parts note: Wood logs that are too long can cause strain and crack the plates, due to the tension created between the side plates. Please note that the Thermotte plates may release coloured dust when touched. Avoid touching any cast iron parts with dust on your fingers. Any visible dust on cast iron can be brushed off with the glove that is included. Door and glass Should there be any soot on the glass it may be necessary to clean it. Use dedicated glass cleaner, as other detergents may damage the glass. (NB! Be careful, even dedicated glass cleaner can damage the varnish on the door frame). A good advice for cleaning the glass is to use a damp cloth or kitchen roll paper and apply some ash from the burn chamber. Rub the ash on the glass and finish off with a piece of clean and damp kitchen roll paper. NB! Only clean when the glass is cold. Check regularly that the transition between the glass and the door is completely tight. Possibly tighten the screws that hold the glass in place - but not too hard, as this can cause the glass to crack. Periodically, it may be necessary to change the gaskets on the door to ensure that the burn chamber is air tight and working optimally. These gaskets can be bought as a set, usually including ceramic glue. CERAMIC GLASS CANNOT BE RECYCLED Ceramic glass should be disposed of as residual waste, together with pottery and porcelain Recycling of the ceramic glass Ceramic glass cannot be recycled. Old glass, breakage or otherwise unusable ceramic glass, must be discarded as residual waste. Ceramic glass has a higher melting temperature, and can therefore not be recycled together with glass. In case it would be mixed with ordinary glass, it would damage the raw material and could, in worst case end the recycling of glass. It is an important contribution to the environment to ensure that ceramic glass does not end up with the recycling of ordinary glass. Packaging recycle The packaging accompanying the product should be recycled according to national regulations. 7. Warranty For detailed description of the warranty conditions see the enclosed warranty card or visit our website 8. Advice on lighting a fire The best way to light a fire is with the use of lightening briquettes and dry kindling wood. Newspapers cause a lot of ash and the ink is damaging for the environment. Advertising flyers, magazines, milk cartons and similar are not suitable for lighting a fire. Good air supply is important at ignition. When the flue is hot the draught increases and door can be closed. Warning: NEVER use a lighting fuel such as petrol, karosine, alcohol or similar for lighting a fire. This could cause injury to you as well as damaging the product. Use clean and dry wood with a maximum moisture content of 20%. The wood should be dried for a minimum of 6 months after it is cut. Humid wood requires a lot of air for the combustion, as extra energy/ heat is required for drying the humid wood and the heat effect is therefore minimal. This in addition creates soot in the chimney with the risk of creosote and chimney fire. Storing of wood In order to ensure that the wood is dry, the tree should be cut in winter and stored during the summer, covered and in a location with adequate ventilation. The wood pile must never be covered by a tarpaulin lying against the ground as the tarpaulin will then act as a sealed lid that will prevent the wood from drying. Always keep a small amount of wood indoors for a few days before use so that moisture in the surface of the wood can evaporate. 12 GB
6 Usage Not enough air to the combustion may cause the glass to soot. Hence, supply the fire with air just after the wood is added, so that the flames and gases in the combustion chamber are properly burnt. Open the air vent and have the door slightly ajar in order for the flames to establish properly on the wood. Note that the air supply for the combustion also can be too large and cause an uncontrollable fire that very quickly heats up the whole combustion chamber to an extremely high temperature (when using with a closed or nearly closed door). For this reason you should never fill the combustion chamber completely with wood. It is recommended to keep an even fire with a small amount of wood. Too many logs put on hot ember, may result in combustion air starvation, and the gases will be released unburnt. For this reason it is important to increase the air supply just after adding logs. Choice of fuel All types of wood, such as birch, beech, oak, elm, ash and fruit trees, can be used as fuel in the insert. Wood species have different degrees of density - the more dense the wood is, the higher the energy value. Beech, oak and birch has the highest density. Attention! We do not recommend using fuel briquettes/ compact wood in our products. Use of such fuel may cause the product to overheat and exceed the temperatures determined safe. Burning briquettes/ compact wood is done so at your own risk and only small amounts (max 1/3 of normal load) should be used for each load. Warning: NEVER use impregnated wood, painted wood, plywood, chipboard, rubbish, milk cartons, printed material or similar. If any of these items are used as fuel the warranty is invalid. Common to these materials is that during combustion they can form hydrochloric acid and heavy metals that are harmful to the environment, yourself and the insert. Hydrochloric acid can also corrode the steel in the chimney or masonry in a masonry chimney. Also, avoid burning with bark, sawdust or other extremely fine wood, apart from when lighting a fire. This form of fuel can easily cause a flashover that can lead to temperatures that are too high. Warning: Make sure the insert is not overheated - it can cause irreparable damage to the product. Such damage is not covered by the warranty. Source Håndbok, effektiv og miljøvennlig vedfyring by Edvard Karlsvik SINTEF Energy Research AS and Heikki Oravainen, VTT. http// GB 13
7 Some advice in case of combustion problems Error Explanation Solution No draught The stove release smoke when lighting the fire and during combustion The stove releases smoke inside when it is windy outside. The stove does not heat sufficiently. Too much draught The glass is sooty The chimney is blocked The flue is sooty or there is accumulated soot on the smoke baffle The smoke baffle is wrongly positioned Downdraught in the room caused by no draught, that the house is too air tight. Downdraught in the room caused by extractor and/or central ventilation system that pulls too much air out of the room. The flues from two fireplaces/stoves are connected to the same chimney at the same height. The flue is in a declining position from the smoke dome to the chimney. The flue is too far into the chimney. Soot hatch in the basement or attic that is open and thus creating a false draught. Damper/top draught vents or doors on fireplaces that are not in use are open and create a false draught. An open hole in the chimney after that a fireplace has been removed, thus creating a false draught. Defect masonry in the chimney, e.g. it is not airtight around the flue pipe entry and/or broken partition inside the chimney creating a false draught. The cross-section in the chimney is too large which results in no or very low draught. The cross-section in the chimney is too small and the chimney cannot carry out all the smoke. The chimney is too low and hence a poor draught. The chimney is too low in relationship to the surrounding terrain, buildings, trees etc. Turbulence around the chimney due to the roof being too flat. The combustion receives too much oxygen due to a leakage under the lower border of the stove or too strong chimney draught. Difficult to regulate the combustion and the wood burn up too quickly. The smoke buffer is wrongly positioned. In case of using oven-dried wood, this requires less air supply than when using normal wood. The gaskets around the door are worn and totally flat. The chimney is too large. Contact a chimney sweeper / dealer for more information or clean the flue, smoke baffle and burn chamber. Verify the assembly of the smoke baffle - see assembly instructions. Light the fire with an open window. If this helps, more/bigger vents must be installed in the room. Turn off/regulate extractor and/or other ventilation. If this helps, more vents must be installed. One flue must be repositioned. The height difference of the two flue pipes must be of at least 30 cm. The flue must be moved so that there is an inclination of at least 10º from smoke dome to chimney. Possibly install a smoke suction device*. The flue must be reconnected so that it does not enter into the chimney but ends 5 mm before the chimney inner wall. Possibly install a smoke suction device*. Soot hatches must always be closed. Hatches that are not tight or are defected must be changed. Close damper, doors and top draught vents on fireplaces that are not in use. Holes must be completely sealed off with masonry. Seal and plaster all cracks and sites that are not tight. The chimney must be refitted, possibly install a smoke suction device*. Change to a smaller fireplace or build new chimney with a larger cross section. Possibly install a smoke suction device*. Increase the height of the chimney and/or install a chimney cap/ smoke suction device*. Increase the height of the chimney and/or install a chimney cap/ smoke suction device*. Increase the height of the chimney and/or install a chimney cap/ smoke suction device*. Any possible leakage must be sealed off. A draught regulator or possibly a damper can reduce the chimney draught. NB! A leakage of only 5 cm2 is enough for 30% of the heated air to disappear. Verify the positioning of the smoke buffer see assembly instructions. Turn down the air supply. Replace the gaskets, contact your dealer. Contact chimneysweeper or other professional for more details. The wood is too wet. Only use dry wood with a humidity of maximum 20%. The air vent control is closed too tightly. Bad combustion (the temperature is too low) Open the air vent control to add air to the combustion. When new wood logs are inserted all vent controls should be completely opened or the door slightly opened until the flames have a good take on the wood. Follow the guidelines in this user guide for correct combustion. White glass Smoke is released when the door is opened White smoke Black or grey/ black smoke Using wrong material for combustion (such as: painted or impregnated wood, plastic laminate, plywood etc) A levelling out of pressure occurs in the burn chamber. The door is opened when there is a fire in the burn chamber. The combustion temperature is too low. The wood is humid and contains water damp. Insufficient combustion. Ensure to use only dry and clean wood. Open the air vent control for about 1 min before opening the door avoid opening the door too quickly. Open the door carefully and/or only when there is hot ember. Increase the air supply. Ensure to use only dry and clean wood. Increase the air supply. 14 GB *Electric top chimney fan
8 Smarty Classic = mm Smarty Stone = mm Smarty One leg = mm x X +/
9 FIG 1 =Brannmur/Brandmur/Turvaetäisyydet/Firewall =Brennbart materiale/brændbart materiale/ Brännbart material/ Palavasta materiaalista/combustible material >500 >500 >250 >350 >500 >100 >50 >500 >500 >250 >50 >1030 >1030 >50 >50 >930 >800 >250 >930 34


10 FIG 2 FIG 3 Classic A B C D E F F FIG 4 Classic FIG 5 Classic


11 FIG 6 Stone FIG 7 Stone FIG 8 One leg FIG 9 One leg


12 FIG 10 One leg FIG 11 One leg +/-mm FIG 12 One leg FIG 13 A B C


13 FIG 14 FIG 15 FIG 16 FIG 17


14 FIG 18 FIG 19 FIG 20 FIG 21

15 FIG 22 Nordpeis AS, Gjellebekkstubben 11, N-3420 LIERSKOGEN, Norway
REMOVE CONTENTS FROM BOX. VERIFY ALL PARTS ARE PRESENT READ INSTRUCTIONS CAREFULLY BEFORE STARTING INSTALLATION
 2011-2014 FORD EXPLORER PARTS LIST Qty Part Description Qty Part Description 1 Bull Bar 2 12mm x 35mm Bolt Plates 1 Passenger/Right Mounting Bracket 2 12mm Nut Plate 1 Driver/Left Mounting Bracket 2 12mm
Roma Garden Art.no: FP-ROMGR-100 Last updated: 12.07.13
 NOMonteringsanvisning 2 GB Assembly instructions 3 Roma Garden Art.no: FP-ROMGR-100 Last updated: 12.07.13 Roma Garden Vekt Krav til gulvplate 352 kg 670 mm Ta kontakt med en faghandler om du trenger tips
INSTALLATION GUIDE FTR Cargo Rack Regular Ford Transit 130" Wheelbase ( Aluminum )
") INSTALLATION GUIDE 1505-FTR Cargo Rack Regular Ford Transit 130" Wheelbase ( Aluminum ) QUICK START GUIDE Phase 1 - Assembly q 1.1 Setup... q 1.2 Cargo Rack Assembly... 3-4 5-6 Phase 2 - Installation q
INSTALLATION GUIDE 1505-FTR Cargo Rack Regular Ford Transit 130" Wheelbase ( Aluminum ) QUICK START GUIDE Phase 1 - Assembly q 1.1 Setup... q 1.2 Cargo Rack Assembly... 3-4 5-6 Phase 2 - Installation q
Start Here USB *CC * *CC * USB USB
 1 USB Start Here USB 11 USB WARNING: To ensure that the software is installed correctly, do not connect the USB cable until step 11. 11 USB 2 a. b. Lower both the paper tray and the print cartridge door.
INSTALLATION GUIDE FTR Cargo Rack Regular Ford Transit 130" Wheelbase ( Aluminum )
") INSTALLATION GUIDE 1505-FTR Cargo Rack Regular Ford Transit 130" Wheelbase ( Aluminum ) QUICK START GUIDE Phase 1 - Assembly q 1.1 Setup... q 1.2 Cargo Rack Assembly... 3-4 5-6 Phase 2 - Installation q
INSTALLATION GUIDE 1505-FTR Cargo Rack Regular Ford Transit 130" Wheelbase ( Aluminum ) QUICK START GUIDE Phase 1 - Assembly q 1.1 Setup... q 1.2 Cargo Rack Assembly... 3-4 5-6 Phase 2 - Installation q
Justeringsanvisninger finnes på de to siste sidene.
 d Montering av popup spredere Justeringsanvisninger finnes på de to siste sidene. Link til monteringsfilm på youtube: http://youtu.be/bjamctz_kx4 Hver spreder har montert på en "svinkobling", det vil si
Midnight BBQ Light USER MANUAL
 Midnight BBQ Light USER MANUAL Instructions The Midnight BBQ Light uses 4 x LR44 / AG13 batteries, included in the package. Unscrew the bottom cover and insert the included batteries and align the battery
The regulation requires that everyone at NTNU shall have fire drills and fire prevention courses.
 1 The law The regulation requires that everyone at NTNU shall have fire drills and fire prevention courses. 2. 3 Make your self familiar with: Evacuation routes Manual fire alarms Location of fire extinguishers
Windlass Control Panel
 SIDE-POWER 86-08955 Windlass Control Panel v1.0.2 Windlass Systems Installasjon manual SLEIPNER MOTOR AS P.O. Box 519 N-1612 Fredrikstad Norway Tel: +47 69 30 00 60 Fax: +47 69 30 00 70 w w w. s i d e
Monteringsanvisning Installation manual Taksokkel for LHH og CareLite Ceiling mount for LHH and CareLite
 Monteringsanvisning Installation manual Taksokkel for LHH og CareLite Ceiling mount for LHH and CareLite Art.nr. 05-900-573-00. Page 1 of 9 Norsk Monteringsanvisning taksokkel Denne monteringsmanualen
Unit Relational Algebra 1 1. Relational Algebra 1. Unit 3.3
 Relational Algebra 1 Unit 3.3 Unit 3.3 - Relational Algebra 1 1 Relational Algebra Relational Algebra is : the formal description of how a relational database operates the mathematics which underpin SQL
Orion NO GB. Brukerveiledning 2 User manual 9
 Orion NO GB Brukerveiledning 2 User manual 9 Produkt nr: SN-00000-000 Sintef nr: 045-047 Sist oppdatert: 23.11..2009 INNHOLD 1. Før du installerer nytt ildsted 2 Installasjon og kontroll før bruk 2 Pipetrekk
N-23G. NO Brukerveiledning 2 GB User manual 10 DK Brugervejledning 17 SE Installations- och bruksanvisning 23 FI Käyttöohje 29
 N-23G NO Brukerveiledning 2 GB User manual 10 DK Brugervejledning 17 SE Installations- och bruksanvisning 23 FI Käyttöohje 29 Product no: IN-00N23-xxx Sintef no: 110-0264 RRF no: 29 09 1915 Last updated:
Product Facts. Product code example
 ESAM Smoke control damper for multi Rectangular smoke control damper ESAM is specifically designed for use in multi fire compartment applications as a closing or as an opening damper for smoke extract
KAMPANJE APK : APK-5: Skifte pakninger mellom turbo og CCDPF
 KAMPANJE APK-5 20150722: APK-5: Skifte pakninger mellom turbo og CCDPF Berørte modeller for APK-5: Vitara APK416D, totalt 66 biler. Liste med chassisnummer legges ikke ved, bruk Forhandlerweb til å sjekke
NEOREST Hybrid (Toilet bowl) NEOREST Hybrid. Installation manual. Safety Cautions Precaution before installation. Included parts.
 NEOREST Hybrid. Installation manual. Safety Cautions Precaution before installation. Included parts.") Installation manual NEOREST Hybrid (Toilet bowl) NEOREST Hybrid Safety Cautions Precaution before installation Included parts Part diagram Installation procedure EN Install the product properly according
Installation manual NEOREST Hybrid (Toilet bowl) NEOREST Hybrid Safety Cautions Precaution before installation Included parts Part diagram Installation procedure EN Install the product properly according
IMPORTANT! HOLD ON THIS DOCUMENT FOR LATER REFERENCE! READ CAREFULLY! VIKTIG! BEHOLD DETTE DOKUMENTET FOR FREMTIDIG BRUK! LES NØYE IGJENNOM!
 GB IMPORTANT! HOLD ON THIS DOCUMENT FOR LATER REFERENCE! READ CAREFULLY! NOR VIKTIG! BEHOLD DETTE DOKUMENTET FOR FREMTIDIG BRUK! LES NØYE IGJENNOM! Produktmål, materiale: 135x77x72 cm Furu Proper use This
S-26R(NI-26) NO Brukerveiledning 2 GB User manual 9 SE Installation- och bruksanvisning 15
 NO Brukerveiledning 2 GB User manual 9 SE Installation- och bruksanvisning 15") S-26R(NI-26) NO Brukerveiledning 2 GB User manual 9 SE Installation- och bruksanvisning 15 Product no: IN-0NI26-020 RRF no: 29 09 2201 Last updated: 09.12.2014 INNHOLD 1. Før du installerer nytt ildsted
S-26R(NI-26) NO Brukerveiledning 2 GB User manual 9 SE Installation- och bruksanvisning 15 Product no: IN-0NI26-020 RRF no: 29 09 2201 Last updated: 09.12.2014 INNHOLD 1. Før du installerer nytt ildsted
Q-23FL. NO Brukerveiledning 2 GB User manual 9
 Q-23FL NO Brukerveiledning 2 GB User manual 9 Product no: 46378780 Sintef no: RRF no: Last updated: 14.10.2013 INNHOLD 1. Før du installerer innsatsen 2 Installasjon og kontroll før bruk 2 Skorsteinstrekk
Fitting instruction. devi-pipeheat / devi-flexheat Assembly between cold tail and selflimiting. Montering av tilledning på selvbegrensende varmekabel
 GB/NO Fitting instruction devi-pipeheat / devi-flexheat Assembly between cold tail and selflimiting heating cable Item no. 19806415 Montering av tilledning på selvbegrensende varmekabel Art. nr. 19806415
Bergen. NO Brukerveiledning 2 GB User manual 9. Product no: SA-BERG0-000 RRF no: 40 10 2244 Last updated: 27.05.10
 Bergen NO Brukerveiledning 2 GB User manual 9 Product no: SA-BERG0-000 RRF no: 40 10 2244 Last updated: 27.05.10 INNHOLD 1. Før du installerer nytt ildsted 2 Installasjon og kontroll før bruk 2 Pipetrekk
Exercise 1: Phase Splitter DC Operation
 Exercise 1: DC Operation When you have completed this exercise, you will be able to measure dc operating voltages and currents by using a typical transistor phase splitter circuit. You will verify your
Vega. NO Brukerveiledning 2 GB User manual 9. Produkt nr: SN-00001-000 Sintef nr: 045-055 Sist oppdatert: 02.04.12
 Vega NO Brukerveiledning 2 GB User manual 9 Produkt nr: SN-00001-000 Sintef nr: 045-055 Sist oppdatert: 02.04.12 INNHOLD 1. Før du installerer nytt ildsted 2 Installasjon og kontroll før bruk 2 Skorsteinstrekk
Dagens tema: Eksempel Klisjéer (mønstre) Tommelfingerregler
 Tommelfingerregler") UNIVERSITETET I OSLO INF1300 Introduksjon til databaser Dagens tema: Eksempel Klisjéer (mønstre) Tommelfingerregler Institutt for informatikk Dumitru Roman 1 Eksempel (1) 1. The system shall give an overview
UNIVERSITETET I OSLO INF1300 Introduksjon til databaser Dagens tema: Eksempel Klisjéer (mønstre) Tommelfingerregler Institutt for informatikk Dumitru Roman 1 Eksempel (1) 1. The system shall give an overview
N-20 T. NO Brukerveiledning 2 GB User manual 9 SE Bruksanvisning 16 FI Käyttöohje 23
 N-20 T NO Brukerveiledning 2 GB User manual 9 SE Bruksanvisning 16 FI Käyttöohje 23 Product no: IN-0N20T-010 Test report No: RRF: 29 15 3996 Last updated: 27.10.2015 Innhold 1. Før du installerer nytt
X-25F. NO Brukerveiledning 2 GB User manual 9. Product no: IN-0X25F-100 Sintef no: 10204435B RRF no: 40 13 3328 Last updated: 071013
 X-25F NO Brukerveiledning 2 GB User manual 9 Product no: IN-0X25F-100 Sintef no: 10204435B RRF no: 40 13 3328 Last updated: 071013 Innhold 1. Før du installerer nytt ildsted 2 Installasjon og kontroll
N-36A. NO Brukerveiledning 2 GB User manual 9
 N-36A NO Brukerveiledning 2 GB User manual 9 Product no: IN-0N36A-000 Sintef no: RRF no: Last updated: 05.07.2013 INNHOLD 1. Før du installerer innsatsen 2 Installasjon og kontroll før bruk 2 Skorsteinstrekk
Orion NO GB. Brukerveiledning 2 User manual 9
 Orion NO GB Brukerveiledning 2 User manual 9 Produkt nr: SN-00000-000 Sintef nr: 045-047 Sist oppdatert: 08.04.2012 INNHOLD 1. Før du installerer nytt ildsted 2 Installasjon og kontroll før bruk 2 Skorsteinstrekk
bondura dual 36 Ø50mm - Ø200mm assembly & inspection manual art rev A
 bondura dual 36 Ø50mm - Ø200mm assembly & inspection manual art. 103803 rev. 27.04.2016 A TABLE OF CONTENT / INNHOLD 1/ assembly montering 2/ technical specifications/torque tekniske data/tiltrekkingsmoment
MCP-16RC, luftrenertårn
 Kompakt filterkassett med pulsrengjøring MCP-16RC luftrensertårn er en kompakt filterkassett for desentralisert inneluftrengjøring der luftgjenoppretting er mulig. Den kompakte filterenheten leveres med
SERVICE BULLETINE 2008-4
 S e r v i c e b u l l e t i n e M a t e r i e l l Materiellsjef F/NLF kommuniserer påminnelse omkring forhold som ansees som vesentlige for å orientere om viktige materiellforhold. Målgruppen for Servicbulletinen
NO Monteringsanvisning s 2 GB Installation manual s 9. Casa
 NO Monteringsanvisning s 2 GB Installation manual s 9 Casa Product no: 49 66 00, 49 66 01 17.06.2008 INNHOLD 1. Før du installerer peisovnen 2 Krav til gulvplate 2 2. Teknisk informasjon 3 3. Brannmur
Slope-Intercept Formula
 LESSON 7 Slope Intercept Formula LESSON 7 Slope-Intercept Formula Here are two new words that describe lines slope and intercept. The slope is given by m (a mountain has slope and starts with m), and intercept
Institutt for biovitenskap
 Institutt for biovitenskap Oppslag for alle avtrekksskap: Alle avtrekksskap skal ha forklaring på alarmsystem på det enkelte skap. Dette varier fra skap til skap. e.g. på IBV finnes det minst 3 ulike typer.
Q-34AL. NO Brukerveiledning 2 GB User manual 9
 Q-34AL NO Brukerveiledning 2 GB User manual 9 Product no: 46378806/ 46378795 Sintef no: RRF no: Last updated: 14.10.2013 INNHOLD 1. Før du installerer innsatsen 2 Installasjon og kontroll før bruk 2 Skorsteinstrekk
Glasgow. NO Monterings- og bruksanvisning 2 GB Installation- and user manual 9
 Glasgow NO Monterings- og bruksanvisning 2 GB Installation- and user manual 9 Product no: SN-GLASG-010 Test report no: RRF: 40 16 4328 Last updated: 16.08.2016 INNHOLD 1. Før du installerer nytt ildsted
Endelig ikke-røyker for Kvinner! (Norwegian Edition)
") Endelig ikke-røyker for Kvinner! (Norwegian Edition) Allen Carr Click here if your download doesn"t start automatically Endelig ikke-røyker for Kvinner! (Norwegian Edition) Allen Carr Endelig ikke-røyker
Endelig ikke-røyker for Kvinner! (Norwegian Edition) Allen Carr Click here if your download doesn"t start automatically Endelig ikke-røyker for Kvinner! (Norwegian Edition) Allen Carr Endelig ikke-røyker
Q-34AL. NO Brukerveiledning 2 GB User manual 9
 Q-34AL NO Brukerveiledning 2 GB User manual 9 Product no: 22-Q34AL-00L / 22-Q34AL-00P RRF no: 29 13 3454 Last updated: 14.03.2014 INNHOLD 1. Før du installerer innsatsen 2 Installasjon og kontroll før
Glasgow. NO Monterings- og bruksanvisning 2 GB Installation- and user manual 9
 Glasgow NO Monterings- og bruksanvisning 2 GB Installation- and user manual 9 Product no: SN-GLASG-010 Test report no: RRF: 40 16 4328, NS 16 4328 Last updated: 06.10.2017 INNHOLD 1. Før du installerer
Duke Energy Seminar September 3 5, 2008 Concord, NC
 Duke Energy Seminar September 3 5, 2008 Concord, NC Ron Richard Senior Consultant RE Consulting -1- Ball Mills -2- Limestone Fineness Some of the FGD vendors have stated that one of the biggest causes
Q-23FL. NO Brukerveiledning 2 GB User manual 9
 Q-23FL NO Brukerveiledning 2 GB User manual 9 Product no: 22-Q23FL-000 RRF no: 29 13 3453 Last updated: 10.07.2014 INNHOLD 1. Før du installerer innsatsen 2 Installasjon og kontroll før bruk 2 Skorsteinstrekk
Software applications developed for the maritime service at the Danish Meteorological Institute
 Software applications developed for the maritime service at the Danish Meteorological Institute Anne Marie Munk Jørgensen (ammj@dmi.dk), Ove Kjær, Knud E. Christensen & Morten L. Mortensen Danish Meteorological
Glasgow. NO Monterings- og bruksanvisning 2 GB Installation- and user manual 9
 Glasgow NO Monterings- og bruksanvisning 2 GB Installation- and user manual 9 Product no: SN-GLASG-010 Test report no: RRF: 40 16 4328, NS 16 4328 Last updated: 21.02.2019 VIKTIGE SIKKERHETSREGLER: 1.
Elektronisk termostat med spareprogram. Lysende LCD display øverst på ovnen for enkel betjening.
 Elektronisk termostat med spareprogram. Lysende LCD display øverst på ovnen for enkel betjening. 27.5 LCD Electronic thermostat with program setting. Bright LCD display placed at the top of the heater
Norsk (English below): Guide til anbefalt måte å printe gjennom plotter (Akropolis)
: Guide til anbefalt måte å printe gjennom plotter (Akropolis)") Norsk (English below): Guide til anbefalt måte å printe gjennom plotter (Akropolis) 1. Gå til print i dokumentet deres (Det anbefales å bruke InDesign til forberedning for print) 2. Velg deretter print
Norsk (English below): Guide til anbefalt måte å printe gjennom plotter (Akropolis) 1. Gå til print i dokumentet deres (Det anbefales å bruke InDesign til forberedning for print) 2. Velg deretter print
#89853 Command Center
 1 #89853 Command Center Portable AV Center Assembly Instructions #89853 Command Center Portable AV Center Part rawing escription Qty Part rawing escription Qty Hardware List A Socket Screw M6X9mm 16 A
Instruksjons manual Instruction manual
 knm Copyright c - 2011 knm Side. 1 BRUK AV UTSTYRET Utstyret er designet for løft, trekk, folding/bøying, kutting, støtteoperasjoner etc, og krever, med sitt høye operasjonstrykk og tunge arbeids last,
X-20 F. NO Brukerveiledning 2 GB User manual 9. Product no: IN-0X20F-010 Teknologisk no: 300-ELAB-2025-EN II Last updated:
 X-20 F NO Brukerveiledning 2 GB User manual 9 Product no: IN-0X20F-010 Teknologisk no: 300-ELAB-2025-EN II Last updated: 130314 GB 1 Innhold 1. Før du installerer nytt ildsted 2 Skorsteinstrekk 2 Tilførsel
KROPPEN LEDER STRØM. Sett en finger på hvert av kontaktpunktene på modellen. Da får du et lydsignal.
 KROPPEN LEDER STRØM Sett en finger på hvert av kontaktpunktene på modellen. Da får du et lydsignal. Hva forteller dette signalet? Gå flere sammen. Ta hverandre i hendene, og la de to ytterste personene
S-31A. NO Brukerveiledning 2 GB User manual 10 SE Installationsanvisning 17 FI Asennusohje 24
 S-31A NO Brukerveiledning 2 GB User manual 10 SE Installationsanvisning 17 FI Asennusohje 24 Product no: IN-0S31A-010 Test report No: SINTEF 102044.24; RRF - 29 16 4413 Last updated: 02.05.2017 VIKTIGE
Bostøttesamling
 Bostøttesamling 2016 Teresebjerke@husbankenno 04112016 2 09112016 https://wwwyoutubecom/watch?v=khjy5lwf3tg&feature=youtube 3 09112016 Hva skjer fremover? 4 09112016 «Gode selvbetjeningsløsninger» Kilde:
N-20 U. NO Brukerveiledning 2 GB User manual 10 SE Bruksanvisning 17 FI Käyttöohje 24
 N-20 U NO Brukerveiledning 2 GB User manual 10 SE Bruksanvisning 17 FI Käyttöohje 24 Product no: IN-0N20U-011 / IN-0N20U-014 / IN-0N20U-017 Test report No: SPFR 20012-20B2 Last updated: 18.12.2018 VIKTIGE
N-20 U. NO Brukerveiledning 2 GB User manual 10 SE Bruksanvisning 17 FI Käyttöohje 24
 N-20 U NO Brukerveiledning 2 GB User manual 10 SE Bruksanvisning 17 FI Käyttöohje 24 Product no: IN-0N20U-011 / IN-0N20U-014 / IN-0N20U-017 Test report No: SPFR 20012-20B2 Last updated: 15.01.2019 VIKTIGE
N-20 A. NO Brukerveiledning 2 GB User manual 10 SE Bruksanvisning 17 FI Käyttöohje 24
 N-20 A NO Brukerveiledning 2 GB User manual 10 SE Bruksanvisning 17 FI Käyttöohje 24 Product no: IN-0N20A-X11 / IN-0N20A-X14 Test report No: SPFR 20012-33B Last updated: 11.12.2018 VIKTIGE SIKKERHETSREGLER:
N-20 A. NO Brukerveiledning 2 GB User manual 10 SE Bruksanvisning 17 FI Käyttöohje 24
 N-20 A NO Brukerveiledning 2 GB User manual 10 SE Bruksanvisning 17 FI Käyttöohje 24 Product no: IN-0N20A-X11 / IN-0N20A-X14 Test report No: SPFR 20012-33B Last updated: 14.01.2019 VIKTIGE SIKKERHETSREGLER:
GYRO MED SYKKELHJUL. Forsøk å tippe og vri på hjulet. Hva kjenner du? Hvorfor oppfører hjulet seg slik, og hva er egentlig en gyro?
 GYRO MED SYKKELHJUL Hold i håndtaket på hjulet. Sett fart på hjulet og hold det opp. Det er lettest om du sjølv holder i håndtakene og får en venn til å snurre hjulet rundt. Forsøk å tippe og vri på hjulet.
N-20F. NO Brukerveiledning 2 GB User manual 10 DK Brugervejledning 17 SE Installations- och bruksanvisning 24 FI Käyttöohje 31
 N-20F NO Brukerveiledning 2 GB User manual 10 DK Brugervejledning 17 SE Installations- och bruksanvisning 24 FI Käyttöohje 31 Product no: IN-00N20-100, IA-00N20-106, IA-0N20D-011, IA-0N20D-014 Test no:
X-20 F. NO Brukerveiledning 2. GB User manual 9. Product no: IN-0X20F-010 Teknologisk no: 300-ELAB-2025-EN II Last updated: 130314
 X-20 F NO Brukerveiledning 2 7 8 9 10 11 12 GB User manual 9 A B C D E F G DRAWN NAME P.Żabiński SIGNATURE DATE 2012-07-18 NAME: IN-0X20F-010 X20F - Insert A2 CHK'D D.Krzyżaniak 2013-11-29 SCALE:1:5 7
Trigonometric Substitution
 Trigonometric Substitution Alvin Lin Calculus II: August 06 - December 06 Trigonometric Substitution sin 4 (x) cos (x) dx When you have a product of sin and cos of different powers, you have three different
Information search for the research protocol in IIC/IID
 Information search for the research protocol in IIC/IID 1 Medical Library, 2013 Library services for students working with the research protocol and thesis (hovedoppgaven) Open library courses: http://www.ntnu.no/ub/fagside/medisin/medbiblkurs
SHORE POWER CONVERTER LIST 2018
 2018 POWER AT YOUR CONTROL Shore cord capacities These tables provide a approximate indication of the amount of kva capacity of different amperage shore cords at common worldwide voltages. Use these tables
Montering av Lian Skyvedør Installation of Lian Sliding Door
 Montering av Lian Skyvedør Installation of Lian Sliding Door Les dette før du starter monteringen! Read these instructions carefully before installation. Sjekk nøye at produktet stemmer med bestilling
N-20 U. NO Brukerveiledning 2 GB User manual 10 SE Bruksanvisning 17 FI Käyttöohje 24
 N-20 U NO Brukerveiledning 2 GB User manual 10 SE Bruksanvisning 17 FI Käyttöohje 24 Product no: IN-0N20U-011 / IN-0N20U-014 / IN-0N20U-017 Test report No: SPFR 20012-20B2 Last updated: 26.03.2019 VIKTIGE
NI-25. NO Brukerveiledning 2 GB User manual 10 DK Brugervejledning 16 SE Installations- och bruksanvisning 22 FI Käyttöohje 28
 NI-25 NO Brukerveiledning 2 GB User manual 10 DK Brugervejledning 16 SE Installations- och bruksanvisning 22 FI Käyttöohje 28 Product no: IN-00025-xxx Sintef no: 110-0213 RRF no: 29 09 1916 Last updated:
NO GB. Monteringsanvisning 2 Installation manual 10. Ronda 160 Soapstone
 NO GB Monteringsanvisning 2 Installation manual 10 Ronda 160 Soapstone Art.no: CC-RON04-1X0 Last updated: 11.12.2013 Innhold 1. Generelt om elementpeiser 1. Generelt om elementpeiser 2 Vekt 2 Brannmur
N-20F. NO Brukerveiledning 2 GB User manual 10 DK Brugervejledning 17 SE Installations- och bruksanvisning 24 FI Käyttöohje 31
 N-20F NO Brukerveiledning 2 GB User manual 10 DK Brugervejledning 17 SE Installations- och bruksanvisning 24 FI Käyttöohje 31 Product no: IN-00N20-100, IA-00N20-101, IA-00N20-102, IA-00N20-103, IA-00N20-104,
X-20 F. NO Brukerveiledning 2. GB User manual 9 SE Bruksanvisning 15 FI Käyttöohje 21
 X-20 F NO Brukerveiledning 2 7 8 9 10 11 12 GB User manual 9 SE Bruksanvisning 15 FI Käyttöohje 21 A B C D E F G DRAWN NAME P.Żabiński SIGNATURE DATE 2012-07-18 NAME: IN-0X20F-010 X20F - Insert A2 CHK'D
Safering / Safeplus Retrofit of Ronis key for disconnector Interlock type EL11AP V and Sv modules
 Safering / Safeplus Retrofit of Ronis key for disconnector Interlock type EL11AP V and Sv modules Installation instructions www.abb.com Document status Responsible RELEASED NODIS Location Date Name Prepared
Requirements regarding Safety, Health and the Working Environment (SHWE), and pay and working conditions
, and pay and working conditions") Requirements regarding Safety, Health and the Working Environment (SHWE), and pay and working conditions Vigdis Bjørlo 2016-02-05 Suppliers' obligations in relation to the Construction Client Regulations
Requirements regarding Safety, Health and the Working Environment (SHWE), and pay and working conditions Vigdis Bjørlo 2016-02-05 Suppliers' obligations in relation to the Construction Client Regulations
Kullsett/Coal Set for Jøtul GF 100 BF2 Jøtul GF 3 BF2
 Jøtul GF 100BF2/GF 3 BF2 Jøtul GI 160 BF Kullsett/Coal Set for Jøtul GF 100 BF2 Jøtul GF 3 BF2 Jøtul GI 160 BF Monterings- og bruksanvisning - Norsk 2 Installation and Operating Instructions- English 3
MONTASJEBESKRIVELSE INSTALLATION GUIDE
 MONTASJEBESKRIVELSE INSTALLATION GUIDE ADVARSEL WARNINGS Dette armaturet er et Klasse II produkt som IKKE SKAL TILKOBLES JORD. This device is a class II product: DO NOT CONNECT THE LAMP and the pole to
N-20F. NO Brukerveiledning 2 GB User manual 10 DK Brugervejledning 17 SE Installations- och bruksanvisning 24 FI Käyttöohje 31
 N-20F NO Brukerveiledning 2 GB User manual 10 DK Brugervejledning 17 SE Installations- och bruksanvisning 24 FI Käyttöohje 31 Product no: IN-00N20-100, IA-00N20-101, IA-00N20-102, IA-00N20-103, IA-00N20-104,
Smart High-Side Power Switch BTS730
 PG-DSO20 RoHS compliant (green product) AEC qualified 1 Ω Ω µ Data Sheet 1 V1.0, 2007-12-17 Data Sheet 2 V1.0, 2007-12-17 Ω µ µ Data Sheet 3 V1.0, 2007-12-17 µ µ Data Sheet 4 V1.0, 2007-12-17 Data Sheet
NI-25. NO Brukerveiledning 2 GB User manual 10 DK Brugervejledning 17 SE Installations- och bruksanvisning 24 FI Käyttöohje 31
 NI-25 NO Brukerveiledning 2 GB User manual 10 DK Brugervejledning 17 SE Installations- och bruksanvisning 24 FI Käyttöohje 31 Product no: IN-00025-xxx Sintef no: 102 041.42B RRF no: 29 09 1916 Last updated:
Q-34AL. NO Brukerveiledning 2 GB User manual 9
 Q-34AL NO Brukerveiledning 2 GB User manual 9 Product no: 46378806/ 46378795 Sintef no: RRF no: Last updated: 10.12.2013 INNHOLD 1. Før du installerer innsatsen 2 Installasjon og kontroll før bruk 2 Skorsteinstrekk
BRUKSANVISNING STØVSUGER D 775
 BRUKSANVISNING STØVSUGER D 775 1 Støvindikator Støvsugeren kjenner selv av når sugeeffekten blir dårlig på grunn av full eller gjentettet støvbeholder. Når støvindikatoren lyser bør støvbeholderen byttes.
KAMPANJE APK : APK-8: Bytte bakaksel bolter
 KAMPANJE APK-8 20160222: APK-8: Bytte bakaksel bolter Berørte modeller for APK-8: Vitara APK, S-cross AKK, og Swift AZG. Totalt 454 biler på det norske markedet. Liste med chassisnummer legges ikke ved,
Q-23FL. NO Brukerveiledning 2 GB User manual 9
 Q-23FL NO Brukerveiledning 2 GB User manual 9 Product no: 22-Q23FL-000 RRF no: 29 13 3453 Last updated: 24.03.2014 INNHOLD 1. Før du installerer innsatsen 2 Installasjon og kontroll før bruk 2 Skorsteinstrekk
stjerneponcho for voksne star poncho for grown ups
 stjerneponcho for voksne star poncho for grown ups www.pickles.no / shop.pickles.no NORSK Størrelser XS (S) M (L) Garn Pickles Pure Alpaca 300 (350) 400 (400) g hovedfarge 100 (100) 150 (150) g hver av
NO Brukerveiledning 2 GB User manual 10 SE Monteringsanvisning 17. Art.no: FP-HAV00-000 02.03.2012 RRF 40 12 2937. Havanna med innsats / with insert
 NO Brukerveiledning 2 GB User manual 10 SE Monteringsanvisning 17 Art.no: FP-HAV00-000 02.03.2012 RRF 40 12 2937 Havanna med innsats / with insert Innhold 1. Generelt om elementpeiser 2 Vekt 2 Tilkobling
Q-34AL. NO Brukerveiledning 2 GB User manual 9
 Q-34AL NO Brukerveiledning 2 GB User manual 9 Product no: 46378806/ 46378795 Sintef no: RRF no: Last updated: 27.09.2013 INNHOLD 1. Før du installerer innsatsen 2 Installasjon og kontroll før bruk 2 Skorsteinstrekk
Administrasjon av postnummersystemet i Norge Post code administration in Norway. Frode Wold, Norway Post Nordic Address Forum, Iceland 5-6.
 Administrasjon av postnummersystemet i Norge Frode Wold, Norway Post Nordic Address Forum, Iceland 5-6. may 2015 Postnumrene i Norge ble opprettet 18.3.1968 The postal codes in Norway was established in
Replacing the tube and/or tyre of a drive wheel, indoor/outdoor
 ASSEMBLY INSTRUCTION Replacing the tube and/or tyre of a drive wheel, indoor/outdoor EN NO 9010182A 5.2.7 9010182 Replacing the tube and/or tyre of a drive wheel, indoor/outdoor Preparation Be sure that
Marmi Plus One. Sleek, Essential, Stunning
 MARMI PLUS ONE Marmi Plus One Sleek, Essential, Stunning Marmi Plus One Bianco - DME01 90x90 cm Marmi Plus One Bianco - DME01 60x120 cm Marmi Plus One Bianco MATTE Marmi Plus One Bianco - DME01 60x120
5 E Lesson: Solving Monohybrid Punnett Squares with Coding
 5 E Lesson: Solving Monohybrid Punnett Squares with Coding Genetics Fill in the Brown colour Blank Options Hair texture A field of biology that studies heredity, or the passing of traits from parents to
X-25F. NO Brukerveiledning 2 GB User manual 9 SE Installationsanvisning 15
 X-25F NO Brukerveiledning 2 GB User manual 9 SE Installationsanvisning 15 Product no: IN-0X25F-100 Sintef no: 10204435B RRF no: 40 13 3328 Last updated: 071013 Innhold 1. Før du installerer nytt ildsted
EMS 1. Music Streamer. Owner's Manual
 EMS 1 Music Streamer Owner's Manual EN N 2 ENG About the EMS 1 Electrocompaniet Music Streamer This unit is designed to work with the Electrocompaniet PD 1 DAC only. A radio link is established between
HONSEL process monitoring
 6 DMSD has stood for process monitoring in fastening technology for more than 25 years. HONSEL re- rivet processing back in 990. DMSD 2G has been continuously improved and optimised since this time. All
Product no: IN-00N36-xxx Sintef no: RRF no: Last updated:
 N-36V NO Brukerveiledning 2 GB User manual 10 DK Brugervejledning 16 SE Installations- och bruksanvisning 22 FI Käyttöohje 28 FR Manuel d installation 34 IT Manuale d installazione 41 DE Montageanleitung
N-20 T. NO Brukerveiledning 2 GB User manual 10 SE Bruksanvisning 17 FI Käyttöohje 24
 N-20 T NO Brukerveiledning 2 GB User manual 10 SE Bruksanvisning 17 FI Käyttöohje 24 Product no: IN-0N20T-010 Test report No: RRF: 29 15 3996 Last updated: 14.12.2018 VIKTIGE SIKKERHETSREGLER: 1. Følg
Merak Un-glazed Porcelain Wall and Floor Tiles
 6 Colours 3 es Absolute Collection 7 s Merak Un-glazed Porcelain Wall and Floor Tiles Merak includes seven sizes perfectly designed for seamless installation. 600 x 50mm 600 x 100mm 600 x 300mm 600 x 150mm
The building blocks of a biogas strategy
 The building blocks of a biogas strategy Presentation of the report «Background report for a biogas strategy» («Underlagsmateriale til tverrsektoriell biogass-strategi») Christine Maass, Norwegian Environment
SafeRing / SafePlus Retrofit of under voltage coil V Module
 SafeRing / SafePlus Retrofit of under voltage coil V Module Installation Instructions www.abb.com Document status Responsible RELEASED NODIS Location Date Name Prepared NODIS 2008-12-15 BJGU/GUSO Checked
N-20 U. NO Brukerveiledning 2 GB User manual 9 SE Bruksanvisning 16 FI Käyttöohje 22
 N-20 U NO Brukerveiledning 2 GB User manual 9 SE Bruksanvisning 16 FI Käyttöohje 22 Product no: IN-0N20U-010 / IN-0N20U-014 Test report No: SPFR 20012-20B2 Last updated: 16.10.2015 Innhold 1. Før du installerer
Q-34AL. NO Brukerveiledning 2 GB User manual 9
 Q-34AL NO Brukerveiledning 2 GB User manual 9 Product no: 22-Q34AL-00L / 22-Q34AL-00P RRF no: 29 13 3454 Last updated: 07.04.2014 INNHOLD 1. Før du installerer innsatsen 2 Installasjon og kontroll før
GEF2200 Atmosfærefysikk 2017
 GEF2200 Atmosfærefysikk 2017 Løsningsforslag til sett 3 Oppgaver hentet fra boka Wallace and Hobbs (2006) er merket WH06 WH06 3.18r Unsaturated air is lifted (adiabatically): The rst pair of quantities
GIMOTA AG. Assembly Instructions Dataconnectors D-SUB. Datenstecker Katalog Gimota AG 04/14 3
 GIMOTA AG Assembly Instructions Dataconnectors D-SUB 2015 Datenstecker Katalog Gimota AG 04/14 3 1 Assembly Instructions D-SUB TRAC / TRAC H 1.1 Preparation Standard Part sets Standard part sets conclude
Product Manual Produkthåndbok
 BEAM Product Manual Produkthåndbok BEAM Technical Specifications Tekniske Spesifikasjoner Description Product number Mode Voltage Current Vehicle interface Cable length Encapsulation Operating temperature
Replacing the batteries
 ASSEMBLY INSTRUCTION Replacing the batteries EN NO 9010189A 5.2.14 9010189 Replacing the batteries Preparation Switch off the wheelchair via the remote control. Remove the fuses from the battery compartment