5000 Series. Rechargeable sonic toothbrush
|
|
|
- Lena Davidsen
- 7 år siden
- Visninger:
Transkript
1 1 3CleanCare Elite 5000 Series Rechargeable sonic toothbrush

2 1 32 1
3 1 3English 4 Dansk 20 Espa 0 9ol 36 Suomi 52 Norsk 67 Portugu ºs 83 ² å ã ã Ü Ú Û 100 Svenska 117 HX5350/02, HX5350/50

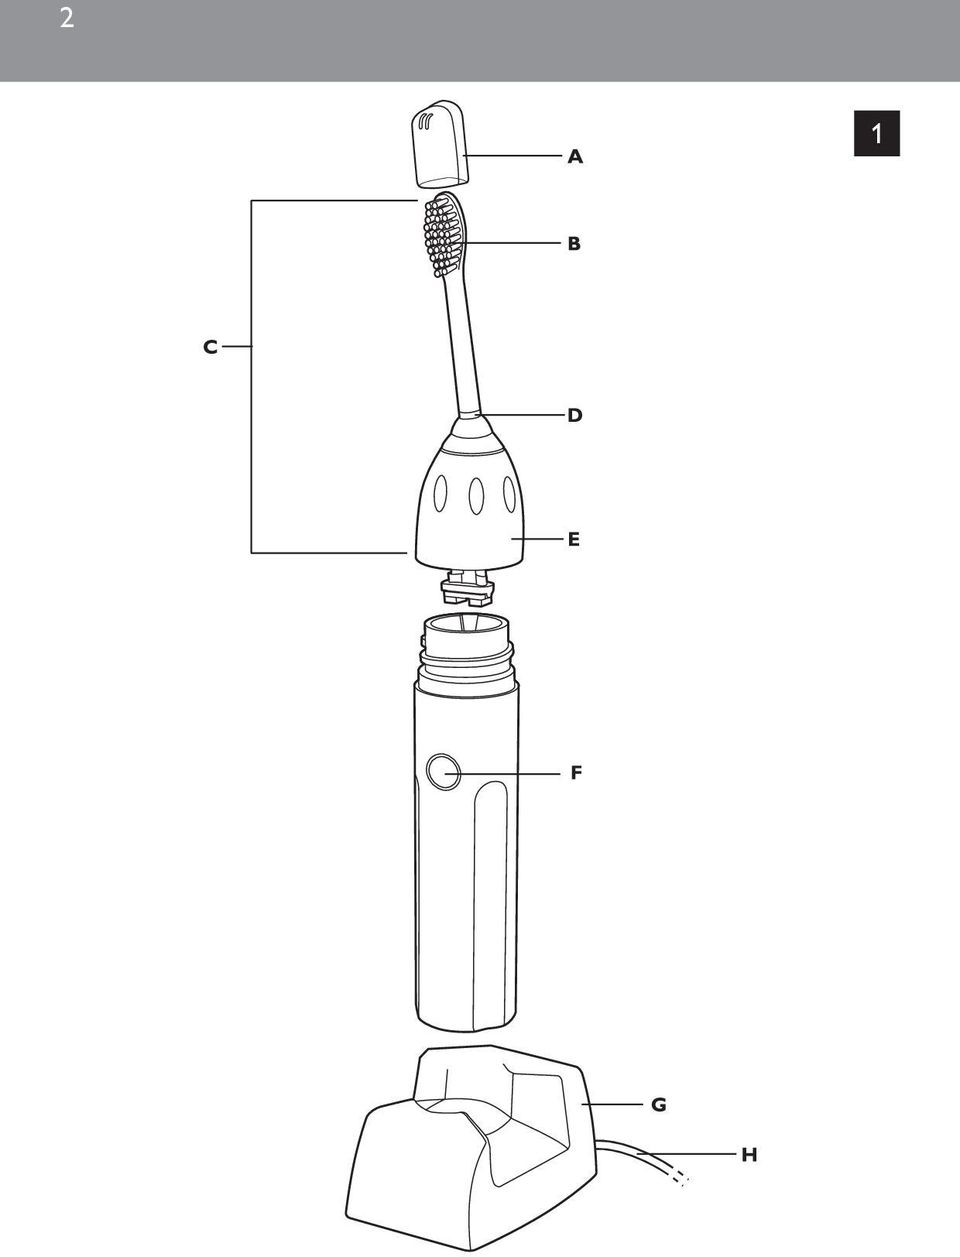
4 1 34 English Introduction Congratulations on your purchase and welcome to Philips! To fully benefit from the support that Philips offers, register your product at welcome. General description (Fig. 1) A Travel cap B Extra-soft bristles C Brush head D Colour code ring E Removable nut F On/off button with charging light G Charger with cord storage hooks H Mains cord Important Read this user manual carefully before you use the appliance and save it for future reference. Danger Keep the charger away from water. Do not place or store it over or near water contained in a bathtub, washbasin, sink etc. Do not immerse the charger in water or any other liquid. After cleaning, make sure the charger is completely dry before you connect it to the mains. Warning Check if the voltage indicated on the appliance corresponds to the local mains voltage before you connect the appliance. Never use the charger if it is damaged in any way. If the charger, the cord or the plug is damaged, always have the charger replaced with one of the original type in order to avoid a hazard.

5 1 3English 5 If the appliance is damaged in any way (brush head, toothbrush handle, charger), stop using it. This appliance contains no user-serviceable parts. If the appliance is damaged, contact the Consumer Care Centre in your country (see chapter Guarantee & service ). Do not use the charger outdoors or near heated surfaces. This appliance is not intended for use by persons (including children) with reduced physical, sensory or mental capabilities, or lack of experience and knowledge, unless they have been given supervision or instruction concerning use of the appliance by a person responsible for their safety. Children should be supervised to ensure that they do not play with the appliance. Caution Do not use the toothbrush in the bath or shower. If you have had oral or gum surgery in the previous 2 months, consult your dentist before you use the toothbrush. Consult your dentist if excessive bleeding occurs after using this toothbrush or if bleeding continues to occur after 1 week of use. The Sonicare toothbrush complies with the safety standards for electromagnetic devices. If you have a pacemaker or other implanted device, contact your physician or the device manufacturer of the implanted device before you use the Sonicare. This appliance has only been designed for cleaning teeth, gums and tongue. Do not use it for any other purpose. Stop using the appliance and contact your doctor if you experience any discomfort or pain. If you have medical concerns, consult your doctor before you use the Sonicare.

6 1 36 English The Sonicare toothbrush is a personal care device and is not intended for use on multiple patients in a dental practice or institution. Stop using a brush head with crushed or bent bristles. Replace the brush head every 3 months or sooner if signs of wear appear. Do not clean the brush head in the dishwasher. Do not use other brush heads than the ones recommended by the manufacturer. Supervise children while they are brushing until they have established good brushing habits. If your toothpaste contains peroxide, baking soda or bicarbonate (common in whitening toothpastes), thoroughly clean the brush head with soap and water after each use. This prevents possible cracking of the plastic. Electromagnetic fields (EMF) This Philips appliance complies with all standards regarding electromagnetic fields (EMF). If handled properly and according to the instructions in this user manual, the appliance is safe to use based on scientific evidence available today.
, thoroughly clean the brush head with soap and water after each use.")
7 1 3English 7 Preparing for use 1 To store excess cord, wind it round the cord storage hooks in the bottom of the charger. Attaching the brush head 1 To place the brush head on the handle, slide the ribs on the inside of the nut into the grooves in the top of the handle. 2 Screw the brush head nut clockwise until it is firmly tightened. If the brush head rattles during use, tighten the nut further. 3 Remove the travel cap from the brush head before you start brushing. Charging Charge the Sonicare for at least 24 hours during the first few days of use. We advise you to keep the Sonicare in the pluggedin charger when not in use, to maintain a full battery charge. When the battery is empty, it takes at least 24 hours to charge the Sonicare fully. 1 Place the handle in the charger (with the on/off button facing towards the front of the charger) to charge the appliance.

8 1 38 English Make sure the bottom of the handle sits back securely in the charger so that it makes complete contact.,, The charging light flashes slowly when the handle is in the charger to indicate that charging is in progress.,, When the Sonicare is fully charged, the charging light lights up continuously to indicate that the Sonicare is ready for use. Note: When the handle is placed in the charger incorrectly, the charging light may still go on, but charging does not take place. Note: The handles of other Sonicare models do not fit in this charger and therefore will not charge effectively. Do not attempt to force a handle into this charger, as this causes damage. Battery charge indication (specific models only) When the battery runs low, you hear 5 beeps after the 2-minute brushing cycle and the charging light flashes rapidly. When you hear the low charge indication, there are 3 or fewer 2-minute brushings left. Using the appliance Brushing technique Follow these simple steps to maximise your brushing experience. 1 Before you switch on the Sonicare, place the bristles of the brush head on your gumline at a 45-degree angle.

9 English 9 2 Hold the handle with a light grip and switch on the Sonicare. Gently move the bristles in a small circular motion so that the longer bristles reach between your teeth. After a few seconds, pass the bristles to the next section. Continue this routine throughout the 2-minute brushing cycle. 3 To maximise the effectiveness of the Sonicare toothbrush, use light pressure and let the Sonicare do the brushing for you. Do not scrub. 4 To make sure you brush evenly throughout the mouth, divide your mouth into 4 sections: outside upper teeth, inside upper teeth, outside lower teeth and inside lower teeth. Begin brushing the first section (outside upper teeth) and brush for 30 seconds before moving to the next section (inside upper teeth). Continue brushing the other two sections for 30 seconds each until you have completed the 2-minute brushing cycle. 5 After the 2-minute brushing cycle, you can briefly switch on the Sonicare again to brush the chewing surfaces of your teeth. You can press the on/off button to switch the Sonicare on or off as desired. Tip: To clean your mouth more completely, you can also brush your tongue with the toothbrush switched on or off, as you prefer.

10 1 310 English Tips for specific oral care needs Stain removal For even better stain removal, dedicate a few seconds of extra brushing time to areas where excess staining occurs. Braces Place the brush head at a 45-degree angle between the brackets and the gumline. Using light pressure, gently move the bristles in a small circular motion so the longer bristles reach between your teeth for 2 seconds. Then gently roll the brush handle so the bristles clean the bracket and the rest of the tooth. Subsequently pass the bristles to the next tooth. Continue this procedure until you have brushed all your teeth. Please note that brush heads wear out sooner when used on braces. Dental restorations Use the Sonicare on dental restorations (such as implants, caps, crowns, bridges and fillings) as you do on your natural tooth surfaces. Work the bristles round all the areas of the restoration for thorough cleaning. Periodontal pockets Your dentist or dental hygienist may have indicated that you have periodontal pockets, deep pockets where plaque bacteria collect. If this is the case, spend extra time brushing these areas after you have completed the 2-minute brushing cycle to improve your gum health.

11 1 3English 11 Features Easy-start This Sonicare model comes with the Easy-start feature activated, which helps you get used to brushing with the Sonicare. The brushing power gently increases to full power over the first 12 brushings. The Easy-start feature is active if you hear 2 beeps immediately after you switch on the Sonicare. Once the Sonicare has reached optimal brushing power (after the 12th brushing), you no longer hear the 2 beeps at the beginning of each brushing cycle. Note: Each of the first 12 brushings must be at least 1 minute long to move properly through the Easy-start ramp-up cycle. To deactivate or activate the Easy-start feature: 1 Attach the brush head to the handle. 2 Place the handle in the plugged-in charger. 3 To deactivate the Easy-start feature, press and hold the on/off button for 5 seconds. You hear 1 beep to indicate that the Easy-start feature has been deactivated. 4 To activate the Easy-start feature, press and hold the on/off button for 5 seconds. You hear 2 beeps to indicate that the Easy-start feature has been activated. Use of the Easy-start feature beyond the initial ramp-up period is not recommended and reduces

12 1 312 English the effectiveness of the Sonicare toothbrush in removing plaque. Make sure the Easy-start feature is deactivated and the handle fully charged when the Sonicare is used in clinical trials. Smartimer The Smartimer automatically sets the brushing time to the 2 minutes that dentists and dental hygienists recommend. After 2 minutes, the Smartimer automatically switches off the toothbrush. If you want to stop brushing briefly during a 2-minute brushing cycle, press the on/off button. When you press the on/off button again, the Smartimer resumes the brushing cycle at the point where you stopped. The Smartimer automatically resets to the beginning of a 2-minute cycle if: 1 you stop brushing for 30 seconds or longer; 2 you put the handle in the charger. Quadpacer (specific models only) The Quadpacer 30-second interval timer ensures that you brush all sections of your mouth evenly and thoroughly. At 30, 60 and 90 seconds, you hear a short beep and notice a pause in brushing action. These signals tell you to continue with the next section of your mouth.

13 1 3English 13 Cleaning Regular cleaning guarantees the best performance and a long life for the appliance. We advise you to use a mild cleaning agent, water and a moist cloth to clean the Sonicare. 1 Rinse the brush head and bristles after every use. 2 Clean the brush head at least once a week, including under the removable nut. To remove the nut: 3 To remove the nut, gently press on the rubber seal with your thumbs. Do not use sharp objects to press on the seal, as this may cause damage. 4 Pull up the nut over the top of the brush head. 5 To reattach the nut, slip the nut over the brush head shaft and pull it down until it snaps home. 6 Clean and dry the handle weekly. 7 Clean the charger periodically. Unplug the charger before you clean it. After you have cleaned the charger, dry it completely before you put the plug back into the wall socket.

14 1 314 English Storage If you do not intend to use the appliance for a long time, unplug it, clean it and store it in a cool and dry place away from direct sunlight. You can store the cord by winding it round the cord storage hooks in the bottom of the charger. Replacement Brush head Replace the brush head every 3 months to achieve optimal results. Only use Sonicare replacement brush heads that are suitable for this Sonicare model. Environment The built-in rechargeable batteries contain substances that may pollute the environment. Always remove the batteries before you discard and hand in the appliance at an official collection point. Dispose of the batteries at an official collection point for batteries. If you have trouble removing the batteries, you can also take the appliance to a Philips service centre. The staff of this centre will remove the batteries for you and will dispose of them in an environmentally safe way. Do not throw away the appliance with the normal household waste at the end of its life, but hand it in at an official collection point for recycling. By doing this, you help to preserve the environment.

15 1 3English 15 Removing the rechargeable batteries This process is not reversible. To remove the batteries yourself, you need a flathead (standard) screwdriver. 1 Remove the toothbrush from the charger, switch it on and let it run until it stops. Continue to switch on the Sonicare until the batteries are completely empty. 2 Insert a screwdriver into one of the slots that are located near the top part of the handle. Push the screwdriver blade into the handle as far as it goes and twist the blade. The housing begins to split. 3 Remove the screwdriver and apply the above instruction to the other slot, which is located on the opposite side of the handle. Twist the blade to split the rest of the housing. 4 Now insert the screwdriver into the middle slot, which is located on the top front part of the handle, as shown. Push the blade in as far as it goes. 5 Now use the screwdriver as a lever to pry the 2 handle sections apart. 6 Pull the 2 handle sections completely apart.

16 1 316 English 7 Insert the screwdriver underneath the electronic circuit board in multiple places. 8 Twist and pry the electronic circuit board loose until it is completely separated from the handle. 9 Pry the batteries loose by inserting the screwdriver on the sides of the two batteries in the locations that are shown in the figure. 10 Twist the screwdriver to break the glue bond round the batteries. The batteries are joined together with glue and are lifted out together.

17 1 3English 17 Guarantee & service If you need service or information or if you have a problem, please visit the Philips website at www. philips.com or contact the Philips Consumer Care Centre in your country (you find its phone number in the worldwide guarantee leaflet). If there is no Consumer Care Centre in your country, go to your local Philips dealer. Guarantee restrictions The terms of the international guarantee do not cover the following: Brush heads Damage caused by misuse, abuse, neglect or alterations Normal wear and tear, including chips, scratches, abrasions, discolouration or fading

18 1 318 English Troubleshooting This chapter summarises the most common problems you could encounter with the Sonicare. If you are unable to solve the problem, contact the Philips Consumer Care Centre in your country (see chapter Guarantee & service ) or visit com. Problem The Sonicare toothbrush does not work. I feel a tickling sensation when I use the Sonicare. The brush head rattles when I use the Sonicare. The brush head chatters against my teeth. Solution You may need to recharge the Sonicare. Charge the Sonicare for at least 24 hours. Make sure the socket is live when you recharge the appliance. The electricity supply to sockets in mirror cabinets over washbasins or shaver sockets in bathrooms may be cut off when the light is switched off. You may need to reattach or replace the brush head. You may experience a slight tickling/tingling sensation when you use the Sonicare for the first time. As you become accustomed to brushing with the Sonicare, this sensation diminishes. The Sonicare should produce a gentle hum during operation. Tighten the brush head nut to eliminate excessive rattling. If the rattling does not stop, you may need to replace the brush head. Make sure you remove the travel cap before you switch on the appliance. You can avoid this by keeping the brush head properly oriented, with the brush head placed on the gumline at an angle of 45 degrees.

19 1 3English 19 Problem Brushing seems less powerful. The Sonicare gives off an unpleasant smell. Solution You may need to recharge the Sonicare. The Easy-start feature may be active and needs to be deactivated (see chapter Features ). You may need to clean the brush head. You may need to replace the brush head. You may need to clean the appliance. Clean the handle, brush head and charger thoroughly (see chapter Cleaning ). You may need to replace the brush head.

20 1 320 Dansk Introduktion Tillykke med dit k 0 3b og velkommen til Philips! For at f 0 2 fuldt udbytte af den support, Philips tilbyder, skal du registrere dit produkt p welcome. Generel beskrivelse (fig. 1) A Beskyttelsesh 0 3tte B Ekstra bl 0 3de b 0 3rsteh 0 2r C B 0 3rstehoved D Farvekodet ring E Aftagelig skruekapsel F On/off-knap og opladeindikator G Oplader med tappe til ledningsopbevaring H Netledning Vigtigt L 0 3s denne brugervejledning omhyggeligt igennem, inden apparatet tages i brug, og gem den til eventuel senere brug. Fare Hold opladeren v 0 3k fra vand, og undlad at placere eller opbevare den over eller t 0 3t p 0 2 vand i badekar, h 0 2ndvask og lign. Opladeren m 0 2 aldrig kommes ned i vand eller anden v 0 3ske. Efter reng 0 3ringen skal du s 0 3rge for, at opladeren er helt t 0 3r, inden du tilslutter str 0 3mmen. Advarsel Kontroll r, om den angivne netsp 0 3nding p 0 2 apparatet svarer til den lokale netsp 0 3nding, f 0 3r du slutter str 0 3m til apparatet. Opladeren m 0 2 ikke bruges, hvis den p 0 2 nogen m 0 2de er beskadiget. Hvis opladeren, ledningen

21 1 3Dansk 21 eller stikket er defekt, skal opladeren udskiftes med en original type for at undg 0 2 enhver risiko. Hvis apparatet har en defekt (b 0 3rstehoved, h 0 2ndtag, oplader), m 0 2 det ikke anvendes. Dette apparat har ingen udskiftelige reservedele. Hvis apparatet beskadiges, skal du kontakte dit lokale Philips Kundecenter (se afsnittet Reklamationsret og service ±). Opladeren m 0 2 ikke bruges udend 0 3rs eller t 0 3t p 0 2 varme flader. Dette apparat er ikke beregnet til at blive brugt af personer (herunder b 0 3rn) med nedsatte fysiske og mentale evner, nedsat f 0 3lesans eller manglende erfaring og viden, medmindre de er blevet vejledt eller instrueret i apparatets anvendelse af en person, der er ansvarlig for deres sikkerhed. Apparatet b 0 3r holdes uden for b 0 3rns r 0 3kkevidde for at sikre, at de ikke kan komme til at lege med det. Forsigtig Brug ikke tandb 0 3rsten i kar- eller brusebad. Hvis du er blevet opereret i mund eller tandk 0 3d inden for de seneste 2 m 0 2neder, skal du sp 0 3rge din tandl 0 3ge til r 0 2ds, f 0 3r du bruger tandb 0 3rsten. Kontakt din tandl 0 3ge, hvis tandk 0 3det bl 0 3der voldsomt efter brug af tandb 0 3rsten, eller hvis der stadig forekommer bl 0 3dninger efter 1 uges brug. Sonicare-tandb 0 3rsten overholder de g 0 3ldende sikkerhedsregler for elektromagnetisk udstyr. Hvis du har en pacemaker eller andre implantater, skal du kontakte din l 0 3ge eller producenten af implantatet inden brug af Sonicare. Dette apparat er kun beregnet til rensning af t 0 3nder, tandk 0 3d og tunge. Det m 0 2 ikke anvendes til andre form 0 2l. Hold op med at bruge apparatet og s 0 3g l 0 3ge, hvis du oplever ubehag eller smerte.
22 1 322 Dansk Hvis du har helbredsproblemer, skal du sp 0 3rge din l 0 3ge til r 0 2ds, f 0 3r du begynder at bruge Sonicare. Sonicare-tandb 0 3rsten er beregnet til personligt hjemmebrug og ikke til brug af et st 0 3rre antal patienter p 0 2 tandl 0 3geklinikker eller institutioner. Brug ikke et b 0 3rstehoved med slidte eller b 0 3jede b 0 3rsteh 0 2r. Udskift b 0 3rstehovedet hver 3. m 0 2ned eller f 0 3r, hvis det er slidt. B 0 3rstehovedet m 0 2 ikke reng 0 3res i opvaskemaskine. Brug ikke andre b 0 3rstehoveder end dem, producenten anbefaler. Hj 0 3lp b 0 3rn med at b 0 3rste t 0 3nder, indtil de har udviklet gode b 0 3rstevaner. Hvis din tandpasta indeholder peroxid, natron eller bikarbonat (almindeligt i blegende tandpastaer), skal b 0 3rstehovedet renses grundigt med vand og s 0 3be, hver gang tandb 0 3rsten har v 0 3ret i brug, for at forebygge revner i plastmaterialet. Elektromagnetiske felter (EMF) Dette Philips-apparat overholder alle standarder for elektromagnetiske felter (EMF). Ved korrekt anvendelse i overensstemmelse med instruktionerne i denne brugervejledning, er apparatet sikkert at anvende if 0 3lge den videnskabelige viden, der er tilg 0 3ngelig i dag.
23 1 3Dansk 23 Klarg 0 3ring 1 Rul den overskydende ledning op omkring tappene i bunden af opladeren. Montering af b 0 3rstehovedet 1 Placer b 0 3rstehovedet p 0 2 h 0 2ndtaget ved at skubbe ribberne p 0 2 indersiden af skruekapslen ind i rillerne 0 3verst i h 0 2ndtaget. 2 Drej skruekapslen h 0 3jre om, indtil den er strammet helt til. Hvis b 0 3rstehovedet rasler under brug, skal skruekapslen strammes yderligere. 3 Fjern beskyttelsesh 0 3tten fra b 0 3rstehovedet, f 0 3r du begynder at b 0 3rste. Opladning Oplad Sonicare i mindst 24 timer i l 0 3bet af de f 0 3rste dages brug. Vi anbefaler, at du lader Sonicare st 0 2 i den tilsluttede oplader, n 0 2r den ikke er i brug, for at opretholde batterikapaciteten. N 0 2r batteriet er tomt, tager en fuld genopladning af Sonicare mindst 24 timer. 1 Plac r h 0 2ndtaget i opladeren med on/offknappen vendende mod forsiden af opladeren for at genoplade apparatet. Kontroll r, at h 0 2ndtagets bund sidder korrekt i opladeren, s 0 2 der er fuld kontakt mellem delene.
24 1 324 Dansk,, N 0 2r h 0 2ndtaget sidder i opladeren, blinker opladeindikatoren langsomt for at angive, at opladning er i gang.,, N 0 2r Sonicare er fuldt opladet, lyser opladeindikatoren konstant for at angive, at Sonicare er klar til brug. Bem 0 3rk: Hvis h 0 2ndtaget er placeret forkert i opladeren, lyser opladeindikatoren muligvis alligevel, men der foreg 0 2r ingen opladning. Bem 0 3rk: H 0 2ndtag fra andre Sonicare-modeller passer ikke til denne oplader og kan derfor ikke oplades effektivt heri. Fors 0 3g aldrig at presse et h 0 2ndtag ned i opladeren med magt, da det vil tage skade af det. Indikator for batteriopladning (ikke alle modeller) N 0 2r batteriet er ved at l 0 3be t 0 3r, h 0 3res 5 bip, n 0 2r du har b 0 3rstet t 0 3nder i 2 minutter, og opladeindikatoren blinker hurtigt. N 0 2r du h 0 3rer indikationen for lavt batteriniveau, er der 3 eller f 0 3rre b 0 3rstninger 2 minutter tilbage. S 0 2dan bruges apparatet B 0 3rsteteknik F 0 3lg disse enkle trin for at blive fortrolig med tandb 0 3rsten. 1 F 0 3r du t 0 3nder for Sonicare, skal du placere b 0 3rstehovedet, s 0 2 b 0 3rsteh 0 2rene ber 0 3rer tandk 0 3dslinjen i en vinkel p grader. 2 Hold om h 0 2ndtaget med et let greb og t 0 3nd for Sonicare. Bev 0 3g forsigtigt tandb 0 3rsten i sm 0 2 cirkelbev 0 3gelser, s 0 2 de l 0 3ngste b 0 3rsteh 0 2r
25 Dansk 25 n 0 2r ind mellem t 0 3nderne. Skift til n 0 3ste sektion efter nogle sekunder. Forts 0 3t p 0 2 denne m 0 2de, indtil du har b 0 3rstet i 2 minutter. 3 Den st 0 3rst mulige effekt opn 0 2s ved at holde og bev 0 3ge Sonicare tandb 0 3rsten med et let tryk og lade Sonicare klare b 0 3rstningen. T 0 3nderne skal ikke skrubbes. 4 For at sikre en ensartet b 0 3rstning i hele munden kan du opdele den i 4 sektioner: Ydersiden af t 0 3nderne i overmunden, indersiden af t 0 3nderne i overmunden, ydersiden af t 0 3nderne i undermunden og indersiden af t 0 3nderne i undermunden. Begynd med at b 0 3rste den f 0 3rste sektion (ydersiden af t 0 3nderne i overmunden), og b 0 3rst i 30 sekunder, f 0 3r du g 0 2r videre til n 0 3ste sektion (indersiden af t 0 3nderne i overmunden). Forts 0 3t med at b 0 3rste de to resterende sektioner i 30 sekunder hver, indtil du har b 0 3rstet i sammenlagt 2 minutter. 5 N 0 2r du har b 0 3rstet t 0 3nder i 2 minutter, kan du t 0 3nde kortvarigt for Sonicare igen for at b 0 3rste t 0 3ndernes tyggeflader. Du kan trykke p 0 2 on/off-knappen for at t 0 3nde eller slukke for Sonicare. Tip: Hvis du vil rense din mund mere grundigt, kan du ogs 0 2 b 0 3rste tungen med tandb 0 3rsten t 0 3ndt eller slukket alt efter, hvad du foretr 0 3kker. Gode r 0 2d ved specielle tandplejebehov Fjernelse af misfarvning Hvis du vil fjerne misfarvning, kan du bruge et par sekunders ekstra b 0 3rstetid p 0 2 omr 0 2der, som er s 0 3rligt misfarvede.
26 1 326 Dansk Tandb 0 3jler Anbring b 0 3rstehovedet i en vinkel p grader mellem b 0 3jlen og tandlinjen. Brug et let tryk, og bev 0 3g forsigtigt tandb 0 3rsten i lette cirkelbev 0 3gelser, s 0 2 de l 0 3ngste b 0 3rsteh 0 2r n 0 2r ind mellem t 0 3nderne, i 2 sekunder. Drej derefter h 0 2ndtaget let, s 0 2 b 0 3rsteh 0 2rene b 0 3rster b 0 3jlen og resten af tanden. G 0 2 derefter videre til den n 0 3ste tand. Forts 0 3t p 0 2 denne m 0 2de, indtil du har b 0 3rstet alle t 0 3nderne. Bem 0 3rk, at b 0 3rstehovedet slides hurtigere, n 0 2r det bruges til at b 0 3rste t 0 3nder med b 0 3jle. Tandrekonstruktioner Brug Sonicare p 0 2 tandrekonstruktioner (s 0 2som implantater, tandhalse, kroner, broer og fyldninger) p 0 2 samme m 0 2de som p 0 2 dine andre t 0 3nder. S 0 3rg for, at b 0 3rsteh 0 2rene kommer hele vejen rundt om det reparerede omr 0 2de. Tandk 0 3dslommer Din tandl 0 3ge eller tandplejer kan have fortalt dig, at du har tandk 0 3dslommer, dybe lommer, hvor plakbakterier kan samle sig. Hvis dette er tilf 0 3ldet, skal du bruge ekstra tid p 0 2 n 0 3nsom b 0 3rstning af disse omr 0 2der, efter at have gennemf 0 3rt 2-minutters b 0 3rstningen, for at forbedre tandk 0 3dets tilstand. Funktioner Easy-start Denne Sonicare-model leveres med Easy-startfunktionen aktiveret, s 0 2 du kan v 0 3nne dig til at b 0 3rste t 0 3nder med Sonicare. B 0 3rstestyrken vil i l 0 3bet af de f 0 3rste 12 b 0 3rstninger gradvist og blidt tiltage til fuld styrke. Hvis du h 0 3rer 2 bip umiddelbart efter, at du har t 0 3ndt for Sonicare, er Easy-start-funktionen
27 1 3Dansk 27 aktiveret. N 0 2r Sonicare n 0 2r op p 0 2 fuld b 0 3rstestyrke (efter 12 b 0 3rstninger), oph 0 3rer det dobbelte lydsignal. Bem 0 3rk: Hver af de f 0 3rste 12 b 0 3rstninger skal v 0 3re af mindst 1 minuts varighed, for at b 0 3rstestyrken tiltager ved n 0 3ste b 0 3rstning. Aktivering og deaktivering af Easy-start-funktionen: 1 S 0 3t b 0 3rstehovedet p 0 2 h 0 2ndtaget. 2 Anbring h 0 2ndtaget i den tilsluttede oplader. 3 Easy-start-funktionen deaktiveres ved at trykke p 0 2 on/off-knappen og holde den inde i 5 sekunder. N 0 2r du h 0 3rer 1 bip, betyder det, at Easy-start-funktionen er deaktiveret. 4 Easy-start-funktionen aktiveres ved at trykke p 0 2 on/off-knappen og holde den inde i 5 sekunder. N 0 2r du h 0 3rer 2 bip, betyder det, at Easy-start-funktionen er aktiveret. Brug af Easy-start-funktionen efter opstartsperioden kan ikke anbefales, da det medf 0 3rer en mindre effektiv plakfjernelse. S 0 3rg for, at Easy-start-funktionen er sl 0 2et fra, og at h 0 2ndtaget er fuldt opladet, n 0 2r Sonicare bruges i kliniske fors 0 3g. Smartimer Smartimer-funktionen indstiller automatisk b 0 3rstetiden til 2 minutter, som anbefalet af tandl 0 3ger og tandplejere. Efter 2 minutter slukker Smartimer-funktionen automatisk for tandb 0 3rsten. Hvis du vil holde pause eller afbryde b 0 3rstningen, inden de 2 minutter er g 0 2et, skal du trykke p 0 2 on/ off-knappen. N 0 2r du trykker p 0 2 on/off-knappen
28 1 328 Dansk igen, starter Smartimer -funktionen der, hvor du slap. Smartimer-funktionen nulstiller automatisk 2-minuttersintervallet, hvis: 1 Du holder op med at b 0 3rste i mere end 30 sekunder 2 Du stiller h 0 2ndtaget i opladeren Quadpacer (ikke alle modeller) Quadpacer-funktionen, som er en 30-sekunders intervaltimer, sikrer, at du f 0 2r b 0 3rstet alle omr 0 2der i munden ensartet og grundigt. Efter 30, 60 og 90 sekunder h 0 3res et kort bip efterfulgt af en kort pause i b 0 3rstefunktionen. Dette indikerer, at du skal g 0 2 videre til n 0 3ste sektion. Reng 0 3ring Regelm 0 3ssig reng 0 3ring giver dig et optimalt resultat og sikrer apparatet en l 0 3ngere levetid. Vi anbefaler brugen af et mildt reng 0 3ringsmiddel, vand og en fugtig klud til reng 0 3ring af Sonicare. 1 Skyl b 0 3rstehoved og b 0 3rsteh 0 2r, hver gang tandb 0 3rsten har v 0 3ret brugt. 2 Reng 0 3r b 0 3rstehovedet mindst n gang om ugen, ogs 0 2 under den aftagelige skruekapsel. S 0 2dan fjernes skruekapslen: 3 Fjern skruekapslen ved at trykke t 0 3tningsringen forsigtigt p 0 2 plads med tommelfingrene. Undlad brug af skarpe genstande for at undg 0 2 beskadigelse af t 0 3tningsringen.
29 1 34 L 0 3ft skruekapslen op over toppen af b 0 3rstehovedet. 5 Skruekapslen s 0 3ttes p 0 2 igen ved at tr 0 3kke den ned over b 0 3rstehovedet, til den klikker p 0 2 plads. 6 Reng 0 3r og t 0 3r h 0 2ndtaget en gang om ugen. 7 Reng 0 3r opladeren regelm 0 3ssigt. Tag opladeren ud af stikkontakten f 0 3r reng 0 3ring. N 0 2r du har rengjort opladeren, skal den v 0 3re helt t 0 3r, f 0 3r du s 0 3tter stikket i stikkontakten igen. Opbevaring Hvis du ikke skal bruge apparatet i en l 0 3ngere periode, skal du tage stikket ud af stikkontakten, reng 0 3re apparatet og opbevare det et k 0 3ligt og t 0 3rt sted, hvor det ikke uds 0 3ttes for direkte sollys. Du kan vikle ledningen rundt om tappene i bunden af opladeren. Udskiftning Dansk 29 B 0 3rstehoved Udskift b 0 3rstehovedet hver 3. m 0 2ned for at f 0 2 det bedste resultat. Brug kun Sonicare-b 0 3rstehoveder, der er beregnet til denne model.
30 1 330 Dansk Milj 0 3hensyn De indbyggede genopladelige batterier indeholder stoffer, der kan forurene milj 0 3et. Fjern altid batterierne, f 0 3r du kasserer apparatet og afleverer det p 0 2 en genbrugsstation. Aflev r batterierne p 0 2 et officielt indsamlingssted for brugte batterier. Kan du ikke f 0 2 batterierne ud, kan du aflevere apparatet til Philips, som vil s 0 3rge for at tage batterierne ud og bortskaffe dem p 0 2 en milj 0 3m 0 3ssig forsvarlig m 0 2de. Apparatet m 0 2 ikke smides ud sammen med det almindelige husholdningsaffald, n 0 2r det til sin tid kasseres. Aflever det i stedet p 0 2 en kommunal genbrugsstation. P 0 2 den m 0 2de er du med til at beskytte milj 0 3et. Udtagning af de genopladelige batterier Batterierne kan ikke s 0 3ttes i igen, efter at du har fjernet dem. Hvis du selv tager batterierne ud, skal du bruge en (almindelig) skruetr 0 3kker med fladt hoved. 1 Fjern tandb 0 3rsten fra opladeren, t 0 3nd den, og lad den k 0 3re, indtil den stopper. Forts 0 3t med at t 0 3nde Sonicare, indtil batteriet er helt tomt. 2 S 0 3t en skruetr 0 3kker ind i en af 0 2bningerne p 0 2 den 0 3verste del af h 0 2ndtaget. Skub skruetr 0 3kkeren s 0 2 langt ind i h 0 2ndtaget, som det kan lade sig g 0 3re og drej den rundt, hvorefter kabinettet 0 2bnes. 3 Fjern skruetr 0 3kkeren og gentag ovenst 0 2ende fremgangsm 0 2de for 0 2bningen p 0 2 den anden side
31 1 3Dansk 31 af h 0 2ndtaget. Drej skruetr 0 3kkeren for at 0 2bne resten af kabinettet. 4 S 0 3t nu skruetr 0 3kkeren i den midterste 0 2bning, 0 3verst foroven p 0 2 h 0 2ndtaget, som vist. Skub bladet s 0 2 langt ind, som det kan komme. 5 Brug nu skruetr 0 3kkeren som l 0 3ftestang til at lirke de to dele af h 0 2ndtaget fra hinanden. 6 Tr 0 3k de to dele af h 0 2ndtaget helt fra hinanden. 7 Skub skruetr 0 3kkeren ind under den elektroniske printplade et par steder. 8 Drej og lirk den elektroniske printplade, indtil det er helt fri af h 0 2ndtaget.
32 1 332 Dansk 9 Vrid batterierne l 0 3s ved at s 0 3tte skruetr 0 3kkeren ind p 0 2 siden af de to batterier som vist p 0 2 illustrationen. 10 Drej skruetr 0 3kkeren for at kn 0 3kke b 0 2ndet omkring batterierne. Batterierne er sat sammen med lim og l 0 3ftes ud samlet.
33 1 3Dansk 33 Reklamationsret og service For alle yderligere oplysninger eller ved eventuelle problemer med apparatet henvises til Philips hjemmeside p 0 2 adressen eller det n 0 3rmeste Philips Kundecenter (telefonnumre findes i vedlagte Worldwide Guarantee ±-folder). Hvis der ikke findes et kundecenter i dit land, bedes du kontakte din n 0 3rmeste Philips-forhandler. G 0 3ldende forbehold i reklamationsretten Betingelserne i den internationale garanti d 0 3kker ikke f 0 3lgende: B 0 3rstehoveder Skader, der opst 0 2r som f 0 3lge af misbrug, manglende vedligeholdelse eller 0 3ndringer Normal slitage, inkl. ridser, skrammer, afslidning, misfarvning og falmning
34 1 334 Dansk Fejlfinding Dette afsnit opsummerer de mest almindelige problemer, der kan forekomme ved brug af Sonicare. Hvis du har brug for yderligere hj 0 3lp og vejledning, kan du kontakte det lokale Philips Kundecenter (se afsnittet Reklamationsret og service ±) eller bes 0 3g Problem Sonicaretandb 0 3rsten virker ikke. Jeg m 0 3rker en kildende fornemmelse, n 0 2r jeg bruger Sonicare. B 0 3rstehovedet rasler, n 0 2r jeg bruger Sonicare. B 0 3rstehovedet vibrerer mod t 0 3nderne. L 0 3sning Du skal muligvis genoplade Sonicare. Oplad den i mindst 24 timer. Kontroll r, at der er t 0 3ndt for stikkontakten, n 0 2r tandb 0 3rsen oplades. V 0 3r opm 0 3rksom p 0 2, at stik i toiletskabe eller badev 0 3relsesstik til barbermaskiner ofte er afbrudt, n 0 2r lyset p 0 2 badev 0 3relset er slukket. Det kan v 0 3re n 0 3dvendigt at udskifte b 0 3rstehovedet. Du kan eventuelt m 0 3rke en let kildende/prikkende fornemmelse, f 0 3rste gang du bruger Sonicare. Efterh 0 2nden som du v 0 3nner dig til at b 0 3rste t 0 3nder med Sonicare, mindskes denne f 0 3lsomhed. Sonicare frembringer en forsigtig summen, n 0 2r den arbejder. Stram skruekapslen for at eliminere overdreven raslen. Hvis denne raslen ikke stopper, kan det v 0 3re n 0 3dvendigt at udskifte b 0 3rstehovedet. S 0 3rg for at fjerne beskyttelsesh 0 3tten, f 0 3r du t 0 3nder for tandb 0 3rsten. Du kan undg 0 2 dette ved at holde b 0 3rstehovedet i den rette vinkel p grader mod tandlinjen.
35 1 3Dansk 35 Problem B 0 3rstningen virker mindre kraftig. Sonicare lugter ubehageligt. L 0 3sning Det kan v 0 3re n 0 3dvendigt at oplade Sonicare. Easy-start-funktionen kan v 0 3re aktiveret og skal deaktiveres (se afsnittet Funktioner ±). B 0 3rstehovedet tr 0 3nger m 0 2ske til at blive rengjort. Det kan v 0 3re n 0 3dvendigt at udskifte b 0 3rstehovedet. Det er muligvis n 0 3dvendigt at reng 0 3re apparatet. Reng 0 3r h 0 2ndtag, b 0 3rstehoved og oplader grundigt (se afsnittet Reng 0 3ring ±). Det kan v 0 3re n 0 3dvendigt at udskifte b 0 3rstehovedet.
36 1 336 Espa 0 9ol Introducci n Enhorabuena por la compra de este producto y bienvenido a Philips. Para sacar el mayor partido de la asistencia que Philips le ofrece, registre su producto en Descripci n general (fig. 1) A Capuch n B Cerdas extrasuaves C Cabezal del cepillo D Arandela de c digo de color E Tuerca desmontable F Bot n de encendido/apagado con piloto de carga G Cargador con ganchos recogecables H Cable de alimentaci n Importante Antes de usar el aparato, lea atentamente este manual del usuario y cons rvelo por si necesitara consultarlo en el futuro. Peligro Mantenga el cargador alejado del agua. No lo coloque ni lo guarde por encima o cerca de agua contenida en ba 0 9eras, lavabos, fregaderos, etc. No sumerja el cargador en agua ni en otros l ªquidos. Despu s de limpiarlo, aseg ²rese de que el cargador est completamente seco antes de enchufarlo a la red el ctrica. Advertencia Antes de enchufar el aparato, compruebe si el voltaje indicado en el mismo se corresponde con el voltaje de red local.
37 1 3Espa 0 9ol 37 No utilice nunca el cargador si tiene alg ²n fallo o deterioro. Si el cargador, el cable o la clavija est n da 0 9ados, sustituya el cargador por uno del modelo original para evitar situaciones de peligro. Deje de utilizar el aparato si tiene alg ²n da 0 9o (en el cabezal del cepillo, en el mango o en el cargador). Este aparato contiene piezas que no son reemplazables por el usuario. Si el aparato est da 0 9ado, p ngase en contacto con el Servicio de Atenci n al Cliente de Philips en su pa ªs (consulte el cap ªtulo Garant ªa y servicio ±). No utilice el cargador al aire libre ni cerca de superficies calientes. Este aparato no debe ser usado por personas (adultos o ni 0 9os) con su capacidad f ªsica, ps ªquica o sensorial reducida, ni por quienes no tengan los conocimientos y la experiencia necesarios, a menos que sean supervisados o instruidos acerca del uso del aparato por una persona responsable de su seguridad. Aseg ²rese de que los ni 0 9os no jueguen con este aparato. Precauci n No utilice el cepillo dental en la ba 0 9era o en la ducha. Consulte a su dentista antes de utilizar este cepillo dental si ha sufrido cirug ªa oral o de las enc ªas en los 2 ²ltimos meses. Consulte a su dentista si se produce un sangrado excesivo despu s de usar este cepillo dental, o si el sangrado contin ²a produci ndose despu s de 1 semana de uso. El cepillo dental Sonicare cumple las normas de seguridad para dispositivos electromagn ticos. Si tiene un marcapasos u otro dispositivo implantado,
38 1 338 Espa 0 9ol consulte a su m dico o al fabricante de dichos dispositivos antes de utilizar el cepillo Sonicare. Este aparato est dise 0 9ado para limpiar s lo los dientes, las enc ªas y la lengua. No lo utilice con otra finalidad. Deje de utilizar este aparato y consulte a su m dico si experimenta alg ²n tipo de dolor o molestia. Si tiene alguna duda m dica, consulte a su m dico antes de utilizar su Sonicare. El cepillo dental Sonicare es un aparato de higiene personal y no ha sido concebido para su uso en m ²ltiples pacientes de cl ªnicas o instituciones. No utilice un cabezal de cepillo si tiene las cerdas aplastadas o curvadas. Sustituya el cabezal del cepillo cada 3 meses o antes si aparecen signos de desgaste. No limpie el cabezal del cepillo en el lavavajillas. No utilice otros cabezales que no sean los recomendados por el fabricante. Supervise a los ni 0 9os cuando se est n cepillando los dientes hasta que hayan adquirido unos buenos h bitos de cepillado. Si su dent ªfrico contiene per xido, bicarbonato s dico u otro bicarbonato (frecuentes en los dent ªfricos blanqueadores), limpie bien el cabezal con agua y jab n despu s de cada uso. Esto evitar la aparici n de posibles grietas en el pl stico. Campos electromagn ticos (CEM) Este aparato Philips cumple todos los est ndares sobre campos electromagn ticos (CEM). Si se utiliza correctamente y de acuerdo con las instrucciones de este manual, el aparato se puede usar de forma segura seg ²n los conocimientos cient ªficos disponibles hoy en d ªa.
39 1 3Espa 0 9ol 39 Preparaci n para su uso 1 Para guardar el cable sobrante, enr llelo alrededor de los ganchos situados en la parte inferior del cargador. C mo fijar el cabezal del cepillo 1 Coloque el cabezal en el mango deslizando los resaltes del interior de la tuerca en las ranuras de la parte superior del mango. 2 Enrosque la tuerca del cabezal en el sentido de las agujas del reloj hasta que quede bien apretada. Si el cabezal vibra durante el cepillado, apriete m s la tuerca. 3 Antes de empezar a cepillarse, quite el capuch n del cabezal del cepillo. Carga Cargue el cepillo Sonicare durante al menos 24 horas durante los primeros d ªas de uso. Deje su Sonicare en el cargador enchufado cuando no lo utilice para mantener la bater ªa completamente cargada. Cuando la bater ªa est descargada, se necesitan al menos 24 horas para cargar completamente el cepillo Sonicare.
40 1 340 Espa 0 9ol 1 Coloque el mango en el cargador (con el bot n de encendido/apagado hacia la parte frontal del cargador) para cargar el aparato. Aseg ²rese de que la parte inferior del mango se apoya perfectamente en el cargador y que hace buen contacto.,, El piloto de carga parpadea lentamente cuando el mango est en el cargador para indicar que el aparato se est cargando.,, Cuando el cepillo Sonicare est completamente cargado, el piloto de carga se ilumina de manera continua para indicar que el cepillo Sonicare est listo para su uso. Nota: Cuando el mango est mal colocado en el cargador, es posible que el piloto de carga se encienda, pero el aparato no se carga. Nota: Los mangos de otros modelos de Sonicare no encajan en este cargador y por tanto no se cargar n correctamente. No intente encajar a la fuerza otro mango en este cargador, ya que podr ªa da 0 9arlo. Indicaci n de carga de la bater ªa (s lo en modelos espec ªficos) Cuando la bater ªa se est agotando, escuchar 5 pitidos despu s del ciclo de cepillado de 2 minutos y el piloto de carga parpadear r pidamente. Cuando escuche la indicaci n de bater ªa baja, significa que le quedan 3 o menos cepillados de 2 minutos.
41 1 3Espa 0 9ol 41 Uso del aparato T cnica de cepillado Siga estos sencillos pasos para maximizar su experiencia de cepillado. 1 Antes de encender el cepillo Sonicare, coloque las cerdas del cabezal sobre la l ªnea de las enc ªas formando un ngulo de 45 grados. 2 Sujete ligeramente el mango, encienda su Sonicare y mueva suavemente las cerdas con peque 0 9os movimientos circulares de modo que las cerdas m s largas lleguen a las zonas interdentales. Transcurridos unos segundos, pase las cerdas a la siguiente secci n. Repita esta operaci n hasta completar el ciclo de cepillado de 2 minutos. 3 Para maximizar la eficacia de Sonicare, ejerza s lo una ligera presi n y deje que Sonicare se encargue del cepillado. No frote. 4 Para asegurarse el cepillado uniforme de toda la boca, divida la cavidad bucal en 4 secciones: parte externa de los dientes superiores, parte interna de los dientes superiores, parte externa de los dientes inferiores y parte interna de los dientes inferiores. Comience el cepillado en la secci n (externa dientes superiores) y cepille durante 30 segundos antes de pasar a la siguiente secci n (interna dientes superiores). Contin ²e cepillando las otras 2 secciones durante 30 segundos cada una, hasta completar el ciclo de cepillado de 2 minutos. 5 Tras completar el ciclo de cepillado de 2 minutos, puede volver a encender
42 1 342 Espa 0 9ol su Sonicare brevemente para cepillar la superficie de masticaci n de los dientes. Puede pulsar el bot n de encendido/apagado para encender y apagar su Sonicare seg ²n lo desee. Consejo: Para limpiar la boca m s en profundidad, tambi n puede cepillarse la lengua con el cepillo encendido o apagado, como prefiera. Consejos para cuidados bucales espec ªficos Eliminaci n de manchas dentales Para asegurar una mejor eliminaci n de manchas dentales, dedique unos segundos adicionales de cepillado a las zonas donde se forman m s manchas. Aparatos correctores Coloque el cabezal del cepillo con un ngulo de 45 grados entre los correctores y la l ªnea de las enc ªas. Ejerciendo una ligera presi n, mueva con suavidad las cerdas con peque 0 9os movimientos circulares de modo que las cerdas m s largas lleguen a las zonas interdentales durante 2 segundos. Despu s gire con suavidad el mango del cepillo para que las cerdas limpien el bracket y el resto del diente. A continuaci n, pase al diente siguiente. Repita esta operaci n hasta que haya cepillado todos los dientes. Tenga en cuenta que los cabezales se gastan antes cuando se utilizan sobre aparatos correctores. Restauraciones dentales Utilice el cepillo Sonicare sobre las restauraciones dentales (tales como implantes, fundas, coronas, puentes y empastes) tal y como lo hace sobre las superficies de sus dientes normales. Mueva las cerdas por todas las zonas de la restauraci n para una limpieza completa. Bolsas periodontales
43 1 3Puede que su dentista o higienista dental le hayan dicho que tiene bolsas periodontales, bolsas profundas en las que se acumula la placa bacteriana. Si es as ª, despu s de completar el ciclo de cepillado de 2 minutos, cepille estas zonas durante un tiempo adicional para mejorar la salud de sus enc ªas. Caracter ªsticas Espa 0 9ol 43 Easy-start Este modelo de Sonicare viene con la funci n Easy-start activada, la cual le ayudar a acostumbrarse al cepillado con Sonicare. Durante los 12 primeros usos, la potencia de cepillado va aumentando paulatinamente hasta alcanzar la potencia total. La funci n Easy-start est activada si inmediatamente despu s de encender su Sonicare escucha 2 pitidos. Una vez alcanzada la potencia de cepillado ptima (tras los 12 primeros usos), ya no oir el doble pitido al comenzar a cepillarse. Nota: cada uno de los 12 primeros cepillados debe tener una duraci n de al menos 1 minuto para realizar adecuadamente el ciclo ascendente de Easy-start. Para desactivar o activar la funci n Easy-start: 1 Fije el cabezal del cepillo al mango. 2 Coloque el mango en el cargador enchufado. 3 Para desactivar la funci n Easy-start, mantenga pulsado el bot n de encendido/apagado durante 5 segundos. Oir un pitido que indica que se ha desactivado la funci n Easy-start. 4 Para activar la funci n Easy-start, mantenga pulsado el bot n de encendido/apagado
44 1 344 Espa 0 9ol durante 5 segundos. Oir 2 pitidos que indican que se ha activado la funci n Easy-start. No se recomienda el uso de la funci n Easy-start m s all del periodo inicial de aumento gradual, ya que reduce la eficacia del cepillo Sonicare en la eliminaci n de la placa. Aseg ²rese de que la funci n Easy-start est desactivada y el mango completamente cargado cuando se utilice Sonicare en ensayos cl ªnicos. Smartimer Smartimer ajusta autom ticamente el ciclo de cepillado en 2 minutos, el tiempo recomendado por los dentistas e higienistas dentales. Transcurridos 2 minutos, el temporizador Smartimer apagar autom ticamente el cepillo. Si desea interrumpir brevemente el cepillado durante un ciclo de cepillado de 2 minutos, pulse el bot n de encendido/apagado. Si pulsa de nuevo el bot n de encendido/apagado, la funci n Smartimer har que el cepillado se reanude desde el punto donde lo dej. Smartimer se volver a ajustar autom ticamente al inicio de un ciclo de 2 minutos si: 1 interrumpe el cepillado durante 30 segundos o m s; 2 vuelve a colocar el mango en el cargador. Quadpacer (s lo en modelos espec ªficos) El temporizador de intervalos de 30 segundos Quadpacer asegura un cepillado completo y uniforme de todas las secciones de la boca. A los 30, 60 y 90 segundos oir un pitido breve y notar una peque 0 9a pausa en la acci n de cepillado. Estas
45 1 3Espa 0 9ol 45 se 0 9ales le indican que puede pasar a la siguiente secci n de la boca. Limpieza Una limpieza regular garantiza el mejor rendimiento y una mayor duraci n del aparato. Recomendamos que utilice un agente limpiador suave, agua y un pa 0 9o h ²medo para limpiar su Sonicare. 1 Enjuague siempre el cabezal y las cerdas despu s de cada uso. 2 Limpie el cabezal del cepillo al menos una vez a la semana, tambi n debajo de la tuerca desmontable. Para quitar la tuerca: 3 Para quitar la tuerca, presione suavemente la junta de goma con los pulgares. No utilice objetos afilados o puntiagudos para empujar la junta, ya que podr ªan deteriorarla. 4 Saque la tuerca por la parte superior del cabezal del cepillo. 5 Para volver a colocar la tuerca, desl ªcela por el eje del cabezal y emp ²jela hasta que encaje en su sitio ( clic ±). 6 Limpie y seque el mango todas las semanas. 7 Limpie el cargador peri dicamente. Desenchufe el cargador antes de limpiarlo. Despu s de haber limpiado el cargador, s quelo
46 1 346 Espa 0 9ol completamente antes de volver a enchufarlo a la red. Almacenamiento Si no va a utilizar el aparato durante mucho tiempo, desench ²felo, l ªmpielo y gu rdelo en un lugar fresco, seco y alejado de la luz directa del sol. Puede guardar el cable enroll ndolo en los ganchos situados en la parte inferior del cargador. Sustituci n Cabezal del cepillo Sustituya el cabezal cada 3 meses para conseguir unos resultados ptimos. Utilice s lo los cabezales de repuesto Sonicare adecuados para este modelo Sonicare. Medio ambiente Las bater ªas recargables incorporadas contienen sustancias que pueden contaminar el medio ambiente. Extraiga siempre las bater ªas antes de deshacerse del aparato o de llevarlo a un punto de recogida oficial. Deposite las bater ªas en un lugar de recogida oficial. Si no puede quitar las bater ªas, puede llevar el aparato a un servicio de asistencia t cnica de Philips. El personal del servicio de asistencia t cnica extraer las bater ªas y se deshar de ellas de forma no perjudicial para el medio ambiente.
47 1 3Espa 0 9ol 47 Al final de su vida ²til, no tire el aparato junto con la basura normal del hogar. Ll velo a un punto de recogida oficial para su reciclado. De esta manera ayudar a conservar el medio ambiente. C mo extraer las pilas recargables Este proceso no es reversible. Para quitar las bater ªas usted mismo necesitar un destornillador de punta plana (normal). 1 Quite el cepillo del cargador, enci ndalo y d jelo funcionar hasta que se pare. Contin ²e encendiendo el cepillo Sonicare hasta que la bater ªa se agote por completo. 2 Inserte un destornillador en una de las ranuras situadas cerca de la parte superior del mango. Presione con la punta del destornillador hacia el interior del mango todo lo que pueda y gire la punta. La carcasa empezar a separarse. 3 Retire el destornillador y haga lo mismo con la otra ranura, situada al otro lado del mango. Gire la punta para abrir el resto de la carcasa. 4 Ahora inserte el destornillador en la ranura del centro situada en la parte superior central del mango, seg ²n se muestra. Presione con la punta todo lo que pueda.
48 1 348 Espa 0 9ol 5 Utilice el destornillador como palanca y separe las 2 secciones del mango. 6 Separe completamente las 2 secciones del mango. 7 Inserte el destornillador en varios lugares debajo de la placa del circuito electr nico. 8 Gire y haga palanca para separar completamente la placa del circuito electr nico del mango. 9 Para sacar las bater ªas, inserte el destornillador en los laterales de las dos bater ªas por los lugares que se indican en la figura.
49 1 3Espa 0 9ol Gire el destornillador para romper el pegamento que hay alrededor de las bater ªas. Las bater ªas est n unidas con pegamento y se levantar n a la vez. Garant ªa y servicio Si necesita informaci n o si tiene alg ²n problema, visite la p gina Web de Philips en o p ngase en contacto con el Servicio de Atenci n al Cliente de Philips en su pa ªs (hallar el n ²mero de tel fono en el folleto de la garant ªa mundial). Si no hay Servicio de Atenci n al Cliente de Philips en su pa ªs, dir ªjase a su distribuidor local Philips. Restricciones de la garant ªa La garant ªa internacional no cubre los siguientes da 0 9os: Cabezales del cepillo Deterioros causados por el uso inapropiado, abusos, negligencias o alteraciones. Desgaste normal, incluyendo ara 0 9azos, desportilladuras, abrasiones, decoloraciones o p rdida gradual del color.
REMOVE CONTENTS FROM BOX. VERIFY ALL PARTS ARE PRESENT READ INSTRUCTIONS CAREFULLY BEFORE STARTING INSTALLATION
 2011-2014 FORD EXPLORER PARTS LIST Qty Part Description Qty Part Description 1 Bull Bar 2 12mm x 35mm Bolt Plates 1 Passenger/Right Mounting Bracket 2 12mm Nut Plate 1 Driver/Left Mounting Bracket 2 12mm
Start Here USB *CC * *CC * USB USB
 1 USB Start Here USB 11 USB WARNING: To ensure that the software is installed correctly, do not connect the USB cable until step 11. 11 USB 2 a. b. Lower both the paper tray and the print cartridge door.
Slope-Intercept Formula
 LESSON 7 Slope Intercept Formula LESSON 7 Slope-Intercept Formula Here are two new words that describe lines slope and intercept. The slope is given by m (a mountain has slope and starts with m), and intercept
TB-615 / TB-617 Wireless slim keyboard. EN User guide SE Användarhandledning FI Käyttöohje DK Brugervejledning NO Bruksanvisning
 TB-615 / TB-617 Wireless slim keyboard EN User guide SE Användarhandledning FI Käyttöohje DK Brugervejledning NO Bruksanvisning EN User guide You have bought a wireless keyboard to use with Windows XP,
KROPPEN LEDER STRØM. Sett en finger på hvert av kontaktpunktene på modellen. Da får du et lydsignal.
 KROPPEN LEDER STRØM Sett en finger på hvert av kontaktpunktene på modellen. Da får du et lydsignal. Hva forteller dette signalet? Gå flere sammen. Ta hverandre i hendene, og la de to ytterste personene
Justeringsanvisninger finnes på de to siste sidene.
 d Montering av popup spredere Justeringsanvisninger finnes på de to siste sidene. Link til monteringsfilm på youtube: http://youtu.be/bjamctz_kx4 Hver spreder har montert på en "svinkobling", det vil si
Elektronisk termostat med spareprogram. Lysende LCD display øverst på ovnen for enkel betjening.
 Elektronisk termostat med spareprogram. Lysende LCD display øverst på ovnen for enkel betjening. 27.5 LCD Electronic thermostat with program setting. Bright LCD display placed at the top of the heater
Windlass Control Panel
 SIDE-POWER 86-08955 Windlass Control Panel v1.0.2 Windlass Systems Installasjon manual SLEIPNER MOTOR AS P.O. Box 519 N-1612 Fredrikstad Norway Tel: +47 69 30 00 60 Fax: +47 69 30 00 70 w w w. s i d e
INSTALLATION GUIDE FTR Cargo Rack Regular Ford Transit 130" Wheelbase ( Aluminum )
") INSTALLATION GUIDE 1505-FTR Cargo Rack Regular Ford Transit 130" Wheelbase ( Aluminum ) QUICK START GUIDE Phase 1 - Assembly q 1.1 Setup... q 1.2 Cargo Rack Assembly... 3-4 5-6 Phase 2 - Installation q
INSTALLATION GUIDE 1505-FTR Cargo Rack Regular Ford Transit 130" Wheelbase ( Aluminum ) QUICK START GUIDE Phase 1 - Assembly q 1.1 Setup... q 1.2 Cargo Rack Assembly... 3-4 5-6 Phase 2 - Installation q
Trigonometric Substitution
 Trigonometric Substitution Alvin Lin Calculus II: August 06 - December 06 Trigonometric Substitution sin 4 (x) cos (x) dx When you have a product of sin and cos of different powers, you have three different
SERVICE BULLETINE 2008-4
 S e r v i c e b u l l e t i n e M a t e r i e l l Materiellsjef F/NLF kommuniserer påminnelse omkring forhold som ansees som vesentlige for å orientere om viktige materiellforhold. Målgruppen for Servicbulletinen
INSTALLATION GUIDE FTR Cargo Rack Regular Ford Transit 130" Wheelbase ( Aluminum )
") INSTALLATION GUIDE 1505-FTR Cargo Rack Regular Ford Transit 130" Wheelbase ( Aluminum ) QUICK START GUIDE Phase 1 - Assembly q 1.1 Setup... q 1.2 Cargo Rack Assembly... 3-4 5-6 Phase 2 - Installation q
INSTALLATION GUIDE 1505-FTR Cargo Rack Regular Ford Transit 130" Wheelbase ( Aluminum ) QUICK START GUIDE Phase 1 - Assembly q 1.1 Setup... q 1.2 Cargo Rack Assembly... 3-4 5-6 Phase 2 - Installation q
The regulation requires that everyone at NTNU shall have fire drills and fire prevention courses.
 1 The law The regulation requires that everyone at NTNU shall have fire drills and fire prevention courses. 2. 3 Make your self familiar with: Evacuation routes Manual fire alarms Location of fire extinguishers
5 E Lesson: Solving Monohybrid Punnett Squares with Coding
 5 E Lesson: Solving Monohybrid Punnett Squares with Coding Genetics Fill in the Brown colour Blank Options Hair texture A field of biology that studies heredity, or the passing of traits from parents to
Midnight BBQ Light USER MANUAL
 Midnight BBQ Light USER MANUAL Instructions The Midnight BBQ Light uses 4 x LR44 / AG13 batteries, included in the package. Unscrew the bottom cover and insert the included batteries and align the battery
GYRO MED SYKKELHJUL. Forsøk å tippe og vri på hjulet. Hva kjenner du? Hvorfor oppfører hjulet seg slik, og hva er egentlig en gyro?
 GYRO MED SYKKELHJUL Hold i håndtaket på hjulet. Sett fart på hjulet og hold det opp. Det er lettest om du sjølv holder i håndtakene og får en venn til å snurre hjulet rundt. Forsøk å tippe og vri på hjulet.
Product Manual Produkthåndbok
 BEAM Product Manual Produkthåndbok BEAM Technical Specifications Tekniske Spesifikasjoner Description Product number Mode Voltage Current Vehicle interface Cable length Encapsulation Operating temperature
Exercise 1: Phase Splitter DC Operation
 Exercise 1: DC Operation When you have completed this exercise, you will be able to measure dc operating voltages and currents by using a typical transistor phase splitter circuit. You will verify your
Institutt for biovitenskap
 Institutt for biovitenskap Oppslag for alle avtrekksskap: Alle avtrekksskap skal ha forklaring på alarmsystem på det enkelte skap. Dette varier fra skap til skap. e.g. på IBV finnes det minst 3 ulike typer.
INSTRUKSJONER FOR TILBEREDNING OG INJEKSJON AV CIMZIA PÅ ENGELSK (certolizumab pegol) INSTRUCTIONS FOR PREPARING AND GIVING AN INJECTION OF CIMZIA
 INSTRUCTIONS FOR PREPARING AND GIVING AN INJECTION OF CIMZIA") INSTRUKSJONER FOR TILBEREDNING OG INJEKSJON AV CIMZIA PÅ ENGELSK (certolizumab pegol) INSTRUCTIONS FOR PREPARING AND GIVING AN INJECTION OF CIMZIA Veiledningen er hentet fra EMA (European Medicines Agency)
INSTRUKSJONER FOR TILBEREDNING OG INJEKSJON AV CIMZIA PÅ ENGELSK (certolizumab pegol) INSTRUCTIONS FOR PREPARING AND GIVING AN INJECTION OF CIMZIA Veiledningen er hentet fra EMA (European Medicines Agency)
Replacing the batteries
 ASSEMBLY INSTRUCTION Replacing the batteries EN NO 9010189A 5.2.14 9010189 Replacing the batteries Preparation Switch off the wheelchair via the remote control. Remove the fuses from the battery compartment
MONTERING OG BRUKERVEILEDNING Elektrisk infravarmer for utendørs bruk Art nr og (SH1685FAL - SH1265EL)
") MONTERING OG BRUKERVEILEDNING Elektrisk infravarmer for utendørs bruk Art nr 421240 og 421250 (SH1685FAL - SH1265EL) NO Bruksanvisning 1-3 EN Instruction Manual 4-6 No. Part Name No. Part Name 1 Skrue
MONTERING OG BRUKERVEILEDNING Elektrisk infravarmer for utendørs bruk Art nr 421240 og 421250 (SH1685FAL - SH1265EL) NO Bruksanvisning 1-3 EN Instruction Manual 4-6 No. Part Name No. Part Name 1 Skrue
KAMPANJE APK : APK-5: Skifte pakninger mellom turbo og CCDPF
 KAMPANJE APK-5 20150722: APK-5: Skifte pakninger mellom turbo og CCDPF Berørte modeller for APK-5: Vitara APK416D, totalt 66 biler. Liste med chassisnummer legges ikke ved, bruk Forhandlerweb til å sjekke
AC10. Brukermanual Brugsanvisning Bruksanvisning User Manual. Spenningsdetektor Voltage Detector. English Norsk
 Spenningsdetektor Voltage Detector Brukermanual Brugsanvisning Bruksanvisning User Manual English Norsk ELIT AS - 2010 Innhold: 1. Generelle applikasjoner. 2. Beskrivelse av instrumentet. 3. Sikkerhetsinformasjon
stjerneponcho for voksne star poncho for grown ups
 stjerneponcho for voksne star poncho for grown ups www.pickles.no / shop.pickles.no NORSK Størrelser XS (S) M (L) Garn Pickles Pure Alpaca 300 (350) 400 (400) g hovedfarge 100 (100) 150 (150) g hver av
Duke Energy Seminar September 3 5, 2008 Concord, NC
 Duke Energy Seminar September 3 5, 2008 Concord, NC Ron Richard Senior Consultant RE Consulting -1- Ball Mills -2- Limestone Fineness Some of the FGD vendors have stated that one of the biggest causes
Unit Relational Algebra 1 1. Relational Algebra 1. Unit 3.3
 Relational Algebra 1 Unit 3.3 Unit 3.3 - Relational Algebra 1 1 Relational Algebra Relational Algebra is : the formal description of how a relational database operates the mathematics which underpin SQL
Information search for the research protocol in IIC/IID
 Information search for the research protocol in IIC/IID 1 Medical Library, 2013 Library services for students working with the research protocol and thesis (hovedoppgaven) Open library courses: http://www.ntnu.no/ub/fagside/medisin/medbiblkurs
Brukerveiledning på engelsk for Dymista Nesespray, suspensjon 137 mikrogram / 50 mikrogram per spray (azelastinhydroklorid/flutikasonpropionat)
") Brukerveiledning på engelsk for Dymista Nesespray, suspensjon 137 mikrogram / 50 mikrogram per spray (azelastinhydroklorid/flutikasonpropionat) Instruction for use Dymista Nasal Spray 137 micrograms /
Brukerveiledning på engelsk for Dymista Nesespray, suspensjon 137 mikrogram / 50 mikrogram per spray (azelastinhydroklorid/flutikasonpropionat) Instruction for use Dymista Nasal Spray 137 micrograms /
Replacing the tube and/or tyre of a drive wheel, indoor/outdoor
 ASSEMBLY INSTRUCTION Replacing the tube and/or tyre of a drive wheel, indoor/outdoor EN NO 9010182A 5.2.7 9010182 Replacing the tube and/or tyre of a drive wheel, indoor/outdoor Preparation Be sure that
SafeRing / SafePlus Retrofit of auxiliary switch S9 for fuse blown indication F module
 SafeRing / SafePlus Retrofit of auxiliary switch S9 for fuse blown indication F module Installation instructions www.abb.com Document status Responsible RELEASED NODIS Location Date Name Prepared NODIS
SafeRing / SafePlus Retrofit of under voltage coil V Module
 SafeRing / SafePlus Retrofit of under voltage coil V Module Installation Instructions www.abb.com Document status Responsible RELEASED NODIS Location Date Name Prepared NODIS 2008-12-15 BJGU/GUSO Checked
Endelig ikke-røyker for Kvinner! (Norwegian Edition)
") Endelig ikke-røyker for Kvinner! (Norwegian Edition) Allen Carr Click here if your download doesn"t start automatically Endelig ikke-røyker for Kvinner! (Norwegian Edition) Allen Carr Endelig ikke-røyker
Endelig ikke-røyker for Kvinner! (Norwegian Edition) Allen Carr Click here if your download doesn"t start automatically Endelig ikke-røyker for Kvinner! (Norwegian Edition) Allen Carr Endelig ikke-røyker
Replacing the carbon brushes
 ASSEMBLY INSTRUCTION Replacing the carbon brushes EN NO 9010180A 5.2.4 9010180 Replacing the carbon brushes (Puma 20/40) Preparation Switch off the wheelchair via the remote control. Be sure that the
NÅR FAGKUNNSKAP & KOMPETANSE TELLER BRUKERMANUAL ELIT AC10 SPENNINGSDETEKTOR USER MANUAL ELIT AC10 VOLTAGE DETECTOR. English Norsk
 NÅR FAGKUNNSKAP & KOMPETANSE TELLER BRUKERMANUAL ELIT AC10 SPENNINGSDETEKTOR USER MANUAL ELIT AC10 VOLTAGE DETECTOR English Norsk WWW.ELIT.NO Innhold: NORSK 1. Generelle applikasjoner. 2. Beskrivelse av
Roma Garden Art.no: FP-ROMGR-100 Last updated: 12.07.13
 NOMonteringsanvisning 2 GB Assembly instructions 3 Roma Garden Art.no: FP-ROMGR-100 Last updated: 12.07.13 Roma Garden Vekt Krav til gulvplate 352 kg 670 mm Ta kontakt med en faghandler om du trenger tips
Newtons fargeskive. Regnbuens farger blir til hvitt. Sett skiva i rask rotasjon ved hjelp av sveiva.
 Newtons fargeskive Regnbuens farger blir til hvitt. Sett skiva i rask rotasjon ved hjelp av sveiva. Se hva som skjer med fargene. Hvitt lys består av en blanding av alle farger. Når fargeskiva roterer
MONTASJEANVISNING INSTRUCTIONS FOR ASSEMBLY AND USE
 MONTASJEANVISNING INSTRUCTIONS FOR ASSEMBLY AND USE Småvarereol R 3000 Shelving unit R 3000 ZERTIFIZIER T 1. Gavl / Upright frame 2. Hylle / Dividing shelf 3. Krysstag / Back braces 4. Gitter bakvegg /
CAMES. Technical. Skills. Overskrift 27pt i to eller flere linjer teksten vokser opad. Brødtekst 22pt skrives her. Andet niveau.
 CAMES Overskrift 27pt i to eller flere linjer Technical Skills Leizl Joy Nayahangan, RN, MHCM Leizl.joy.nayahangan@regionh.dk IMPORTANCE Challenges Brødtekst 22pt of patient skrives her care Increasing
Perpetuum (im)mobile
mobile") Perpetuum (im)mobile Sett hjulet i bevegelse og se hva som skjer! Hva tror du er hensikten med armene som slår ut når hjulet snurrer mot høyre? Hva tror du ordet Perpetuum mobile betyr? Modell 170, Rev.
Perpetuum (im)mobile Sett hjulet i bevegelse og se hva som skjer! Hva tror du er hensikten med armene som slår ut når hjulet snurrer mot høyre? Hva tror du ordet Perpetuum mobile betyr? Modell 170, Rev.
bondura dual 36 Ø50mm - Ø200mm assembly & inspection manual art rev A
 bondura dual 36 Ø50mm - Ø200mm assembly & inspection manual art. 103803 rev. 27.04.2016 A TABLE OF CONTENT / INNHOLD 1/ assembly montering 2/ technical specifications/torque tekniske data/tiltrekkingsmoment
2018 ANNUAL SPONSORSHIP OPPORTUNITIES
 ANNUAL SPONSORSHIP OPPORTUNITIES MVP SPONSORSHIP PROGRAM CALLING ALL VENDORS! Here is your chance to gain company exposure while strengthening your dealer Association at the same time. Annual Sponsorship
Hvordan føre reiseregninger i Unit4 Business World Forfatter:
 Hvordan føre reiseregninger i Unit4 Business World Forfatter: dag.syversen@unit4.com Denne e-guiden beskriver hvordan du registrerer en reiseregning med ulike typer utlegg. 1. Introduksjon 2. Åpne vinduet
Wonderland 904. Regulerbar seng Electrical adjustable bed. my bed - my wonderland
 Wonderland 904 Regulerbar seng Electrical adjustable bed my bed - my wonderland Lykke til med valget av ditt nye Wonderland produkt. Wonderland produserer individuelt tilpassede sengeløsninger med unike
KAMPANJE APK : APK-8: Bytte bakaksel bolter
 KAMPANJE APK-8 20160222: APK-8: Bytte bakaksel bolter Berørte modeller for APK-8: Vitara APK, S-cross AKK, og Swift AZG. Totalt 454 biler på det norske markedet. Liste med chassisnummer legges ikke ved,
SHORT POT KETTLE. User Guide KE4520 KE4520K KE4520R
 SHORT POT KETTLE User Guide KE4520 KE4520K KE4520R Contents Sunbeam s Safety Precautions 1 Features of your Short Pot Kettle 2 Using your Short Pot Kettle 4 Sunbeam s 3-Way Safety System 5 Care and Cleaning
IMPORTANT! HOLD ON THIS DOCUMENT FOR LATER REFERENCE! READ CAREFULLY! VIKTIG! BEHOLD DETTE DOKUMENTET FOR FREMTIDIG BRUK! LES NØYE IGJENNOM!
 GB IMPORTANT! HOLD ON THIS DOCUMENT FOR LATER REFERENCE! READ CAREFULLY! NOR VIKTIG! BEHOLD DETTE DOKUMENTET FOR FREMTIDIG BRUK! LES NØYE IGJENNOM! Produktmål, materiale: 135x77x72 cm Furu Proper use This
0:7 0:2 0:1 0:3 0:5 0:2 0:1 0:4 0:5 P = 0:56 0:28 0:16 0:38 0:39 0:23
 UTKAST ENGLISH VERSION EKSAMEN I: MOT100A STOKASTISKE PROSESSER VARIGHET: 4 TIMER DATO: 16. februar 2006 TILLATTE HJELPEMIDLER: Kalkulator; Tabeller og formler i statistikk (Tapir forlag): Rottman: Matematisk
Norsk (English below): Guide til anbefalt måte å printe gjennom plotter (Akropolis)
: Guide til anbefalt måte å printe gjennom plotter (Akropolis)") Norsk (English below): Guide til anbefalt måte å printe gjennom plotter (Akropolis) 1. Gå til print i dokumentet deres (Det anbefales å bruke InDesign til forberedning for print) 2. Velg deretter print
Norsk (English below): Guide til anbefalt måte å printe gjennom plotter (Akropolis) 1. Gå til print i dokumentet deres (Det anbefales å bruke InDesign til forberedning for print) 2. Velg deretter print
#89853 Command Center
 1 #89853 Command Center Portable AV Center Assembly Instructions #89853 Command Center Portable AV Center Part rawing escription Qty Part rawing escription Qty Hardware List A Socket Screw M6X9mm 16 A
25 Monate Garantiebedingungen 25 mois conditions de garantie 25 months warranty conditions
 Wireless Transmitter de Bedienungsanleitung en Instructions for use fr Mode d emploi it Istruzioni per l uso nl Gebruiksaanwijzing es Modo de empleo pt Manual de instruções sv Bruksanvisning no Instruksjonsbok
manual Powerbank mah Item: Linocell
 manual Powerbank 20000 mah Item: 97667 EN NO SV Linocell ENGLISH Charge the powerbank Start by charging the powerbank. Connect the charging cable (included) to the powerbank s Micro USB port and to a USB
EMS 1. Music Streamer. Owner's Manual
 EMS 1 Music Streamer Owner's Manual EN N 2 ENG About the EMS 1 Electrocompaniet Music Streamer This unit is designed to work with the Electrocompaniet PD 1 DAC only. A radio link is established between
1 User guide for the uioletter package
 1 User guide for the uioletter package The uioletter is used almost like the standard LATEX document classes. The main differences are: The letter is placed in a \begin{letter}... \end{letter} environment;
// Translation // KLART SVAR «Free-Range Employees»
 // Translation // KLART SVAR «Free-Range Employees» Klart Svar is a nationwide multiple telecom store, known as a supplier of mobile phones and wireless office solutions. The challenge was to make use
SHORE POWER CONVERTER LIST 2018
 2018 POWER AT YOUR CONTROL Shore cord capacities These tables provide a approximate indication of the amount of kva capacity of different amperage shore cords at common worldwide voltages. Use these tables
Vi skaper tilgjengelighet
 Vi skaper tilgjengelighet HEIS Løfteplattformer med sjakt Lavløfteplattformer Plattformheiser til trapper Stolheiser til trapper Trappebårer www.tksheis.no HEIS Krav til økt tilgjengelighet Den nye Diskriminerings-
Han Ola of Han Per: A Norwegian-American Comic Strip/En Norsk-amerikansk tegneserie (Skrifter. Serie B, LXIX)
") Han Ola of Han Per: A Norwegian-American Comic Strip/En Norsk-amerikansk tegneserie (Skrifter. Serie B, LXIX) Peter J. Rosendahl Click here if your download doesn"t start automatically Han Ola of Han Per:
Han Ola of Han Per: A Norwegian-American Comic Strip/En Norsk-amerikansk tegneserie (Skrifter. Serie B, LXIX) Peter J. Rosendahl Click here if your download doesn"t start automatically Han Ola of Han Per:
Speak with Us! - Kindergarten
 SPEAK WITH US! Heftet er gitt ut av Nasjonalt senter for fremmedspråk i opplæringen. Ansvarlig redaktør: R. Steinar Nybøle Redaktør: Karin Dahlberg Pettersen Forfatter: Katrine Kjæreng Kolstad Alle bilder
PARABOLSPEIL. Still deg bak krysset
 PARABOLSPEIL Stå foran krysset på gulvet og se inn i parabolen. Hvordan ser du ut? Still deg bak krysset på gulvet. Hva skjer? Hva skjer når du stiller deg på krysset? Still deg bak krysset Det krumme
Administrasjon av postnummersystemet i Norge Post code administration in Norway. Frode Wold, Norway Post Nordic Address Forum, Iceland 5-6.
 Administrasjon av postnummersystemet i Norge Frode Wold, Norway Post Nordic Address Forum, Iceland 5-6. may 2015 Postnumrene i Norge ble opprettet 18.3.1968 The postal codes in Norway was established in
SafeRing / SafePlus Retrofit of auxiliary switch S9 for relay trip indication V module
 SafeRing / SafePlus Retrofit of auxiliary switch S9 for relay trip indication V module Installation instructions www.abb.com Document status Responsible RELEASED NODIS Location Date Name Prepared NODIS
Elektronisk innlevering/electronic solution for submission:
 VIKINGTIDSMUSEET Plan- og designkonkurranse/design competition Elektronisk innlevering/electronic solution for submission: Det benyttes en egen elektronisk løsning for innlevering (Byggeweb Anbud). Dette
Smart High-Side Power Switch BTS730
 PG-DSO20 RoHS compliant (green product) AEC qualified 1 Ω Ω µ Data Sheet 1 V1.0, 2007-12-17 Data Sheet 2 V1.0, 2007-12-17 Ω µ µ Data Sheet 3 V1.0, 2007-12-17 µ µ Data Sheet 4 V1.0, 2007-12-17 Data Sheet
Den som gjør godt, er av Gud (Multilingual Edition)
") Den som gjør godt, er av Gud (Multilingual Edition) Arne Jordly Click here if your download doesn"t start automatically Den som gjør godt, er av Gud (Multilingual Edition) Arne Jordly Den som gjør godt,
Den som gjør godt, er av Gud (Multilingual Edition) Arne Jordly Click here if your download doesn"t start automatically Den som gjør godt, er av Gud (Multilingual Edition) Arne Jordly Den som gjør godt,
Monitoring water sources.
 Monitoring water sources. Generell Informasjon Versjon 2 Url http://com.mercell.com/permalink/38336681.aspx Ekstern anbuds ID 223314-2013 Konkurranse type: Tildeling Dokument type Kontraktstildeling Prosedyre
TUSEN TAKK! BUTIKKEN MIN! ...alt jeg ber om er.. Maren Finn dette og mer i. ... finn meg på nett! Grafiske lisenser.
 TUSEN TAKK! Det at du velger å bruke mitt materiell for å spare tid og ha det kjekt sammen med elevene betyr mye for meg! Min lidenskap er å hjelpe flotte lærere i en travel hverdag, og å motivere elevene
Moving Objects. We need to move our objects in 3D space.
 Transformations Moving Objects We need to move our objects in 3D space. Moving Objects We need to move our objects in 3D space. An object/model (box, car, building, character,... ) is defined in one position
SafeRing / SafePlus Retrofit of auxiliary switch S10 for position indication of earthing switch De module
 SafeRing / SafePlus Retrofit of auxiliary switch S10 for position indication of earthing switch De module Installation instructions www.abb.com Document status Responsible RELEASED NODIS Location Date
TUSEN TAKK! BUTIKKEN MIN! ...alt jeg ber om er.. Maren Finn dette og mer i. ... finn meg på nett! Grafiske lisenser.
 TUSEN TAKK! Det at du velger å bruke mitt materiell for å spare tid og ha det kjekt sammen med elevene betyr mye for meg! Min lidenskap er å hjelpe flotte lærere i en travel hverdag, og å motivere elevene
Mathematics 114Q Integration Practice Problems SOLUTIONS. = 1 8 (x2 +5x) 8 + C. [u = x 2 +5x] = 1 11 (3 x)11 + C. [u =3 x] = 2 (7x + 9)3/2
![Mathematics 114Q Integration Practice Problems SOLUTIONS. = 1 8 (x2 +5x) 8 + C. [u = x 2 +5x] = 1 11 (3 x)11 + C. [u =3 x] = 2 (7x + 9)3/2](/thumbs/77/75859899.jpg "Mathematics 114Q Integration Practice Problems SOLUTIONS. = 1 8 (x2 +5x) 8 + C. [u = x 2 +5x] = 1 11 (3 x)11 + C. [u =3 x] = 2 (7x + 9)3/2") Mathematics 4Q Name: SOLUTIONS. (x + 5)(x +5x) 7 8 (x +5x) 8 + C [u x +5x]. (3 x) (3 x) + C [u 3 x] 3. 7x +9 (7x + 9)3/ [u 7x + 9] 4. x 3 ( + x 4 ) /3 3 8 ( + x4 ) /3 + C [u + x 4 ] 5. e 5x+ 5 e5x+ + C
Mathematics 4Q Name: SOLUTIONS. (x + 5)(x +5x) 7 8 (x +5x) 8 + C [u x +5x]. (3 x) (3 x) + C [u 3 x] 3. 7x +9 (7x + 9)3/ [u 7x + 9] 4. x 3 ( + x 4 ) /3 3 8 ( + x4 ) /3 + C [u + x 4 ] 5. e 5x+ 5 e5x+ + C
NEOREST Hybrid (Toilet bowl) NEOREST Hybrid. Installation manual. Safety Cautions Precaution before installation. Included parts.
 NEOREST Hybrid. Installation manual. Safety Cautions Precaution before installation. Included parts.") Installation manual NEOREST Hybrid (Toilet bowl) NEOREST Hybrid Safety Cautions Precaution before installation Included parts Part diagram Installation procedure EN Install the product properly according
Installation manual NEOREST Hybrid (Toilet bowl) NEOREST Hybrid Safety Cautions Precaution before installation Included parts Part diagram Installation procedure EN Install the product properly according
6350 Månedstabell / Month table Klasse / Class 1 Tax deduction table (tax to be withheld) 2012
 2012") 6350 Månedstabell / Month table Klasse / Class 1 Tax deduction table (tax to be withheld) 2012 100 200 3000 0 0 0 13 38 63 88 113 138 163 4000 188 213 238 263 288 313 338 363 378 386 5000 394 402 410 417
6350 Månedstabell / Month table Klasse / Class 1 Tax deduction table (tax to be withheld) 2012 100 200 3000 0 0 0 13 38 63 88 113 138 163 4000 188 213 238 263 288 313 338 363 378 386 5000 394 402 410 417
Instruksjons manual Instruction manual
 knm Copyright c - 2011 knm Side. 1 BRUK AV UTSTYRET Utstyret er designet for løft, trekk, folding/bøying, kutting, støtteoperasjoner etc, og krever, med sitt høye operasjonstrykk og tunge arbeids last,
Trådløsnett med Windows XP. Wireless network with Windows XP
 Trådløsnett med Windows XP Wireless network with Windows XP Mai 2013 Hvordan koble til trådløsnettet eduroam med Windows XP Service Pack 3? How to connect to the wireless network eduroam with Windows XP
Instruksjoner for oppbevaring: Oppbevares på et kjølig, mørkt sted.
 icewave Bruksanvisning Instructions Hensikten med produktet (indikasjoner for bruk): IceWave reduserer: muskel-/skjelettsmerter, knesmerter, smerter på spesifikke steder, generell smerte i hele kroppen,
MONTASJEBESKRIVELSE INSTALLATION GUIDE
 MONTASJEBESKRIVELSE INSTALLATION GUIDE ADVARSEL WARNINGS Dette armaturet er et Klasse II produkt som IKKE SKAL TILKOBLES JORD. This device is a class II product: DO NOT CONNECT THE LAMP and the pole to
229 SONATA Manual NO_ENG 1.04
 -SONATA 2 SONATA SONATA Informasjon og sikkerhet ADVARSEL -Bruk bare strømforsyning som er godkjent av COMMidt, for bruk sammen med denne enheten. Bruk av andre typer kan oppheve all godkjenning og garanti,
Tema Fusion Monteringsanvisning
 Monteringsanvisning Assembly instruction N-6230 SYKKYLVEN - NORWAY TLF. 70 25 59 00 - TELEFAX. 70 25 59 01 E-POST: post@tema.no Målsetting Dimensions Monter fast skrogene på veggen før du monterer skuffer,
manual Plexgear L14 Item: Plexgear
 manual Plexgear L14 Item: 61647-61649 EN NO SV Plexgear ENGLISH 3 4 5 2 1 1. On/off switch 2. Battery hatch 3. Left button Specifications Compatible: Windows and Mac Connection: Wireless Range: Up to 8
Vedlegg 2 Dokumentasjon fra TVM leverandør
 (Step 7) Payment selection or date modification state This screen is displayed after validation of a date in the calendar screen. The customer can: - Modify again the date by pressing the Validity begin:
Full face mask. ResMed.com/F30
 Full face mask ResMed.com/F30 The design leaves most of the face free and is very elegant. 1 - AirFit F30 user Getting a good night s sleep gives you the energy you need to get back to doing the things
Utstyr for avstandsmåling. Dommersamling 14. mars 2015 Stein Jodal
 Utstyr for avstandsmåling Dommersamling 14. mars 2015 Stein Jodal Dommersamlingen 2012 Regulert i R 14-3 Kunstige hjelpemidler, uvanlig utstyr og uvanlig bruk av utstyr Anmerkning: Komiteen kan lage en
UNIVERSITETET I OSLO
 UNIVERSITETET I OSLO Det matematisk-naturvitenskapelige fakultet Eksamen i INF 3230 Formell modellering og analyse av kommuniserende systemer Eksamensdag: 4. juni 2010 Tid for eksamen: 9.00 12.00 Oppgavesettet
DANGER. Carbon Monoxide. Using a generator indoors WILL KILL YOU IN MINUTES. Carbon Monoxide
 DANGER Carbon Monoxide Using a generator indoors WILL KILL YOU IN MINUTES. Carbon Monoxide Generator exhaust contains high levels of carbon monoxide (CO), a poisonous gas you cannot see or smell. If you
The internet of Health
 The internet of Health! Biler, helse og fremtiden!! Velkon 2014, 22. October 2014 Nard Schreurs, IKT-Norge Få ut begrepet «pasient» av tanker om helse. Aldring 1980-2010 Menn 72 år til 79 år Kvinner 79
Bestille trykk av doktoravhandling Ordering printing of PhD Thesis
 Bestille trykk av doktoravhandling Ordering printing of PhD Thesis Brukermanual / User manual Skipnes Kommunikasjon ntnu.skipnes.no PhD Thesis NTNU LOG IN NOR: Gå inn på siden ntnu.skipnes-wtp.no, eller
Safering / Safeplus Retrofit of Ronis key for disconnector Interlock type EL11AP V and Sv modules
 Safering / Safeplus Retrofit of Ronis key for disconnector Interlock type EL11AP V and Sv modules Installation instructions www.abb.com Document status Responsible RELEASED NODIS Location Date Name Prepared
Kartleggingsskjema / Survey
 Kartleggingsskjema / Survey 1. Informasjon om opphold i Norge / Information on resident permit in Norway Hvilken oppholdstillatelse har du i Norge? / What residence permit do you have in Norway? YES No
Trådløsnett med. Wireless network. MacOSX 10.5 Leopard. with MacOSX 10.5 Leopard
 Trådløsnett med MacOSX 10.5 Leopard Wireless network with MacOSX 10.5 Leopard April 2010 Slå på Airport ved å velge symbolet for trådløst nettverk øverst til høyre på skjermen. Hvis symbolet mangler må
Guía básica del subjuntivo (parte práctica)
") Oraciones con que (at-setninger) Guía básica del subjuntivo (parte práctica) 1) En las siguientes oraciones encontramos dos verbos: el verbo principal de la oración (V1) y el verbo de la oración con que
Oraciones con que (at-setninger) Guía básica del subjuntivo (parte práctica) 1) En las siguientes oraciones encontramos dos verbos: el verbo principal de la oración (V1) y el verbo de la oración con que
klassisk angoragenser classic angora sweater
 klassisk angoragenser classic angora sweater www.pickles.no / shop.pickles.no NORSK Størrelser XS (S) M (L) XL (XXL) Garn Pickles Angora 150 (175) 200 (225) 250 (275) g Pinner 80 og 40 cm rundpinne og
User manual English Svenska Norsk
 User manual English Svenska Norsk Copyright This manual is the copyright of CI no 556520-4137. No part of this manual may be revised, copied or transmitted in any way without written permission from CI
SafeRing / SafePlus Retrofit of auxiliary switch S7 & S10 for position indication of load break switch and earthing switch C, F and SI modules
 SafeRing / SafePlus Retrofit of auxiliary switch S7 & S10 for position indication of load break switch and earthing switch C, F and SI modules Installation instructions www.abb.com Document status Responsible
Neural Network. Sensors Sorter
 CSC 302 1.5 Neural Networks Simple Neural Nets for Pattern Recognition 1 Apple-Banana Sorter Neural Network Sensors Sorter Apples Bananas 2 Prototype Vectors Measurement vector p = [shape, texture, weight]
Dagens tema: Eksempel Klisjéer (mønstre) Tommelfingerregler
 Tommelfingerregler") UNIVERSITETET I OSLO INF1300 Introduksjon til databaser Dagens tema: Eksempel Klisjéer (mønstre) Tommelfingerregler Institutt for informatikk Dumitru Roman 1 Eksempel (1) 1. The system shall give an overview
UNIVERSITETET I OSLO INF1300 Introduksjon til databaser Dagens tema: Eksempel Klisjéer (mønstre) Tommelfingerregler Institutt for informatikk Dumitru Roman 1 Eksempel (1) 1. The system shall give an overview
COLLECTION FAB KATALOG S PRODUKTBLAD FAB CIRCULAR S Enjoy! embaccolighting
 COLLECTION FAB KATALOG S. 2-19 PRODUKTBLAD FAB CIRCULAR S. 20-22 Enjoy! embaccolighting WE DO ACOUSTIC LIGHTING WITH A DEEP BELIEF IN COMBINING SOFT ACOUSTIC MATERIALS AND TECHNICAL LIGHT, WE INTEND TO
Enkel og effektiv brukertesting. Ida Aalen LOAD september 2017
 Enkel og effektiv brukertesting Ida Aalen LOAD.17 21. september 2017 Verktøyene finner du her: bit.ly/tools-for-testing Har dere gjort brukertesting? Vet du hva dette ikonet betyr? Mobil: 53% sa nei Desktop: